BridgeGate Workbench User Guide
Table of Contents
- Table of Contents
- Audience
- Documentation Web Site
- Contacting Us
- Getting Started
- Welcome to BridgeGate™
- Release Notes
- BridgeGate Features
- Freedom of Communication
- Data Translation
- Transaction Monitoring, Auditing and Dashboards
- Samples and Tutorials
- Documentation
- Frequently Asked Questions
- Using the BridgeGate Workbench
- Features of the BridgeGate Workbench
- Inbound Templates
- Outbound Templates
- Automatic Generation of Inbound and Outbound Templates
- Creating dependencies between Inbound and Outbound Templates
- Testing of Templates and Workflows
- Scheduling of Workflows
- BridgeGate Workbench Tour
- Working with Workflow Groups
- Workflow Group Navigator
- Status Bar/Title Bar
- BridgeGate Workbench Preferences
- Local Templates vs. BridgeGate Server Templates
- Inbound Template Screen
- Workflow Group Navigator
- Template Properties Editor
- Data Types for Inbound Templates
- Group-By Settings
- Record Navigator
- Record Editor
- Record Editor Database
- Field Editor
- Field Editor Database
- Field Group Editor
- XML Element Editor
- XML Attribute Editor
- Database Navigator
- New Fields (Quick Add)
- Comment Editor
- Outbound Template Screen
- Workflow Group Navigator
- Template Properties Editor
- Data Types for Outbound Templates
- Inbound Dependency
- Send Records
- Execute SQL
- Quote All Fields
- Trim All Fields
- Keep Original Data on Conversion Error
- Remove Trailing 'Empty Field' Delimiters
- Do Not Increment Internal Relation Count
- Tell me more about Global Substitutions
- Tell me more about Field Level Substitutions
- Tell me more about Default Field Type Values
- Record Navigator
- Record Editor
- Record Editor Database
- Field Editor
- Field Editor Database
- Field Group Editor
- XML Element Editor
- XML Attribute Editor
- Conditional Field List Editor
- Custom DB Field Editor
- Plugin Editor
- Sequence Editor
- Variable Editor
- Variable Collection Editor
- Comment Editor
- Action Editor
- Workflow Screen
- Overview
- Workflow Group Navigator
- Template Properties Editor
- Workflow State
- Workflow Transaction Details
- Workflow Processing
- Workflow should process multiple input files
- Workflow Data Archive
- Workflow Item Navigator
- Get Data Editor
- Translate Item Editor
- Send Data Editor
- Variable Editor
- Item List Editor
- Plugin Editor
- Call Workflow Editor
- Comment Editor
- Error Handler Usage Editor
- Workflow Session Value Wizard
- Synchronous Response Workflows
- Visual Workflow Mode
- Test Template Screen
- Test Workflow Screen
- Schedule Screen
- Transfer Screen
- Appendix A Encodings
- Appendix B Database Navigator
- Appendix C SSL Certificate Manager
- Appendix D Trading Partner Data Dialog
- Appendix E Data Depot Dialog
- Appendix F Account Data Dialog
- Appendix G Predefined Connections Dialog
- Appendix H Date Formatter and Number Formatter Dialogs
- Appendix I Regular Expression Dialog
Audience
This document is written and intended for users of the BridgeGate Workbench, including Business Analysts and Programmers. While not required, a general knowledge of the Java Programming Language would prove beneficial in particular areas of the BridgeGate Workbench. This document is not intended for Systems Administrators who will be installing and configuring BridgeGate™ Server. Advanced features and Workbench customization documentation can be found in the BridgeGate Developer Guide.
Documentation Web Site
This documentation is written for the version of BridgeGate™ printed on the cover of this document.
Contacting Us
Technical Support is available in varying levels and is detailed in your support contract. You may contact BridgeGate Support via Email at support@bridgegateintl.com by selecting the Support button on the Transfer Screen. You may also contact BridgeGate Support via phone at 1-866-739-0300 x250.
Getting Started
Welcome to BridgeGate
Through the use of BridgeGate, enterprise applications (such as eCommerce, ERP, CRM, etc.) can seamlessly integrate with a company's trading partners including suppliers, service providers and clients. Fast, powerful and transparent, it eliminates the need for extensive software development or middleware applications. Companies that wish to electronically communicate with other entities or applications have three major challenges:
- They must choose one of several communication "standards" to follow
- They must convince all the other entities to put those same standards into practice
- They must purchase a solution that is extremely costly and time consuming to implement
Currently, any company that needs to do business with a wide-variety of partners is faced with an expensive, multi-faceted IT initiative that requires constant modification in order to adapt to new partners (communication entities) and changing standards.
Vorro, Inc. dba BridgeGate developed its BridgeGate™ Software to translate incoming and outgoing data and adapt it to the requirements of each company or application involved in the process. The product implements quickly and inexpensively. Most importantly, it eliminates the three challenges listed above. BridgeGate™ may well be the fastest, most reliable and cost effective translation solution available today.
Release Notes
Welcome to BridgeGate! With this release, data translation is accomplished in real time or as scheduled events. BridgeGate's powerful, patented translation engine allows virtually any data format to be translated into any other format through the use of templates. BridgeGate includes an extensive Workflow Engine that provides even more flexibility in the business logic used when translating data.
The most notable difference is the new BridgeGate Workbench. It has been redesigned from the ground up and is quicker and easier to use than previous versions. Context sensitive help has been improved and is more readily accessible.
BridgeGate Features
The real power behind BridgeGate is the ability to create templates specific to any format of data required. The BridgeGate Workbench is a robust Graphical User Interface that allows the creation of these templates without having to know how the templates work and without the need for technical expertise. Drag and Drop functionality provides the ability to accurately map records and fields from inbound data to outbound data.
Freedom of Communication
BridgeGate has the ability to send and receive the data to be translated to other systems using several different types of communication protocols: FTP, FTPS, File, Socket, HTTP, HTTPS, RDBMS, Java Servlet, AS2, JMS, MQ Series, MSMQ, Email and Web Services. The list of protocols is not exhaustive and new protocols are being added all the time. Other bulky, hard-to-integrate solutions require the use of specific data formats and only a single means of communicating with partners. Our strength is in our flexibility.
Data Translation
After defining your templates for the various data formats you use, BridgeGate™ can be used to translate data on demand or set up schedules to discover data at predefined intervals. Either way, the data can then be transferred to any system using one of the available communication protocols within BridgeGate™. Alternatively, you can transmit it using your company system's existing protocols. The translated data can also be stored locally on the machine where BridgeGate™ is running. BridgeGate's built in FTP Server also allows translated data to be picked up by other departments or organizations.
Transaction Monitoring, Auditing and Dashboards
BridgeGate™ has extensive transaction monitoring and auditing abilities.
Receive Alerts using the Business Activity Monitoring "BAM" feature.
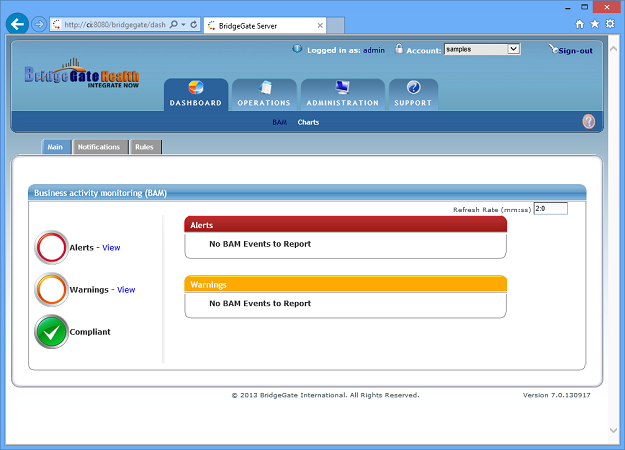
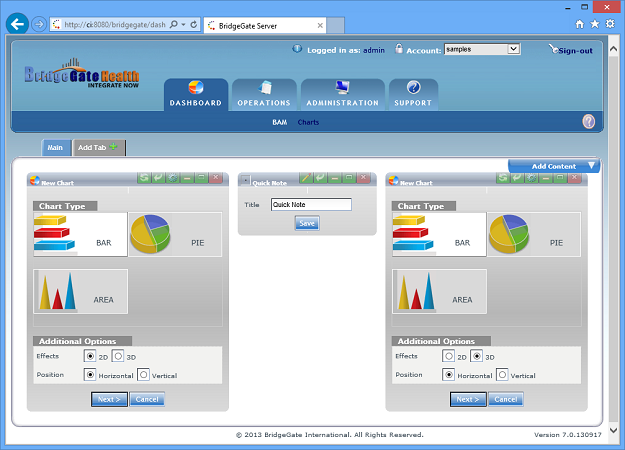
View, in real time, the data that is important to your business using the BridgeGate Dashboard feature.
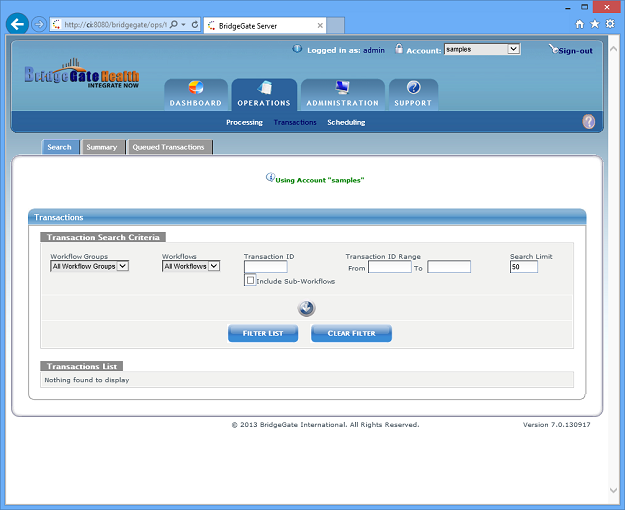
View transaction information in real time through a built in web-based interface, accessible from your web-based account.
Samples and Tutorials
The BridgeGate Workbench comes with a multitude of samples and tutorials. Sample Templates are provided with test data so you can immediately test BridgeGate's compatibility with your existing systems. Tutorials are provided to speed the learning curve and demonstrate building the sample Templates from scratch. A complete sample Workflow Group is provided and includes Schedules so that you can use it with the sample Templates. A tutorial is also provided to facilitate learning to build these pieces from scratch.
You can also navigate to http://www.BridgeGateintl.com for new Samples and Tutorials that may be available.
Documentation
Documentation is provided to further your knowledge of how BridgeGate™ works. It includes various objects used by BridgeGate™ that are exposed within the BridgeGate Workbench as well as pluggable interfaces to allow extensibility and setting up translation schedules. If BridgeGate™ is to be used for real time translation, documentation is available on how to access BridgeGate™ directly using a Java API.
Frequently Asked Questions
-
What kind of environment do I need to run BridgeGate™?
BridgeGate™ is written in Java so it is capable of running on any environment that supports Java (such as Windows, UNIX/Linux, AIX, or Mac). Additionally, BridgeGate™ can run in either a full J2EE Application Server environment or as a stand-alone Java Application depending on whether or not redundancy and fault-tolerance are needed.
-
What kind of transaction volume can I expect?
This depends on the size of your transactions, the server you're running on and how the server has been configured. On a Pentium IV processor running at 1.5GHz with 384Mb RAM on Windows2000, BridgeGate™ will perform approximately 30,000 1K transactions per minute.
-
I understand that BridgeGate™ requires templates that
describe the data before and after translation and that the
BridgeGate Workbench provides an easy way to create and edit these
templates, but what if I want to edit the XML templates directly?
The choice is yours. The BridgeGate Workbench is provided as a convenience but it is NOT required that you use it. Part of the usefulness of the BridgeGate Workbench is to make certain that the XML templates are properly formed and that they conform to the BridgeGate API specification. Editing the XML templates outside of the tool can lead to template parsing errors if care is not taken to follow the specific XML template requirements.
-
Will BridgeGate™ handle a situation where I need to
take data from our internal system and send it to multiple
recipients, each with a different set of data specifications?
Absolutely! BridgeGate™ can be set up to send data (and different data formats) to multiple external entities all from the same input source. It is merely a matter of setting up where you'd like the data to go and how it should be formatted. There's no limit to the number of output destinations.
-
My company uses a proprietary data format. Will
BridgeGate™ support it?
Yes. One of the biggest strengths of BridgeGate™ is that it does not force you to use any particular data format or transmission protocol; it is completely open.
-
How long has BridgeGate been on the market? Is the technology
new?
BridgeGate™ has unofficially been on the market since January 2002 but was officially released on July 1, 2002. The technology is both new and patented; although the underlying technology (Java and XML) has been around for some time.
-
We use both Windows and Solaris in our enterprise. Does
BridgeGate run on Solaris?
BridgeGate™ is written in Java and is able to run on any platform that supports the Java Virtual Machine. BridgeGate Server clusters very well with heterogeneous networks consisting of Windows and Unix/Linux/Solaris machines.
-
Is BridgeGate a complete EAI (Enterprise Application
Integration) tool or is it something else?
BridgeGate™ can be used as an EAI application. Additionally, BridgeGate™ goes beyond current EAI systems and is considered a (Transformation and Exchange Infrastructure) that allows connectivity and integration of single data sources, multiple data sources, external systems and separate partner networks.
-
How do I run a workflow via command line?
You can execute a workflow from the BridgeGate Workbench or by using an URL. You can run any Workflow from the command line by executing the following command in a DOS Window or by using a programming language.
To Execute the Workflow on the computer (local host) where the BridgeGate Workbench is installed, Execute the Workflow by using the following command:
/bridgegate/utils/curl http://localhost:8080/portal/translate?accountName=samples&wfGroupName=sample1&wfName=PurchaseOrders&userName=sample&password=mypassword&KEY=VALUE
The optional [KEY=VALUE] will be added to the Workflow Session as SESSION_DATA. The KEY can be any alpha numeric text that is not one of the above reserved keys.
-
How do I run a workflow from a Browser?
You can run any Workflow from a browser, or an external program can call a workflow via an URL by executing the following URL to the BridgeGate server. For a detailed example of using an URL, refer to Sample 6 in the online documentation under Tutorials.
http://[BGSERVER]/portal/translate?accountName=[ACCOUNT]&wfGroupName=[WFGROUP]&wfName=[WFNAME]&userName=[USER]&password=[PASSWORD]& [KEY=VALUE]
URL Parameter Value BGSERVER The IP Address or fully qualified domain name (NetBIOS) for the BridgeGate Server, including port if not 80. ACCOUNT BridgeGate Account the workflow is located within WFGROUP BridgeGate Workflow Group the workflow is located within WFNAME BridgeGate Workflow you want to execute USER User name and Password are required to authenticate and execute the workflow PASSWORD User name and Password are required to authenticate and execute the workflow Additional KEYs Add as many additional key=value pairs to the URL as you need. These are passed into the Workflow Session during execution for templates to use. An example of accessing a server:
http://www.mycompany.com:8080/portal/translate?accountName=samples&wfGroupName=sample1&wfName=PurchaseOrders&userName=sample&password=mypassword
BridgeGate™ allows applications within enterprises to communicate with each other as well as providing seamless data connectivity to external systems and applications.
Using the BridgeGate Workbench
BridgeGate comes with a Graphical User Interface to facilitate the creation of all templates necessary for BridgeGate to run.
There are three types of templates:
- Workflow Templates (Workflow Templates contain all of the information for associated Communications and Schedules.)
- Inbound Templates (Inbound Templates define inbound data formats.)
- Outbound Templates (Outbound Templates define outbound data formats and which Inbound Templates they are dependent on.)
Features of the BridgeGate Workbench
The BridgeGate Workbench includes the following features:
- Management of Workflow Groups.
- Management of Workflows within each Workflow Group.(Including a visual Workflow Mode)
- Management of Inbound Templates.
- Management of Outbound Templates.
- Creating dependencies between Inbound and Outbound Templates.
- Testing of Templates.
- Testing of Workflows
- Scheduling of Workflows.
- Transferring of Templates and Workflows between the BridgeGate Server and Workbench.
Inbound Templates
An Inbound Template defines the data before it is translated. The Inbound Template screen is where you will create Inbound Templates and define the Records and Fields that make up a specific data format as it looks before it is translated. Data, as it appears before translation, is known in BridgeGate as Inbound Data.
Outbound Templates
An Outbound Template defines how the data will look after it has been translated by BridgeGate. The Outbound Template screen is where you will create Outbound Templates and define the Records and Fields that make up a specific data format. In addition to defining Records and Fields, several other features are available for Outbound Templates. These features allow complete flexibility and control of how outbound data is translated such as selecting from a list of possible segments where only one can be used, arithmetic and concatenation, extensive stripping/replacing/portioning of fields, use of sequences, and pluggable logic based on the any programming language (Note: Java must be used as the interface between BridgeGate and another language). Data, as it appears after translation, is known as Outbound Data.
Automatic Generation of Inbound and Outbound Templates
As a convenience, new Inbound and Outbound Templates can be created by copying existing ones. Also, BridgeGate™ can automatically create your inbound and outbound templates from SEF descriptor files as well as from a repository of EDI, HL7 and NCPDP formats included within BridgeGate™. BridgeGate™ has most of the 3030, 4010, and 4030 SEF files available and the repository includes 4010 and 5010 formats for your organization to use. For more information, contact support@BridgeGateintl.com
Creating dependencies between Inbound and Outbound Templates
In order for Inbound Templates and Outbound Templates to work together, dependencies are created between the two to allow mapping of every Record and Field type available from inbound data to outbound data. Drag and Drop technology is utilized for quick, intuitive mapping between the two.
Testing of Templates and Workflows
After creating Inbound and Outbound Templates, a facility is available in the BridgeGate Workbench to test your templates in performing a translation. You supply the data, select the templates you want to test and click Test Translation. For complex business processes that are mapped into BridgeGate workflows, a facility is also available. Select the workflow you want to test from the test screen and click Test.
Scheduling of Workflows
Workflows are created to emulate or facilitate business processes and allow BridgeGate to perform translation of data, or simply move data around from one system to another. Schedules are used to run the Workflow at either user-defined intervals or in real time. An additional feature is the ability to integrate BridgeGate™ into existing systems through the use of the BridgeGate API. This allows dynamic translations on demand.
BridgeGate Workbench Tour
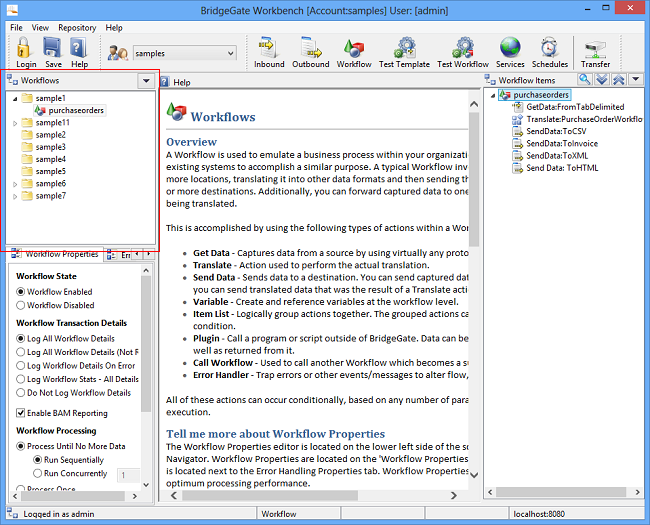
After logging into the BridgeGate Workbench, you will be presented with the following screen:
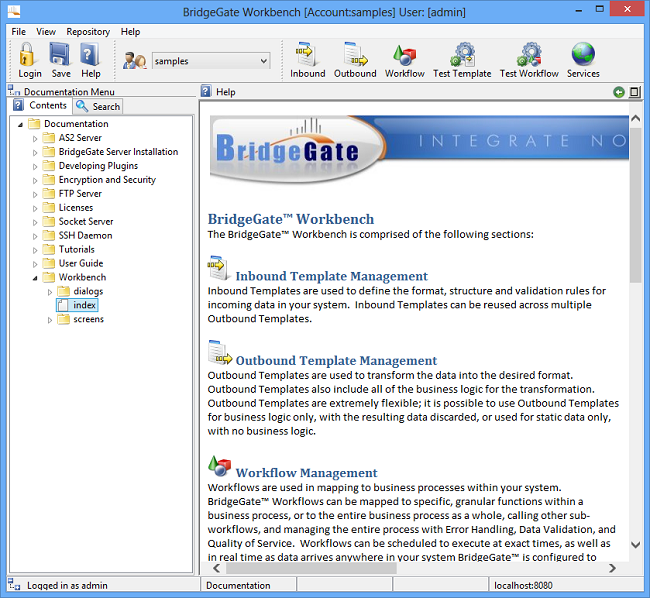
BridgeGate Workbench
The BridgeGate Workbench is comprised of the follow sections:
 Inbound Template Management
Inbound Templates are used to define the format, structure and validation rules for incoming data in your system. Inbound Templates can be reused across multiple Outbound Templates.
 Outbound Template
Management
Outbound Template
Management
Outbound Templates are used to transform the data into the desired format. Outbound Templates also include all the business logic for the transformation. Outbound Templates are extremely flexible; it is possible to use Outbound Templates for business logic only, with the resulting data discarded, or used for static data only, with no business logic.
 Workflow Management
Workflows are used to map to business processes within your system. BridgeGate Workflows can be mapped to specific, granular functions within a business process, or to the entire business process as a whole, calling other sub-workflows, and managing the entire process with Error Handling, Data Validation, and Quality of Service. Workflows can be scheduled to execute at exact times, as well as in real time as data arrives anywhere in your system BridgeGate™ is configured to look.
 Workflow Scheduling
BridgeGate™ includes a very flexible and robust scheduler than can be configured to run at different interval, from every minute to once a year. When the schedule criteria are met one or more Workflows can be executed.
 Workflow Service Execution
Workflows can be triggered to execute in real time, using a Service Oriented Architecture (SOA) approach for an ever growing list of BridgeGate Adapters, including listeners for file systems, FTP Servers, SSH Daemons, JMS, MQ Series, AS2, Sockets, HTTP, and Web Services. By using this real time mechanism, BridgeGate™ can identify data, qualify it, and finally execute one or more workflows for it.
 Test Facilities
The BridgeGate Workbench includes industry leading test facilities, allowing you to test data manipulation at the Field level, Template level, and the Workflow level. As you build Templates to map your data and business logic, it is possible to test each step of the process within the Workbench. Entire workflows can be tested within the Workbench, prior to production.
 Transferring
Templates/Workflows
Transferring
Templates/Workflows
Templates and Workflows can be transferred easily from the BridgeGate Workbench and the BridgeGate Server, allowing exchange in either direction. Templates and Workflows are usually maintained on user workstations, and then exported to a Server for immediate use. The transfer screen comes with features to lock Templates and Workflows while maintenance is done, as well as a revision history to allow you to see who transferred each version. Prior revisions are easily retrieved and imported to your Workbench.
Working with Workflow Groups
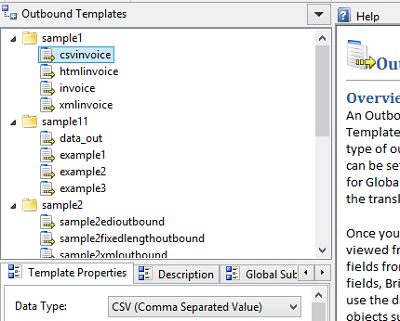
The Inbound, Outbound, Workflow and Schedule screens show all of their respective items for the entire Account. Items are organized by Workflow Group. When working with these screens, items from which you can select are located in the top left area of the screen.
The area shown above and highlighted in red is known as the Workflow Group Navigator. In the example above, eight Workflow Groups are found: Sample1, Sample2, Sample3, Sample4, Sample5, Sample6, Sample7 and Sample11. When a Workflow Group is expanded, the list of Inbound Templates for it is shown. Selecting one of these Inbound Templates will open it. This same concept applies to the other screens mentioned; Outbound, Workflow and Schedules.
Workflow Group Navigator
The Workflow Group Navigator is where you create/rename/delete/copy/reload Inbound Templates, Outbound Templates and Workflows. You would use the Workflow Group Navigator for the Inbound Template Screen to create/rename/delete/copy/reload Inbound Templates. You would use the Workflow Group Navigator for the Outbound Template Screen to create/rename/delete/copy/reload Outbound Templates. You would use the Workflow Group Navigator for the Workflow Screen to create/rename/delete/copy/reload Workflows.
Notice the Workflow Group Navigator above has a down arrow in the title bars. This is where you would perform these actions. You can also right click within the Workflow Group Navigator to open the context menu. The down arrow is identified in red below:
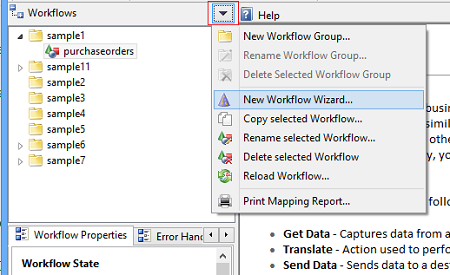
This is also where you would create new Workflow Groups. When you create a new Workflow Group, it is displayed in the Workflow Group Navigator for all applicable screens (Inbound, Outbound, Workflow, Schedule and Service).
Status Bar/Title Bar
The Status Bar is used to display information about BridgeGate, and the actions you perform while using it. It is located at the bottom of the BridgeGate Workbench:

From left to right, information is divided into four sections. The first section displays information about important actions being performed as they occur. The second section shows the current screen. The example above says Workflow, which means you are currently viewing the workflow screen. The third section display a warning notice if the Inbound Template, Outbound Template, Workflow or Schedule currently open is in read only mode signifying that any changes made will not be saved. The fourth section shows the BridgeGate Server into which you are currently logged.
The Title Bar also shows useful information and is located at the top of the BridgeGate Workbench:

In the image above, the Title Bar displays the current Account selected and the username of the user that is logged in.
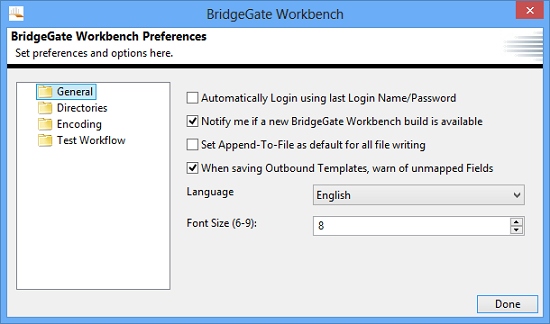
BridgeGate Workbench Preferences
All BridgeGate Workbench preferences can be set from the preferences dialog. This is available from the Menu Bar under File. This is where you can instruct the BridgeGate Workbench to look for new updates, automatically login and set several other preferences.
Local Templates vs. BridgeGate Server Templates
The Templates available in the BridgeGate Workbench consist of the Templates on your local machine only. Templates should be created and modified on your local machine, then exported to the server when complete. You do not edit Templates on the server in real time; you must transfer them to the server when done testing. Transferring a template from the BridgeGate Server to your local machine is known as downloading a template. Transferring a Template from your local machine to the BridgeGate Server is known as uploading a template. A locking feature is available so no one else can upload a Template that is currently being worked. There is no requirement to use the locking feature, it is strictly optional.
Typically, you will download a Template from the BridgeGate server, work on it locally and then upload it back to the server. To test the Templates for accuracy, the BridgeGate Workbench has a testing mechanism. For information about testing Templates, see the Test Templates section. The same functionality is available for testing Workflows.
Inbound Template Screen
The Inbound Template Screen is where you create Inbound Templates. An Inbound Template, as defined earlier, is where you define the structure of data before it is translated by BridgeGate. The screen consists of the following sections:
Workflow Group Navigator
Template Properties Editor
Record Navigator
Item Editors (Record Editor, Field Editor, etc.)
Help Screens
Workflow Group Navigator
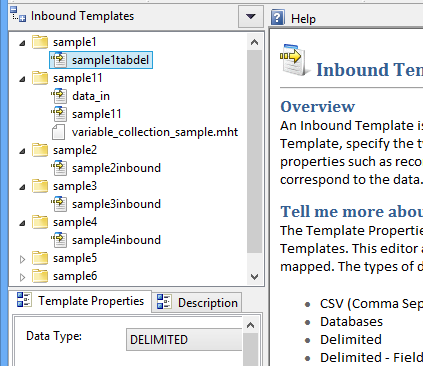
The Workflow Group Navigator displays all Inbound Templates for the BridgeGate Account, organized by Workflow Group. This is where you select the Inbound Template to work with. This is also where you create/rename/delete Inbound Templates. Click on the down arrow in the title bar area of this navigator to create/rename/delete an Inbound Template or simply right click on a template in this navigator. When you create a new Inbound Template, a wizard is displayed to help you create the type of Inbound Template you need:
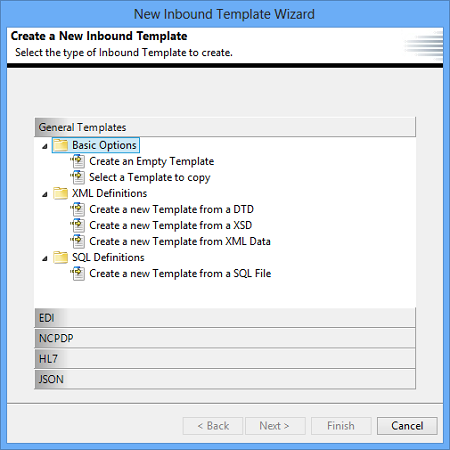
General Templates
- Basic Options:
- create an empty template without any definitions
- or copy an existing template.
- XML Definitions:
- designed for XML data formats to be created directly from their Data Type Definitions known as DTD files
- from their XML Schema Definition files known as XSD files
- or from the XML Data directly.
- SQL Definitions:
- allows Templates to be created from a SQL file.
EDI
- Basic Options:
- allows Templates to be created for EDI data formats directly from their associated definition files, known as SEF files.
- X12:
- allows Templates to be created for EDI data formats from definitions included in the built in Repository for the selected version.
NCPDP
- Post Adjudication Standard
- allows Templates to be created for NCPDP data formats from definitions included in the built in Repository for the selected version
- Script Standard
- allows Templates to be created for NCPDP data formats from definitions included in the built in Repository for the selected version
- Telecommunication Standard
- allows Templates to be created for NCPDP data formats from definitions included in the built in Repository for the selected version
HL7
- BridgeGate Repository:
- allows Templates to be created for Health Level Seven data formats from definitions included in the built in Repository for the selected version.
JSON
- create an empty template without any definitions
- create a new template from Data.
Template Properties Editor
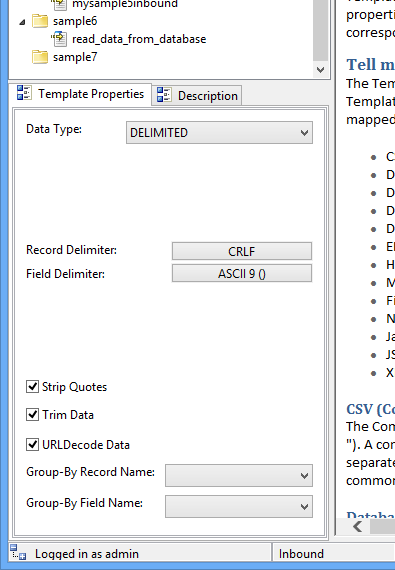
When you select an Inbound Template from the Workflow Group Navigator, the Inbound Template will open. The general properties for the Inbound Template are displayed in the Template Properties Editor. In the example above, the Inbound Template is of type Delimited, uses a Carriage Return/Line Feed combination for the Record delimiter, and a Tab for the Field Delimiter (ASCII 9). You can change these settings to customize the Inbound Template.
Data Types for Inbound Templates
Inbound Templates can be of the following Data Types:
| Data Type | Description |
| CSV | Comma Separated Values |
| DELIMITED | Choose any delimiters from the ASCII table |
| DELIMITED FIELD IDENTIFIER | An advanced delimited format, allowing fields to be composite and contain multiple values using a Field Group, including a Group separator |
| DELIMITED MULTIPLE SEPARATORS | An even more advanced delimited format, allowing fields to be composite and contain multiple values using a Field Group, including Component, Subcomponent, and Repetition separators |
| EDI X12 | Read data from EDI X12 compliant data format |
| EXCEL | Read data from a Microsoft Excel Spreadsheet |
| DATABASE | Models tables and columns as Record and Fields (Generates SELECT statements upon execution) |
| FIXED LENGTH | Only a record delimiter is used, all fields must specify length |
| HL7 | Read data from HL7 compliant data format |
| JSON | Read data from JSON (JavaScript Object Notation) compliant data format |
| NVP | Name Value Pair (key=value) |
| XML | Shown as Elements and Attributes |
| SERVLET | Read data from a Java Session |
DELIMITED
Delimited files consist of a character to separate Fields, and another character to separate Records. The length of each field does not matter for this data type.
DATABASE
If the inbound data comes from a DATABASE, this data type allows you to specify the database Tables and Columns from which to retrieve the data as specified by a WHERE clause. Stored Procedures can also be used in place of a WHERE clause. When DATABASE is selected, you have the ability to connect to the database directly from within the BridgeGate Workbench. This will allow the database Tables to be shown. For each field, select a Table, and the Columns available for that Table will be shown. This allows quick mapping for each Field to a specific Table and Column. The WHERE clause for each Record then grabs data specific for this file and populates each Field specified for the Record.
EDI
In BridgeGate™ the default EDI X12 Segment, Element and Component delimiters are set to tilde (~) asterisk (*) and colon (:), respectively. Because some businesses do not follow this delimiter standard, BridgeGate™ allows you to change these delimiters on the inbound template. One exciting feature is that BridgeGate™ can automatically discover the delimiters for you. This flexibility allows multiple ISA segments in the data to have their own delimiters. This proves necessary sometimes when a file contains multiple vendors' data, and each vendor uses different field and record delimiters. The use case examples below show how BridgeGate™ can dynamically process EDI delimiters. Furthermore, on the outbound template you have the ability to access Inbound and Outbound Delimiters via System Data.
| Use Case 1 - Inbound Data delimiters are the same as listed on the Inbound Template and the Override with Inbound Delimiters check box (located on the Outbound Template Properties Tab) is not checked | ||||
| Record Delimiter | Field Delimiter | Component Delimiter | ||
| Inbound Data | ~ |
* | : | |
| Inbound Template | ~ |
* | : | |
| Outbound Template | @ |
! | ` | |
| Expected Results | Inbound Record Delimiter | Inbound Field Delimiter | Inbound Component Delimiter | |
| ~ |
* | : | ||
| Outbound Record Delimiter | Outbound Field Delimiter | Outbound Component Delimiter | ||
| @ |
! | ` | ||
| Use Case 2 - Inbound Data delimiters are the same as listed on the Inbound Template and the Override with Inbound Delimiters check box is checked | ||||
| Record Delimiter | Field Delimiter | Component Delimiter | ||
| Inbound Data | ~ |
* | : | |
| Inbound Template | ~ |
* | : | |
| Outbound Template | @ |
! | ` | |
| Expected Results | Inbound Record Delimiter | Inbound Field Delimiter | Inbound Component Delimiter | |
| ~ |
* | : | ||
| Outbound Record Delimiter | Outbound Field Delimiter | Outbound Component Delimiter | ||
| ~ |
* | : | ||
| Use Case 3 - Inbound Data delimiters are different than what exists on the Inbound Template and the Override with Inbound Delimiters check box is not checked | ||||
| Record Delimiter | Field Delimiter | Component Delimiter | ||
| Inbound Data | + |
| | \ | |
| Inbound Template | ~ |
* | : | |
| Outbound Template | @ |
! | ` | |
| Expected Results | Inbound Record Delimiter | Inbound Field Delimiter | Inbound Component Delimiter | |
| + |
| | \ | ||
| Outbound Record Delimiter | Outbound Field Delimiter | Outbound Component Delimiter | ||
| @ |
! | ` | ||
| Use Case 4 - Inbound Data delimiters are different than what exists on the Inbound Template and the Override with Inbound Delimiters check box is checked | ||||
| Record Delimiter | Field Delimiter | Component Delimiter | ||
| Inbound Data | + |
| | \ | |
| Inbound Template | ~ |
* | : | |
| Outbound Template | @ |
! | ` | |
| Expected Results | Inbound Record Delimiter | Inbound Field Delimiter | Inbound Component Delimiter | |
| + |
| | \ | ||
| Outbound Record Delimiter | Outbound Field Delimiter | Outbound Component Delimiter | ||
| + | | | \ | ||
EXCEL
This format allows you to read data directly from an Excel Spreadsheet. The data must be contained within a single sheet of the Excel file and the Excel Sheet Name must be specified. The Sheet Name for the Excel Spreadsheet is case sensitive.
FIXED LENGTH
Fixed Length files do not use a character to separate Fields. However, they do contain a character to separate Records. The length of each field is predetermined.
HL7
The HL7 format is a standard for exchanging information between medical applications and is an abbreviation of "Health Level Seven" . "Level Seven" refers to the seventh OSI layer protocol for the health environment. In general terms, HL7 is a protocol for data exchange. It defines the format and the content of the messages that applications must use when exchanging data with each another in various circumstances.
JSON
JSON (JavaScript Object Notation) is a lightweight, text-based open standard designed for human-readable data interchange. It is based on a subset of the JavaScript Programming Language, Standard ECMA-262 3rd Edition - December 1999 for representing simple data structures and associative arrays, called objects. The JSON format is often used for serializing and transmitting structured data over a network connection. It is used primarily to transmit data between a server and web application, serving as an alternative to XML.
NVP (Name Value Pair)
Name Value Pair files do not use a character to separate Fields, but do contain a character to separate Records. A Value Begin Delimiter and a Value End Delimiter are specified to allow maximum flexibility when using this type. For the following example
name="value"
the " before the value is considered the Value Begin Delimiter, and the " after the value is considered the Value End Delimiter. These are normally the same value.
CSV (Comma Separated Value)
Comma Separated Value files are delimited, but each Field is wrapped in quotes (" "). A comma (,) is also determined to be the character to separate Fields and cannot be changed. However, the character used to separate Records can be modified.
XML
XML Files do not contain characters to separate Fields and Records, as each Field is contained in an element in which the name of the Field is wrapped in < and > characters. The Root Element Name must be given and denotes the top element used for the entire file. For a file that contains an order, the top element might be <Order>. If the Inbound Template was imported using a DTD (Data Type Definition) file, the option to Conform To DTD is available so new Fields and Records cannot be created. By default, this is checked. Header and Trailer Records are not included in the DTD for an XML file and are allowed even if Conform to DTD is checked.
Java Servlet
The Java Servlet API allows a software developer to add dynamic content to a web server using the Java platform. The generated content is commonly HTML, but may be other data such as XML. Servlets are the Java counterpart to non-Java dynamic web content technologies such as PHP, CGI and ASP.NET. Servlets can maintain state across many server transactions by using HTTP cookies, session variables or URL rewriting. Using BridgeGate™, you can access Servlets running in application servers.
Group-By Settings
BridgeGate™ translates data on-the-fly (i.e. as it reads the inbound data). Specifically, it reads in an entire structure of the data being translated (all records in an Inbound Template). It then takes that structure of data and translates it accordingly to the Outbound Template. In this way, you can think of an entire structure of data as a single customer order. The Inbound Template for reading this data could consist of an Order Record, a Customer record, and a Line Item record. These three records describe all of the possible data that could be present in the file. Multiple line items could exist for an order, but they are described by the same definition presented in the Line Item record. Similarly, multiple orders can be present in the data, but they are described by the same definition of the Order Record. If multiple orders were present in the data, then each set of the records (order, customer, and 1 or more line item records) that represent a single order are translated as they are read in.
Specifying a Group-By is like specifying a sub-header for the resulting translated data. It is similar to how Microsoft Access and Crystal Reports use sub-headers. When Group-By is used, BridgeGate™ waits until an entire group of these sets of data complete before translating the data. To further explain the example presented in the above paragraph, we could apply Group-By logic.. Without it, the Outbound Template would translate each order as they are read in, so having a Customer ID written once to the translated data, with all or their orders below it would be impossible. Instead, the Customer ID would have to be written each time an order is read in, translated, and written out. If we specify the record and field that designates the Customer ID as the Group-By Record Name and Group-By Field Name, then it would be possible to create an Outbound Template that allows the Customer ID to be written once with all their orders below it.
Tell me more about Descriptions
Descriptions are optional and used for documenting the Template.
If a description is entered then the Icon on the description tab will have a green dot  placed to the right of the existing icon so it is easy to distinguish templates with description content.
Record Navigator
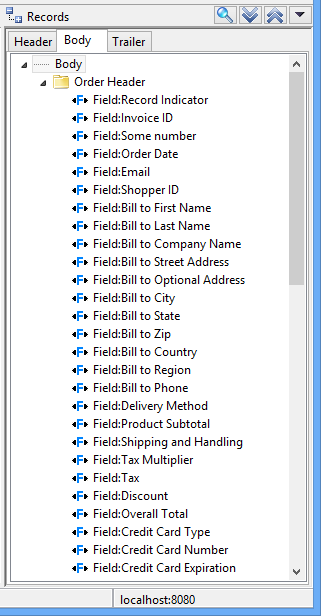
The Record Navigator displays all of the Records and Fields that define the structure of the inbound data. Inbound data, as defined earlier, is the data to be translated. The Record Navigator is divided into 3 tabs, the Header Tab, Body Tab, and Trailer Tab. If the structure of the data contains a Header or Trailer, you may need to specify the Records and Fields for them in these tabs. To create new Records and Fields, click on the down arrow in the title bar of the Record Navigator or right click on the Record Navigator to show the following popup menu
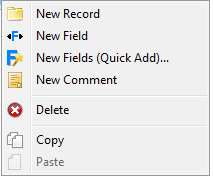
The new Record or Field will be created directly under the currently selected item in the Record Navigator. If you select Delete, the currently selected Record or Field will be deleted. You can copy/paste Records and Fields, as well as drag them around within the Record Navigator.
Based on the data format used, the context menu will show other options available, such as XML Elements, XML Attributes, Field Groups, Repeating Fields, Database Tables, and Database Columns.
Record Editor
Overview
A Record consists of a set of fields and uses a character or set of characters to separate the fields. In addition, the record itself ends with a character or set of characters that is/are different than the delimiter that separates the fields. If the file type is Fixed Length, then no delimiter character(s) is used to separate the fields since each field has a set length. Delimiters are set in the Template Properties editor, to the left of this help screen.
Record Mappings designate the proper record created in the Inbound Template that is used to read in the data being translated. Data validation may be specified, allowing you to determine what to do in the event data is improper and/or missing.
Tell me more about Record Mappings
Record Mappings are located on the 'Record Properties' tab. To toggle between the Record Mappings tab and the Data Validation tab, click on the icon representing the desired tab.
A Record Mapping should be created after all fields are defined. If a single record is defined for the Inbound Template, then no Record Mapping is necessary. If your Inbound Template contains more than one record type (as most formats do), Record Mappings are required for each record type. To create a Record Mapping, right-click in the Record Mappings list.
Explanation of Record Mappings
When the inbound data is read by BridgeGate it is read in one line at a time as denoted by the record delimiter. In the case of multiple record types for a single file, BridgeGate needs to determine which record type it belongs to when the line is read in. Consider the case of the following inbound data, which is of delimited format:
			00,1/25/2002,5:58,1 10,1020992 20,399,24.95,1,SPECIALIZED
				WIDGET,GREEN 30,John,,Doe,123 Main
				Street,Jacksonville,FL,32256,904-555-2315
				40,VISA,4111111111111111,7/2004
A comma is used as a field delimiter, and a Carriage Return/Line Feed (CRLF) is used as the line delimiter. Each line will be read and processed serially. This particular format uses the first field as the record type. If we were specifying the Order Record, we would know when defining the Inbound Template for it that '10' means the line is an Order Record (00 would be the HEADER, 20 would be the Order Line Item, 30 would be the billing information, and 40 would be the payment information). For the Record Mapping of this record type, we would specify the following properties:
- Comparator: EQUALS
- Comparator Value: 10
- Comparator Scope: Field level
- Comparator Field: RECORD_TYPE (the first field defined for this record)
BridgeGate™ will then check the first field of this line, as specified by the delimiter, for the exact value of '10'. If this condition is true, the record is determined to belong to this record type and the fields specified for this record type are populated as specified.
Record Mappings are flexible enough to allow comparison at the field level or record level. For the field level, a field is selected from the list of fields available for this record and the field number denotes its sequence. Note that the field must have already been created for this screen to know to populate it in the Comparator Field drop down box. For the record level, an exact begin and end position must be specified for BridgeGate to extract that portion of data to compare against. The first character is always considered 1 in BridgeGate not 0. After determining the data to be compared against, the type of comparator and the value to compare against must be specified. The following comparators are currently allowed:
- EQUALS - Exact match of comparator value.
- CONTAINS - Comparator value must exist somewhere in the data to be compared.
- START_WITH - Data must start with the comparator value.
- GREATER THAN - Data must be greater than the comparator value.
- LESS THAN - Data must be less than the comparator value.
- IS RECORD NUMBER - Data must equal to the current record number.
- IS NUMERIC - Data must be numeric.
- IS DATE - The data must be a Date that matches a specified Pattern entered. If a Pattern is not entered it will validate against the following:"yyyymmdd","yyyy-MM-dd HH:mm:ss.SSSSSS","yyyy-MM-dd HH:mm:ss.SSS","yyyy-MM-dd HH:mm:ss","yyyy-MM-dd","HH:mm:ss","hh:mm:ss a","M/dd/yyyy","dd.M.yyyy","M/dd/yyyy hh:mm:ss a","dd.M.yyyy hh:mm:ss a","dd.MMM.yyyy","dd-MMM-yyyy" If it matches the Pattern then it will return True else False.
- FIELD LENGTH GREATER THAN - Data length must be greater than comparator value.
- FIELD LENGTH LESS THAN - Data length must be less than comparator value.
- ENDS_WITH - Data must end with the comparator value.
- EMPTY - Data to be compared must be empty. The Comparator Value is not used.
- REGULAR_EXPRESSION - Use the Expression Builder, available using the button '...' to the right of the Comparator Value text field to build and test any POSIX Regular Expression you want. If a value is found for this regular expression, then the condition is true.
A Record Mapping should be created after all fields are defined. There is no limit to the number of Record Mappings available for each record type. To delete a Record Mapping, select it from the list and click 'Delete Selected Record Mapping' from the menu shown in the image above.
Explanation of Compound Record Mappings
Typical Record Mappings only need a single condition to be checked. An example would simply be if field x EQUALS some value. But, BridgeGate™ allows Record Mappings to contain multiple conditions for the Record Mapping to be true. An example of this would be field x EQUALS some value AND field y EQUALS some other value. Another example could be field x STARTS_WITH some value OR field x STARTS_WITH some other value. These two examples make use of AND/OR logic. When creating a compound Record Mapping, the actual conditions listed under it must either ALL be true, or ANY of them true.
All Record Mappings listed that are not compound Record Mappings make use of OR logic. That means if ANY of the Record Mappings are true, then the record of data being interpreted by BridgeGate™ belongs to the record defined in this Inbound Template. If your logic required more than one condition to be true, use a compound Record Mapping.
Tell me more about Data Validation
Data Validation is located on the 'Data Validation' tab. To toggle between the Record Mappings tab and the Data Validation tab, click on the icon representing the desired tab.
Data Validation can be used to verify the integrity of your inbound data for records. These include:
- Minimum Loops - If there is a minimum number of loops required, set it here. A setting of 0 means do not use.
- Maximum Loops - If there is a maximum number of loops required, set it here. A setting of 0 means do not use.
- Required - If this record is required, check this box.
Specify data validation for groups of Fields within the Record by using 'Situational Field Rules'. The types of Situation Rules are, along with an example:
- REQUIRED - At least one of the two fields, field07 and field08, is required.
- CONDITIONAL - If field01 is present, then all three fields, field02, field03, and field04, are required.
- EXCLUSION - Only allow one of the three fields, field06, field07, field08, may be present.
- LIST_CONDITIONAL - If field01 is present, then AT LEAST one of these two fields, field02 and field03, are required.
- PARING - If any of the three fields, field06, field07, and field08, are present, ALL of them are required.
To create a Situational Field Rule, click the arrow on the right hand corner of the Data Validation editor, or right-click on the Situational Field list.
You can create as many Situational Field Rules as needed. If any of the rules you specify are violated, you can specify what actions to take on the Outbound Template in its corresponding Data Validation section. To delete a Situational Field Rule, click 'Deleted Selected Field Rule' from the menu in the image shown above.
When creating a Situational Field Rule, specify the Rule Type first. If a conditional rule type is selected (CONDITIONAL or LIST_CONDITIONAL), then you must select the field to which the condition will apply. A drop down list for 'Conditional Field' will become enabled. For all rule types, select the fields the rule applies to from the table that is presented. Be sure to create all the fields for the record before creating a Situational Field Rule. Both the 'Conditional Field' and the table below it are populated with fields existing at that point in time.
Record Editor Database
Overview
A database record consists of a set of fields, which contains values from columns. You do not have to think of a database record as being a representation of a database table because a database record can contain fields that map too many tables. You can create a database record to map to each table, and only place fields in the database record that belong to that table. You can also have a database record containing all columns returned from a JOIN clause.
You typically will want to specify a WHERE clause for each database record, or else the resulting SELECT statement performed by BridgeGate™ will return all rows. The WHERE clause can contain dynamic values such as Vendor IDs, that exist within the Workflow Session, or values such as the current date.
Sub queries allow you to link a child query with its parent (outer) query. You should not think of this as a typical JOIN clause, but more as an INNER SELECT query. Remember, a database record can contain fields from many tables as a result of a JOIN statement.
Tell me more about Record Properties
To access the properties of a record, a record must first be linked to a database connection. Database record and field properties are accessible after this connection has be defined and linked to the record. Record properties are located on the 'Record Properties' tab. To toggle between the Record Properties tab and the Sub Query tab, click on the icon representing the tab.
The Record Properties screen contains the name of the record, various settings and most importantly, the WHERE clause of the SQL query that BridgeGate™ will perform. The Record Name works the same as it does for all other inbound data types for mapping to an Outbound Template. A record can be configured to perform queries on a different database. By default, the Predefined Connection selected in the Template Properties area will be used for all records created in this template. If you create a record that needs to query a different database, you may override it by selecting a different connection in the Predefined Connection section.
A Database Inbound Template requires a Root Query. Any record can be designated as a root query by checking the Make this Record the Root Query box. A root query is the first query performed on the database. If you do not specify a record as the root query, you will be warned when you save.
The Database Navigator enables you to connect to any database and build queries to use to create or update the record. You can select available database tables and columns and add them to the query, or alternatively, you can copy and paste a query in the Navigator and use it to update your record. Once you have created your query, you can validate it against the associated database, or you can compare it to the template to see the differences before you use it to update the template.
Tell me more about creating the WHERE clause
The WHERE clause is typed directly into the text area on the Record Properties screen. It is not necessary to type the word WHERE, although you may do so if you prefer.
Dynamic values in the WHERE Clause
If you want to add a dynamic value into the WHERE clause, such as the current date or a value found in the Workflow Session, surround the value with percent signs (%) in the WHERE clause. Next, create a Dynamic Clause Value with that same name, and designate where its value comes from by selecting the appropriate Record Name/Field Name combination. For the current date, select SYSTEM/TODAY and set the pattern for the date as your database requires it. For values in the Workflow Session, select SESSION DATA for the record name and manually type in the field name.
Accessing an Oracle Database that requires you use the Oracle to_date function is an example of using the current date. See below:
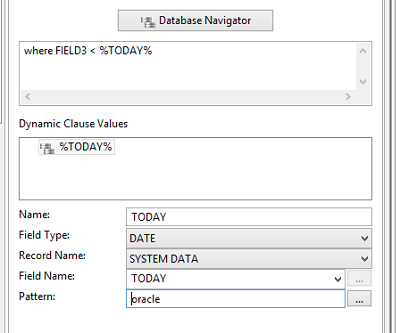
Tell me more about creating a Sub Query
A sub query allows you to join the results of two different queries, which could be accomplished with JOIN or INNER SELECT logic, and a sub query is specified on the inner record of two records. You can create as many sub query 'links' as needed, where each 'link' is a matching column between the two queries. For the Sub Query Link, specify the table/column combination of this record, the Comparator (equal or LIKE), and the parent (outer) record's field on which to match. For more in-depth information, see the Inbound Database Templates section in the tutorial.
Field Editor
Overview
A Field represents a single data value. Fields are grouped together into collections known as records. Fields have a character or set of characters that are used to separate themselves from other fields within a record. If the file type is Fixed Length, then no delimiter character(s) is used to separate the fields since each field has a set length. Each field has a type specified and each type has specific properties associated with it.
Data validation may be specified, to allow you to determine what to do in the event data is improperly formatted and/or missing.
Tell me more about Field Properties
Field Properties are located on the 'Field Properties' tab. To toggle between the Field Properties tab and the Data Validation tab, click on the icon representing the desired tab.
Fields must be specified in the exact order they will appear in the inbound data. If a field needs to be moved up or down in the list of fields for a record, simply drag and drop to the proper location. Inbound data fields can be of the following types:
- CHAR - Alphanumeric fields
- BYTE - Binary data
- INTEGER - Numbers not containing a decimal point (also see Precision below).
- (Note: Any digits after a decimal point will be discarded for INTEGER fields).
- FLOAT - Numbers that may contain a decimal point
- DATE - Date and Time fields
Each field needs to be given a Field Name which identifies it for the record. It is the combination of record name and field name that is used on an Outbound Template to 'map' each field from the inbound data to the outbound data. A description is not required, but if it is populated, it is used for display in the Record Navigator to the right. If a description is not given, the field name is shown in the Record Navigator. For fields of type Date, a pattern is required so BridgeGate™ can determine how to properly read the field and convert it to an internal Date/Time object. Use the '...' button next to the Pattern text field to create and test a pattern for the field. BridgeGate™ allows a different Date Pattern to be used on the Outbound Template, to allow you to change the way the Date/Time appears when translated. For FIXED LENGTH types, the beginning and ending position is required so BridgeGate™ can determine which part of the line read-in belongs to which Field. The first field in a Fixed Length file always starts with 1 (BridgeGate™ does not use 0 as the first position for anything requiring positional information).
Tell me more about Data Validation
Data Validation is located on the 'Data Validation' tab. To toggle between the Field Properties tab and the Data Validation tab, click on the icon representing the desired tab.
Data validation can be used to verify the integrity of your inbound data. This includes:
- Minimum Length - If this field has a minimum length, specify it here.
- Maximum Length - If this field has a maximum length, specify it here.
- Required - If this field is required, select it here. If it is required based on specific conditions (e.g., if Field1 is present, Field2 and Field3 are present), look at the section above for 'Creating Situational Field Rules'
- Range Type - If a range is involved for this field, select the type here. Currently, numeric, regular expression, contains and date range are the types allowed. Regular Expression can be used to express non-concurrent ranges (e.g., the letters A,B,C,E,F,X and the Alphanumeric Codes A1,A2,F2,and HH). Date Range can only be used with DATE type fields.
- Range Minimum - Set a minimum for Numeric . Use this field for Regular Expression value.
- Range Maximum - Set a maximum for Numeric.
- Contains - Set a value or values that the field can contain.
- Date Minimum - Set a minimum for Date.
- Date Maximum - Set a maximum for Date.
If these settings are not met, you can specify what actions to take on the Outbound Template in its corresponding Data Validation section.
Field Editor Database
Overview
A database field represents a single column value. These fields are grouped together into collections known as a database record. Even though the fields represent database columns, they do not all need to be from the same database table. Within the same database record, you can create fields that map many database tables if needed. It is for this reason we do not refer to fields and records as columns and tables for the data type of database.
Tell me more about Field Properties
Unlike all other inbound data types (except XML), the order you create fields within the record is not important. However, if you would like to move a field up or down in the list of fields for a given record, simply drag and drop them to the proper location. Inbound data fields can be of the following types:
- CHAR - Alphanumeric fields
- BYTE - Binary values
- CONSTANT - A fixed but possibly unspecified value
- INTEGER - Numbers not containing a decimal point (also see Precision below).(Note: Any digits after a decimal point will be discarded for INTEGER fields).
- FLOAT - Numbers that may contain a decimal point
- DATE - Date and Time fields
Connecting to a database to map tables and columns
Select the table and column from which this field will get its value. When you select a table from the table drop down, the list of columns will automatically populate with the columns for that table. If you do not see any tables in the drop down, be sure you have connected to a database. You can connect to a database by choosing the "Connect to Selected Database" button in the Template Properties tab, found in the lower left panel. To do that, you will first need to make sure you have selected the Predefined Connection. Again, the 'Predefined Connection' drop down is found on the left side of the BridgeGate Workbench in the Template Properties section. If no Predefined Connections exist for databases, then this Predefined Connection drop down will be empty. You can create a new Predefined Connection by clicking on the '...' next to the drop down, or by selecting Repository | Predefined Connections... from the menu.
If you are creating your own connection the format for the database URL is as follows:
- ://:/ or @:/
- As an example for mySQL, you may use:
jdbc:mysql://123.123.123.123:456/myDatabaseName - As an example for SQLServer, you may use:
jdbc:jtds:sqlserver://123.123.123.123:456/myDatabaseName - As an example for Oracle, you may use:
jdbc:Oracle:thin:@123.123.123.123:456:myDatabaseName - As an example for ODBC, use the jdbc:odbc bridge driver in the
URL:
jdbc:odbc:myDatabaseNameNote: if you are using ODBC with Microsoft Access, you may connect from your templates as with the other database types, but you will not be able to use the quick field feature to add fields directly from the database as you can with the other supported databases.
Basic Field Properties
Each field needs to be given a field name, which identifies it for the record. This name is the combination of record name and field name that is used on an Outbound Template to 'map' each field from the inbound data to the outbound data. A description is not required, but if it is populated, it is used for display in the Record Navigator to the right. If a description is not given, the field name is shown in the Record Navigator. For fields of type DATE, a pattern is required so BridgeGate™ can determine how to properly read the field and convert it to an internal Date/Time object. Use the '...' button next to the pattern text field to create and test a pattern for the field. BridgeGate™ allows a different date pattern to be used on the Outbound Template, allowing you to change the way the Date/Time appears when translated. For FIXED LENGTH types, the beginning and ending positions are required so BridgeGate™ can determine which part of the line belongs to which field. The first field in a FIXED LENGTH file always starts with 1 (BridgeGate™ does not use 0 as the first position for anything requiring positional information).
Date Field Properties
For database Date or Timestamp fields you should select the inbound field type as DATE, and BridgeGate™ will read the date from the database is its native or default format. You may leave the Date Pattern blank. If the database column is a character type i.e. VARCHAR and contains a date value, you must specify that a pattern or the date will not be parsed. You may also set the inbound field type as CHAR and parse the date in the outbound template.
Field Group Editor
Overview
A Field Group in BridgeGate is a field which contains multiple components. Field Groups may be used across multiple data types, HL7 and EDI being most common, and use the respectful separator which is located on the Template Properties Tab.
When using the EDI data type in BridgeGate, a Field Group is used to support Composite Elements. The Fields inside the Field Group are Components and are separated by the Component Separator. Field Groups may only exist one level deep and you may not place a Record inside of a Field Group.
In HL7 a Field may contain discernible parts called Components. Field Groups existing at the 1st level under a Record are considered Fields that contains Components. During translation, the Component Separator will be used. If a Component is a Field Group then the Fields under the Component are Sub Components thus the Sub Component Separator will be used during processing. Field Groups may only exist two levels deep. You may not place a Record inside of a Field Group. Fields cannot be repeatable when within a Field Group.
XML Element Editor
Overview
An XML Element is similar to a self-describing field that contains a value and can contain a list of its own sub-elements. An XML Element can also contain attributes which are additional field-like values that are specific to the element.
Data validation may be specified and allow you to determine what to do in the event data is improper and/or missing.
Tell me more about Element Properties
Elements have only three properties: Name, Type and an optional Pattern if the type is DATE. Elements can be of the following types:
- CHAR - Alphanumeric fields
- BYTE Binary values
- INTEGER - Numbers not needing decimal precision
- FLOAT - Numbers that have decimal precision
- DATE - Date and Time fields
Generally, the type CHAR is good for most situations. If the type is DATE, and you need to modify the format of the date during translation, then it is good practice to set the type to DATE and specify the PATTERN for the date. Use the '...' button next to the pattern text field to create and test a pattern for the field. Each element needs to be given a name, must start with a letter and cannot contain spaces.
Important note regarding the root XML element
The top most XML element you create in the right hand navigator is always consider the root XML element. However, in the event you want to use an element further down as the root, to allow the concept of multiple documents within a single XML document, you may do so by using the 'Override Root Element' feature, available on the Inbound Template Properties panel, on the lower right hand side of the screen. Select the XML element you want to treat as the root, and every instance of this element found will be treated as a new document.
Tell me more about XML Validation
Validating an XML document involves checking it using its defined schema, if one is provided, and checking that the document is well-formed and correct. To be well-formed a document has to comply with well-formedness constraints that are provided by itsspecification. Additionally, each of the parsed entities within the document that are referenced directly or indirectly must also be well-formed. Contents of a parsed entry are referred to as its replacement text and is considered an integral part of the document.
The XML validation process ensures that a given document is well-formed. If it is not an error message is generated.
XML Attribute Editor
Overview
Attributes work exactly the same as their parent elements and have the same properties. Attributes can be created, deleted, and copied. Right-click in the Record Navigator and select XML Attribute it from the context menu to create one.
Database Navigator
Overview
The Database Navigator is a tool that lets you connect to databases (with Predefined Connections) so you can view data and work with fields on the associated template record. It will only affect the currently selected record from which it was launched. It is currently available from the Record Screen for Inbound Templates of datatype DATABASE . In future releases, it will also be available from Outbound Templates of datatype DATABASE and Outbound Custom database fields.
Tell me more about the Database Navigator
 Toggle
Connections As a convenience, if a record-level or template-level
Predefined Connection is defined, the Database Navigator's predefined
connection will default accordingly (Record-Level takes precedence).
It will attempt to "reuse" a Predefined Connection that is already in
a connected state and does not assume you want to open a new or
different connection. You can navigate to any Predefined Connection,
toggle it open, select a schema, run queries and toggle it closed.
When you exit the Database Navigator, any existing Predefined
Connection definitions and their connection state remain unaffected.
Toggle
Connections As a convenience, if a record-level or template-level
Predefined Connection is defined, the Database Navigator's predefined
connection will default accordingly (Record-Level takes precedence).
It will attempt to "reuse" a Predefined Connection that is already in
a connected state and does not assume you want to open a new or
different connection. You can navigate to any Predefined Connection,
toggle it open, select a schema, run queries and toggle it closed.
When you exit the Database Navigator, any existing Predefined
Connection definitions and their connection state remain unaffected.
With one exception ...
When no Predefined
Connections are defined, and you use Database Navigator to update
fields on the current template record, The Predefined Connection used
to update the record will be set as the new record-level or
template-level Predefined Connection.

 Working with SQL
When the Database Navigator opens, the currently selected template's
record has its SQL statement built and loaded into both the SQL
Editor and Template Record SQL tabs. The Template Record SQL
reflects the associated Template Record and is not editable. The SQL
Editor can be edited to run any query you enter or copy into it. You
can check the validity of or run the SQL script from either tab. The
results of which are shown below in the SQL Results tab.
After connecting to a database and selecting a table, you may view a
table's meta data and top 25 records. There are also context menus on
the tables and their meta data fields that can help you construct
your SQL statement. It should be noted that Database Navigator limits
query results to 500 records so not to adversely impact your database
performance.
 Compare SQL to the
Template
Compare SQL to the
Template
This powerful feature of the Database Navigator compares your SQL Editor statement against the existing Template Record and lets you choose, field by field, which ones to keep, add, alter, or delete.
New Fields (Quick Add)
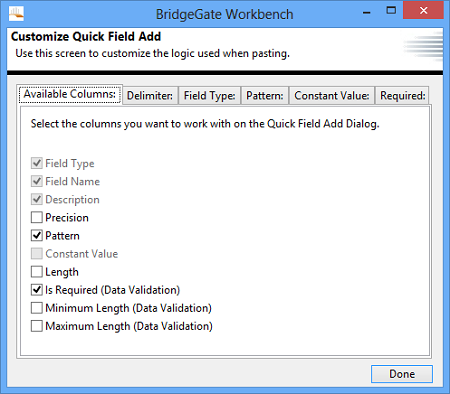
If you have several fields to add, you can quickly add them at once using a special screen called the Quick Field Add Dialog. You can access it by right clicking on the item to which you want the Fields to be added, then selecting New Fields (Quick Add)
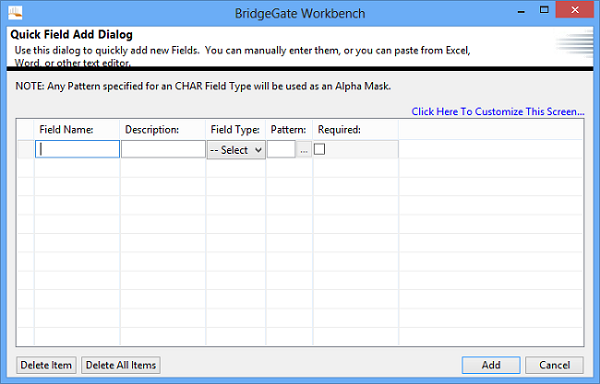
From this screen, you can enter large numbers of fields into the table. The Fields will be created below the item that was selected in the Record Navigator. If a Record was selected, they will be added inside of the Record.
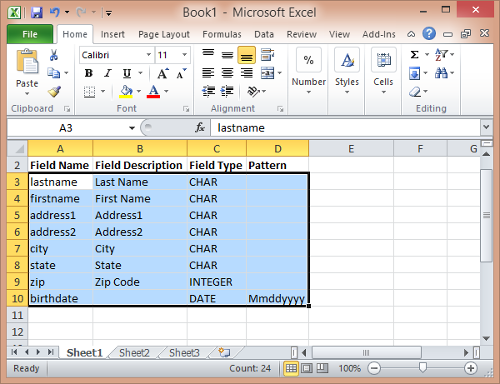
You can enter the information in line by line (manually), or you can copy and paste the information from a text editor or from Microsoft Excel. The default delimiters for pasting data into this editor is CRLF for delimited records, and TAB for delimiting fields. If you have data using other types of delimiters, change what this dialog expects to use by clicking on the Click Here To Customize This Screen link:
The screen will know how to paste the data into the rows. If you make a mistake, simply select the row you want to delete and click Delete Item or click Delete All Items to start over. To manually create a new row, press the down arrow on your keyboard from the last row entered. The cursor must be positioned in one of the textboxes on the last row for this to work. Here is an example of copying data from Microsoft Excel. Highlight all the rows/columns to copy, and hit CTRL+C from Excel as shown:
After copying the data to your clipboard, open the Quick Field Add Dialog. Position the cursor on the first column (Field Name), then press CTRL+V. The columns across the Excel spreadsheet will be pasted into the columns across the Quick Field Add Dialog. Likewise, each row copied from the Excel spreadsheet will be inserted. The Quick Field Add Dialog knows how to do this because data copied out of Excel is delimited as follows:
Columns are delimited with a TAB
Rows are delimited with a CRLF
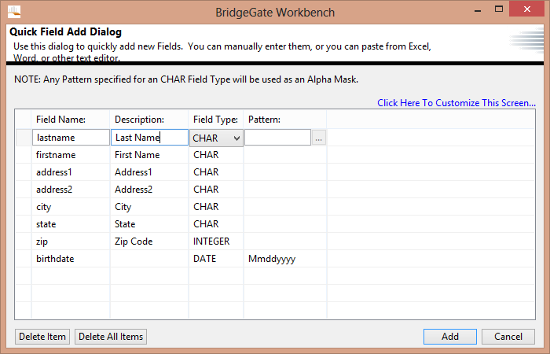
After pasting, the Quick Field Add Dialog looks like this:
NOTE: You can also move the table columns (to match your spreadsheet) simply by dragging them to the desired position.
More items (not pictured) are available by clicking on the Click Here To Customize This Screen link, then click the Available Columns tab.
Comment Editor
Overview
A Comment is used for documentation purposes on the template. A Comment Item does not produce data during translation.
Tell me more about Comment
A Comment item provides the ability to add text for documentation purposes. A tool tip will display when hovering over the Comment item in the Tree.
Outbound Template Screen
The Outbound Template Screen is where you create Outbound Templates. The screen consists of the following sections:
Workflow Group Navigator
Template Properties Editor
Record Navigator
Item Editors (Record Editor, Field Editor, and other custom types of items)
Inbound Template Viewer (to associate mappings, Drag Drop Mode)
Help Screens
An Outbound Template specifies the format you want the data translated into. Every Outbound Template is dependent on an Inbound Template for the fields that are being mapped. As with Inbound Templates, specify the type of data in the Template Properties editor you want the resulting data translated into. Outbound Templates have many other properties that can be set. In addition to the Template Properties editor, the Outbound Template screen also has sections for Global Substitutions, Field Level Substitutions and Default Field Type Values. These all affect how the translated data is handled.
Once you have selected an Inbound Template for the Inbound Dependency, the Inbound Template can be viewed from the Outbound Template screen, allowing you to drag and drop the fields from the Inbound Template to the Outbound Template, in the order the data needs to be used. In addition to straight mapping of Records and Fields, BridgeGate™ comes with a full set of data manipulation features to modify the data and conditionally use the data in any way needed. To utilize these features, the Outbound Template utilizes many other objects such as Conditional Field Lists, Variables, Sequences, Custom DB Fields and Plugins.
Workflow Group Navigator
The Workflow Group Navigator displays all Outbound Templates for the BridgeGate Account, organized by Workflow Group. This is where you select the Outbound Template to work with. This is also where you create/rename/delete Outbound Templates. Click on the down arrow in the title bar area of this navigator to create/rename/delete an Outbound Template or simply right click on a template in this navigator. When you create a new Outbound Template, a wizard is displayed to help you create the type of Outbound Template you need:

General Templates
- Basic Options:
- create an empty template without any definitions
- copy an existing template.
EDI
- Basic Options:
- allows Templates to be created for EDI data formats directly from their associated definition files, known as SEF files.
- BridgeGate Repository: allows Templates to be created for EDI data formats from definitions included in the built in Repository for the selected version.
NCPDP
- Basic Options:
- BridgeGate Repository: allows Templates to be created for National Council for Prescription Drug Programs data formats from definitions included in the built in Repository for the selected version.
HL7
- Basic Options:
- BridgeGate Repository: allows Templates to be created for Health Level Seven data formats from definitions included in the built in Repository for the selected version.
JSON
- Basic Options:
- create an empty template without any definitions
- copy an existing template.
Template Properties Editor
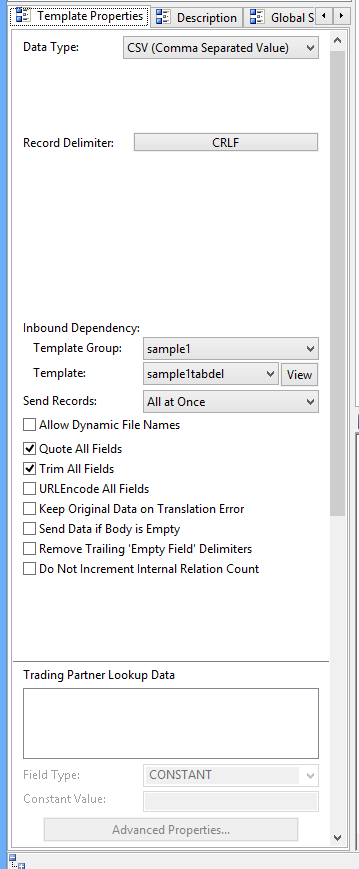
When
you select an Outbound Template from the Workflow Group Navigator,
the Outbound Template will open. The Template Properties editor is
located on the left side of the screen and below the Workflow Group
Navigator. The Template Properties Editor has more functionality than
the Inbound Template screens Template Properties Editor. It is
divided into five tabs:
Template Properties
Description
Global Substitutions
Field Level Substitutions
Default Field Type Values
In the screen shot here, the Outbound Template is of type CSV, uses a Carriage Return/Line Feed combination for the Record delimiter. You can change these settings to customize the Inbound Template.
Data Types for Outbound Templates
Outbound Templates can be of the following Data Types:
| Data Type | Description |
| CSV | Comma Separated Values |
| DELIMITED | Choose any delimiters from the ASCII table |
| DELIMITED FIELD IDENTIFIER | An advanced delimited format, allowing fields to be composite and contain multiple values using a Field Group, including a Group separator |
| DELIMITED MULTIPLE SEPARATORS | An even more advanced delimited format, allowing fields to be composite and contain multiple values using a Field Group, including Component, Subcomponent, and Repetition separators |
| EDI X12 | Read data from EDI X12 compliant data format |
| DATABASE | Models tables and columns as Record and Fields (Generates SELECT statements upon execution) |
| FIXED LENGTH | Only a record delimiter is used, all fields must specify length |
| HL7 | Read data from HL7 compliant data format |
| JSON | Read data from JSON (JavaScript Object Notation) compliant data format |
| XML | Shown as Elements and Attributes |
| SERVLET | Read data from a Java Session |
These types are flexible enough to allow virtually any data format to be read in and interpreted. New formats are introduced upon customer request or industry need.
The following section describes each of these data types. In addition to the data type, many other properties are available from this editor. These are explained after the data types below.
CSV (Comma Separated Values)
The Comma Separated Value format is a subset of Delimited, and each field is usually wrapped in quotes (" "). A comma (,) is used as the character to separate fields and cannot be changed. The character used to separate records can be specified and is usually a CRLF (Carriage Return/Line Feed). This format can be imported into Microsoft Excel spreadsheets.
Databases
BridgeGate™ can read data from any format, and in turn write it to a database. For convenience, the BridgeGate Workbench can connect directly to your database and display a list of tables and columns when mapping to a database. The types of databases currently available for use with BridgeGate™ are:
Oracle
Microsoft SQLServer
IBM DB2
MySql
Microsoft ACCESS
Any ODBC Connection
PostgreSQL
Teradata
In order to connect to a database using the BridgeGate Workbench, you must first create a Predefined Connection. You can do this in the Predefined Connections screen. To get to the Predefined Connections screen, navigate to Repository|Predefined Connections in the menu bar or simply click the ... button next to the Predefined Connection drop down.
BridgeGate™ uses JDBC connections to connect to a database. The format for JDBC is:
<jdbc:driver><hostname or IP address:optional port><database name>
Examples are provided below for different types of databases:
MySQL- jdbc:mysql://192.168.10.11/bridgegate <--the last field is database name
MySQLUnicode append to above - &useUnicode =true&characterEncoding=UTF-8
Oracle - jdbc:Oracle:thin:@192.168.10.11:1521:qa9i <--the last field is the SID
SQL Server - jdbc:jtds:sqlserver://192.168.10.11/bridgegate <--the last field is database name
DB2 jdbc:db2://192.168.10.11:50000/sample
Microsoft Access jdbc:odbc:myDatabaseName - This requires creating an ODBC connection
PostgreSQL - jbdc:postgresql://192.168.10.11/bridgegate -This specifies a URL connection
Teradata - jdbc:teradata://192.168.10.11/DATABASE=BRIDGEGATE
If you are using Microsoft Access and ODBC via the System DSN, note that you need to register the Access database in the System DSN. From the Control Panel, find the ODBC data sources (in most of the Microsoft operating systems such as XP, this is found in the Administrative Tools). Pick the Microsoft Access Driver (*.mdb). Enter your database name into the Data Source Name field, and then press the Select button. Navigate to the location of your database (either local or on the network) and select the Access database that you are registering, click OK.
Additional database vendors are supported. Contact BridgeGate Support for instructions on how to setup them up.
Delimited
The Delimited format covers a wide range of other formats, such as CSV, NVP, and EDI. A delimited format is basically any format that uses a character or set of characters to specify the end of a field or record. BridgeGate™ provides this data type when predefined formats such as CSV, NVP, and EDI do not fit the type of data, or if these formats required modifications to the field and/or record delimiters.
Delimited - Field Identifier
The Delimited - Field Identifier format is an extension of the Delimited format. It can be used to generate several of the NCPDP file format standards. Like the delimited format, it uses a character or set of characters to specify the end of fields and records. In addition, the fields are identified by a character or set of characters that precede the field data. This allows the fields to be in any order within the record. The any additional group separator characters can be added as a constant field value.
EDI X12
The EDI X12 format is an industry standard format used by many businesses. BridgeGate™ can automatically create an Outbound Template based on pre-defined EDI X12 format by importing the definition file (.SEF file) for it. It is a subset of Delimited, and the standard field and record delimiters are usually set to asterisk (*) and tilde (~), respectively. Because some businesses do not follow this delimiter standard, BridgeGate™ allows you to set these delimiters manually. One exciting feature of BridgeGate™ is that it is not necessary to specify the delimiters for EDI, as they are automatically discovered for you! This flexibility allows multiple ISA segments in the data to have their own delimiters. This is occasionally necessary when a file contains multiple vendors' data, and each vendor uses different field and record delimiters.
Fixed Length
The Fixed Length format is a special format that does not use a delimiter to signal the end of a field. Rather, the length of each field is fixed to a specific length. A record of fixed length data is difficult to read as all the fields run together and form a long series of characters and spaces. A record delimiter is still specified.
HL7
HL7 format is coming soon to the outbound template. For more information, read the HL7 section on the inbound template.
XML
The eXtensible Markup Language (XML) format is an industry standard format. It is unique in that the data describes itself. BridgeGate™ can automatically create an Outbound Template based on a pre-defined XML format by importing the definition file. Two types of definition files are recognized by BridgeGate™: DTD and XML Schema.
Java Servlet
A servlet is a small program that runs on a server. The term was coined in the context of the Java applet, a small program that is sent as a separate file along with a Web (HTML) page. Java applets, usually intended for running on a client, can result in such services as performing a calculation for a user or positioning an image based on user interaction.
JSON
The JavaScript Object Notation (JSON) format is an dynamice data format. It consists of several nested data values: strings, integers, floating point values, true, false, and null. These values may be nested inside objects, or repeated within arrays. Likewise, objects may be nested inside objects and arrays. BridgeGate™ can automatically create an Outbound Template based on a pre-existing JSON data file.
Inbound Dependency
The Inbound Dependency is the most important property on the Template Properties Editor. This is where you choose the Inbound Template that maps the data read into BridgeGate™ and translates it into the format defined by this Outbound Template. After selecting an Inbound Template, you can view the records and fields from the Inbound Template on this screen and use it to drag and drop the records and fields to the Outbound Template in their required order. To view the Inbound Template from this screen, select the 'Mapping Mode' button from the tool bar.
For a further explanation of the Mapping (Drag and Drop) screen, click this button in the toolbar to display help for it.
Send Records
As data is translated, each set of data as defined by the Inbound Template can be sent to its destination one at a time. This will make multiple calls to the Adapter to transmit the data. The One at a time feature is commonly used for real time interactive processing. The default is All at Once. This option will translate all the data and then send the data to its Send Data location.
Execute SQL
This feature is only available if your Data Type is Database. The As Batch option will translate all your data into a single SQL statement, but it will only send the SQL query after all inbound records have been translated. The translated SQL statement will route to the SendData as a group. If you are use real time features like CustomDB fields, they will be executed before the SQL query is executed. The As Batch feature allows you to run multiple SQL concurrently. The default is As Batch. The Immediate option will execute each SQL as its translated. This will allow you to work more interactively with the database. For example if you have two INSERT statements into two tables and the second INSERT statement has some dependency on the first INSERT, the Immediate option will allow you to retrieve the KEY before executing the second INSERT statement.
Quote All Fields
If this checkbox is selected, every field in the translated data will be quoted using a double quote (ASCII 43).
Trim All Fields
If this checkbox is selected, every field in the translated data will be stripped of leading and lagging white space. This is convenient when reading FIXED LENGTH data into a delimited format (or database). FIXED LENGTH usually has lots of white space in the remaining positions of fields where data is not present.
Keep Original Data on Conversion Error
This checkbox applies to data that is either in Date or Numeric format. If BridgeGate™ cannot interpret a field that is a date or number due to bad data, you have the choice of configuring BridgeGate™ to map the raw data directly as it appears in the original data, configuring BridgeGate™ to set the translated field as blank.
Remove Trailing 'Empty Field' Delimiters
Some formats end up having many unused fields that are not necessary to display if no data is present. BridgeGate™ can strip the resulting field delimiters from the end of the record if this is the case. EDI is a prime example of this scenario. An example of an EDI record with the trailing delimiters looks like this:
N1*VN*Company Name*92*****~
BridgeGate™ can strip the remaining 5 field delimiters (asterisk characters) from the record, resulting in this:
N1*VN*Company Name*92~
Do Not Increment Internal Relation Count
This is an advanced feature of BridgeGate™ that relates to using Group By logic from the Inbound Template. This checkbox should be left unchecked unless a need arises for it. For an explanation of this feature, see the BridgeGate Workbench User Guide.
Tell me more about Descriptions
Descriptions are optional and used for documenting the Template.
If a description is entered then the Icon on the description tab will have a green dot placed to the right of the existing icon so it is easy to distinguish templates with description content.
Tell me more about Global Substitutions
Global Substitutions are located on the 'Global Substitutions' tab.
A Global Substitution tells BridgeGate™ that whenever the Value To Replace is found in any field, replace it with the Replacement Value. To create a Global Substitution, right-click in the list on the screen:
Additionally, you can specify if the Replace functionality will work verbatim, or if a regular expression should be used to search for data to replace. You can test the Replace logic by entering in some sample data and clicking the 'Click Here To Test' button. The results will be displayed in the Test Result textbox.
Tell me more about Field Level Substitutions
Field Level Substitutions are located on the 'Field Level Substitutions' tab.
A Field Level Substitution tells BridgeGate™ that whenever the Compare Value is found in the specific field selected, replace it with the Replacement Value. This is similar to the Global Substitution, except that it acts only on a specific field. Also, unlike the Global Substitution, you can specify the type of Comparator to use in determining whether or not to replace the field's value. The following comparators are currently allowed:
- EQUALS - Exact match of comparator value
- NOT_EQUALS - Cannot equal the comparator value
- CONTAINS - Comparator value must exist somewhere in the data to be compared
- START_WITH - Data must start with the comparator value
- ENDS_WITH - Data must end with the comparator value
- GREATER THAN - Data must be greater than the comparator value
- LESS THAN - Data must be less than the comparator value
- IS RECORD NUMBER - Data must be equal to the current record number
- EMPTY - Data to be compared must be empty. The Comparator Value is not used
- IS NUMERIC - Data must be numeric
- IS DATE - The data must be a Date that matches a specified Pattern entered. If a Pattern is not entered it will validate against the following:"yyyymmdd","yyyy-MM-dd HH:mm:ss.SSSSSS","yyyy-MM-dd HH:mm:ss.SSS","yyyy-MM-dd HH:mm:ss","yyyy-MM-dd","HH:mm:ss","hh:mm:ss a","M/dd/yyyy","dd.M.yyyy","M/dd/yyyy hh:mm:ss a","dd.M.yyyy hh:mm:ss a","dd.MMM.yyyy","dd-MMM-yyyy" If it matches the Pattern then it will return True else False.
- FIELD LENGTH GREATER THAN - Data field length must be greater than comparator value.
- FIELD LENGTH LESS THAN - Data field length must be less than comparator value.
- REGULAR_EXPRESSION - Use the Expression Builder, available using the button '...' to the right of the Comparator Value text field to build and test any POSIX Regular Expression you want. If a value is found for this regular expression, then the condition is true.
To create a field level substitution, click on the down arrow next to 'Field Level Substitution' or right-click on the list as shown in the section above for Global Substitution.
Tell me more about Default Field Type Values
Default Field Type Values are located on the 'Default Field Type Values' tab.
Every field created in the Outbound Template has the properties shown in this screen. If you need to specify the exact same properties for every field of a specific type, you can set them here and they will be used in all fields found in the Outbound Template. An example of this could be setting the default pattern for DATE to be of a specific date format, or setting all fields containing floating point numbers to have only two significant digits.
Record Navigator
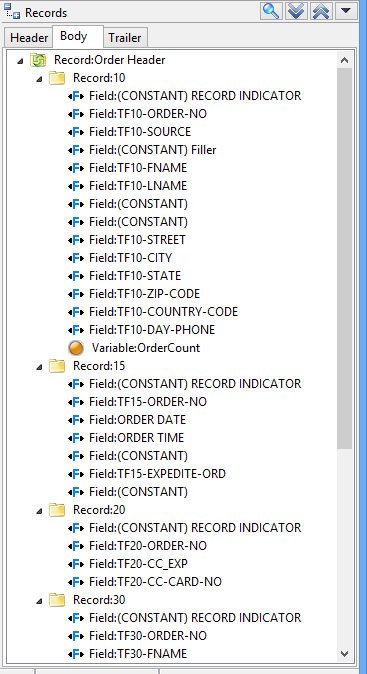
The Record Navigator displays all of the Records and Fields that define the structure of the outbound data, along with other types of special items that allow you to use custom logic to produce it. Outbound data, as defined earlier, is the resulting translated data after it is translated by BridgeGate. The Record Navigator is divided into 3 tabs, the Header Tab, Body Tab, and Trailer Tab. If the structure of the data requires a Header or Trailer, you may need to specify the Records and Fields for them in these tabs for BridgeGate to produce the data correctly.
To create new Records, Fields or other items, click on the down arrow in the title bar of the Record Navigator, or right click on the Record Navigator to show the following popup menu. The context menu shown below will appear.
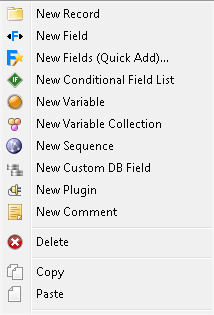
Based on the data format used, the context menu will show other options available, such as XML Elements, XML Attributes, Field Groups, Repeating Fields, Database Tables, and Database Columns.
The new Record, Field, or other type of item will be created directly under the currently selected item in the Record Navigator. If you select Delete, the currently selected Record or Field will be deleted. You can copy/paste Records and Fields, as well as drag them around within the Record Navigator.
Record Editor
Overview
A Record consists of a set of fields and uses a character or set of characters to separate the fields. In addition, the record itself ends with a character or set of characters that is/are different than the delimiter that separates the fields. If the file type is Fixed Length, then no delimiter character(s) is used to separate the fields since each field has a set length. These delimiters are set in the Template Properties editor to the left of this help screen. Data validation may be specified and allows you to determine what to do in the event data is improperly formatted and/or missing.
Tell me more about Record Properties
Record Properties are located on the 'Record Properties' tab. To toggle between the Record Properties tab and the Data Validation tab, click on the icon representing the desired tab.
A record for an Outbound Template can be of two types: looping and non-looping. Looping records are mapped to an Inbound Template record and for each inbound record found, an outbound record is created. Non-Looping records are not mapped to an Inbound Template record and the record only relates to the outbound format. Looping records display a different icon in the Record Navigator that looks like a red circle. Non-looping records display a yellow folder icon.
An Outbound Loop has the ability to loop over inbound records, system records, field groups, and business objects such as Variable Collection, Custom DB Fields, and over integer values derived from and field belonging to the above mentioned record types.
An Outbound Loop has the ability to not set a record delimiter at the end of the record produced by the looping action (all items in the loop completing). This option is a checkbox.
An Outbound Loop has the ability to have a counter created for it for use elsewhere. This option is a checkbox.
Ability to loop over records
The types of records available to loop over include inbound records (defined by an inbound template associated to this outbound template), system record types (built in record types available whether an inbound template is associated or not), select outbound business objects (Variable Collection, Custom DB Field), and integers via a record type/map name.
Inbound Records
When an inbound record is selected, the Loop will loop over every instance of the inbound record found in the data. The icon in the GUI will switch from a 'Record' to a 'Record with a Green Recycle Bin' type badge. No additional information is needed on the screen to loop over inbound records.
Looping over an inbound record, from the associated inbound template. No additional information is needed from the user.
System Records
When a system record is selected, the Loop will loop over every instance of the system record found in the data. The icon in the GUI will switch from a Record to a Record with a green recycle bin type badge. No additional information is needed on the screen to loop over system records.
Looping over a System Record Type. No additional information is needed from the user.
Outbound Business Objects
Depending on the business object selected, additional information may be needed from the user. For Variable Collection, the name of the Variable Collection must be selected from an additional drop down. For Custom DB Field, the name of the Custom DB Field must be selected from an additional drop down. The icon in the GUI will switch from a Record to a Record with a green recycle bin type badge.
Looping over a Variable Collection
The additional drop down
for the one to use is presented below the Loop Record drop down.
Looping over a Custom DB Field
The additional drop down for the one to use is presented below the Loop Record drop down.
Integer Values
To loop over an integer value, the user must select the record type/map name that contains a valid integer. The Loop will loop x number of times, where x is the value of the record type/map name. The rules for obtaining the Record Type/Map Nam are identical to every other outbound item that can map to a record type/map name. All inbound records, system records, and select outbound business objects will be available in the drop down for record type. When a record type is selected, the map names for the said record type will populate.
The user has the ability to use a Session Value for the map name, by selecting the button to the right of the map name drop down. The WF Session Wizard dialog will open , asking for the Workflow to use, then the session variable to use.
Looping over an integer. Selecting Loop over Value will cause the screen to display the record type/map name drop downs (identical behavior as all other outbound screens using these drop downs). You can also select an Inbound Record Type of Constant, and type in a numeric value directly into the Inbound Field Name drop down.
If a description is entered for the record, it is displayed in the Record Navigator. If no description is given, but a mapping to an Inbound Record is given, that name is displayed in the Record Navigator. If neither is entered, the record is not given a name in the Record Navigator.
In the Template Properties editor, a record delimiter is chosen for most types of data formats, except Database, XML, JSON and Servlet. For the formats that require a record delimiter, a check box is shown above to allow the record delimiter to be disabled for the record. By default, this check box is selected for all records.
Tell me more about Data Validation
Data Validation is located on the 'Data Validation' tab. To toggle between the Record Properties tab and the Data Validation tab, click on the icon representing the desired tab.
Data Validation is used on the Inbound Template to flag records and fields that are identified as either missing or containing bad data. Identified records and fields are flagged only and not directly manipulated. Data Validation on the Outbound Template is where the decision is made for the flagged items. Data validation uses the following check boxes:
Include All Records, Regardless of Errors
Include Records That Do Not Have Any Errors
Include Records That Have the Following Errors
Include All Records, Regardless of Errors
This is the default setting and any flags on missing/bad data on the Inbound Template are ignored.
Include Records That Do Not Have Any Errors
If this check box is selected, the first check box cannot be checked. This check box is used to only include error free records in the resulting translated data.
Include Records That Have the Following Errors
If this check box is selected, the first check box cannot be checked. This check box can be used in conjunction with the second check box. If this check box is selected, the table of error types below it is enabled to allow you to specify which types of errors you are accepting for the resulting translated data. This flexibility allows two different types of data to be created. The first allows error free data only to be created and the second allows data to be created that contains errors.
Record Editor Database
Overview
A record in an Outbound Template maps to a database table, when the data type is Database. All fields within this record are used to create either an INSERT, UPDATE, or DELETE statement that will be executed on the selected database. Optionally, if you do not select a database operation for the 'Statement Type' drop down, the icon changes to the familiar looping record, which will allow you to perform any type of business logic on the data without it becoming a database statement to execute.
Tell me more about Record Properties
A record for an Outbound Template can be of two types, looping or non-looping. Looping records are mapped to an Inbound Template record, and for each inbound record found, an outbound record is created. Non-Looping records are not mapped to an Inbound Template record, and the record only relates to the outbound format. Looping records display a different icon in the Record Navigator, appearing as a red circle. Non-looping records display a yellow folder icon.
An Outbound Loop has the ability to loop over inbound records, system records, field groups, and business objects such as Variable Collection, Custom DB Fields, and over integer values derived from and field belonging to the above mentioned record types.
An Outbound Loop has the ability to not set a record delimiter at the end of the record produced by the looping action (all items in the loop completing). This option is a checkbox.
An Outbound Loop has the ability to have a counter created for it for use elsewhere. This option is a checkbox.
Ability to loop over records
The types of records available to loop over include inbound records (defined by an inbound template associated to this outbound template), system record types (built in record types available whether an inbound template is associated or not), select outbound business objects (Variable Collection, Custom DB Field), and integers via a record type/map name.
Inbound Records
When an inbound record is selected, the Loop will loop over every instance of the inbound record found in the data. The icon in the GUI will switch from a Record to a Record with a green recycle bin type badge. No additional information is needed on the screen to loop over inbound records.
Looping over an inbound record , from the associated inbound template. No additional information is needed from the user.
System Records
When a system record is selected, the Loop will loop over every instance of the system record found in the data. The icon in the GUI will switch from a Record to a Record with a green recycle bin type badge. No additional information is needed on the screen to loop over system records.
Looping over a System Record Type. No additional information is needed from the user.
Outbound Business Objects
Depending on the business object selected, additional information may be needed from the user. For Variable Collection, the name of the Variable Collection must be selected from an additional drop down. For Custom DB Field, the name of the Custom DB Field must be selected from an additional drop down. The icon in the GUI will switch from a Record to a Record with a green recycle bin type badge.
Looping over a Variable Collection
The additional drop down for the one to use is presented below the Loop Record drop down.
Looping over a Custom DB Field
The additional drop down for the one to use is presented below the Loop Record drop down.
Integer Values
To loop over an integer value, the user must select the record type/map name that contains a valid integer. The Loop will loop x number of times, where x is the value of the record type/map name. The rules for obtaining the Record Type/Map Nam are identical to every other outbound item that can map to a record type/map name. All inbound records, system records, and select outbound business objects will be available in the drop down for record type. When a record type is selected, the map names for the said record type will populate.
The user has the ability to use a Session Value for the map name, by selecting the button to the right of the map name drop down. The WF Session Wizard dialog will open , asking for the Workflow to use, then the session variable to use.
Looping over an integer . Selecting Loop over Value will cause the screen to display the record type/map name drop downs (identical behavior as all other outbound screens using these drop downs). You can also select an Inbound Record Type of Constant, and type in a numeric value directly into the Inbound Field Name drop down.
If a description is entered for the record, it is displayed in the Record Navigator. If no description is given, but a mapping to an Inbound Record is given, that name is displayed in the Record Navigator. If neither is entered, the record is not given a name in the Record Navigator. For Outbound Database Templates, the record will show the type of statement to be executed along with the table name it is mapped to.
You have the option of converting the INSERT statement into an UPDATE statement if the record is already found to exist in the table. However, this may require the primary key to be set. Only one field may be set as the primary key.
For your convenience, a Table Viewer is provided to allow the quick addition of fields to a record. Each field must be mapped to the Inbound Template to instruct BridgeGate™ on where to retrieve data. The Table Viewer will only available if you are connected to a database and if you have selected the table's corresponding mapped record.
Field Editor
Overview
A Field represents a single data value. Fields are grouped together into collections known as a Record. Fields have a character or set of characters that are used to separate themselves from other Fields within a Record. If the file type is Fixed Length, no delimiter character(s) is used to separate the Fields since each Field has a set length.
The value you place in the Field typically comes from a mapped Field from the Inbound Template. However, the value can come from many other places. If you click on the drop down box for the 'Inbound Record Name', you will notice the following internal types available:
- SYSTEM
- TRADING PARTNER KEYS
- ACCOUNT KEYS
- VARIABLE
- CUSTOM DB FIELD
- SEQUENCE
- SESSION DATA
- PLUGIN
You may also 'hard code' a value to this Field using a CONSTANT field type. After assigning a value to this Field, the data itself can be manipulated into any form desired. This can be accomplished by specifying the field type:
- CHAR
- DATE
- INTEGER
- FLOAT
- BYTE
The data set in this Field can also be manipulated by using any of the properties available in the Field Properties editor. These properties include:
- Pattern (DATE, INTEGER, FLOAT)
- Padding Direction (Used in conjunction with LENGTH)
- Fill Character (Used in conjunction with LENGTH)
- Length
- Inbound Precision (INTEGER, FLOAT)
- Outbound Precision (INTEGER)
- Quote Data
- Trim Data
- Advanced Properties Dialog (many settings here)
If the Field does not contain a mapping, an  icon will appear for the
Field. When you see this icon, the translation will most likely not
produce a value for this Field and it will be blank in the data
produced. Allowing a Field to stay unmapped will not cause problems
during translation. In fact, some data formats expect this for
certain fields. To map a Field properly, you will need to select an
'Inbound Record Name' and an 'Inbound Field Name'. Also, you may
choose the Field Type of CONSTANT which lets you 'hard code' the
value.
icon will appear for the
Field. When you see this icon, the translation will most likely not
produce a value for this Field and it will be blank in the data
produced. Allowing a Field to stay unmapped will not cause problems
during translation. In fact, some data formats expect this for
certain fields. To map a Field properly, you will need to select an
'Inbound Record Name' and an 'Inbound Field Name'. Also, you may
choose the Field Type of CONSTANT which lets you 'hard code' the
value.
Tell me more about SYSTEM mappings
The SYSTEM record type allows you to insert information about the translation into the data:
- TODAY - Timestamp of today's current date. Use in conjunction with PATTERN to specify the format you want it in.
- TOMORROW - Timestamp of tomorrow's date. Use in conjunction with PATTERN to specify the format you want it in.
- YESTERDAY - Timestamp of yesterday's date. Use in conjunction with PATTERN to specify the format you want it in.
- Hostname - Hostname of the server the transaction ran on.
- IP Address - IP Address of the server the transaction ran on.
- TRANSACTION ID - The BridgeGate™ Transaction ID assigned to the current transaction.
- IS REPROCESS - (TRUE/FALSE) depending on if the workflow was executed by reprocessing a transaction.
- IS PROCESS INCOMPLETE - (TRUE/FALSE) depending on if a workflow was executed / restarted by the incomplete workflow manager after system restart.
- IS REALTIME - (TRUE/FALSE) depending on if the workflow is configurated and executing as a Real Time Service.
- GUID - Globally Unique Identifier. Provides a reference number which is unique that you may use elsewhere.
- Output Record Count - Total character count of the entire current record of outbound data being created.
- Input Record Count - Total character count of the entire current record of inbound data.
- Output Char Count - Total character count of the entire inbound data.
- Input Char Count - Total character count of the entire inbound data.
- XML VERSION TAG - Places the tag in the field.
- Inbound Record Delimiter - One or more characters used to seperate records of the inbound data.
- Inbound Field Delimiter - One or more characters used to seperate fields within a record of the inbound data.
- Inbound Component Delimiter - One or more characters used to seperate fields within a field Group of the inbound data.
- Outbound Record Delimiter - One or more characters used to seperate records of the outbound data.
- Outbound Field Delimiter - One or more characters used to seperate fields within a record of the outbound data.
- Outbound Component Delimiter - One or more characters used to seperate records of the outbound data.
Tell me more about TRADING PARTNER KEY mappings
BridgeGate" allows you to create trading partner data, which is stored internally in BridgeGate's own MySql database. The trading partner data can be retrieved by looking up specific criteria such as a Vendor ID or Customer ID from the inbound data. If you specify 'Lookup Fields' in the Template Properties editor, the data found for the Lookup Field is used to query BridgeGate's MySql database to retrieve the trading partner data. All the information entered for the trading partner can then be accessed using this TRADING PARTNER KEYS record type. Information such as Vendor Name, Address and Contact Information can be entered in and then used in this manner. This is valuable when all you get from inbound data is a unique ID, but need additional information to be put in the translated outbound data that isn't available from the inbound data. When trading partner data is entered into the Trading Partner Data Repository screen, those fields will be available in the 'Inbound Field Name' drop down box when TRADING PARTNER KEYS record type is selected. For more information, see the Template Properties editor help screen as well as the Trading Partner Data Repository help screen.
Tell me more about ACCOUNT KEY mappings
BridgeGate" allows you to create account data which is stored internally in BridgeGate's own MySql database. The account key data is identical to the trading partner data, except that only one account is created to store information. For trading partner keys, you can create as many as needed. For more information, see the Template Properties editor help screen as well as the Account Data Repository help screen. When account data is entered into the Account Data Repository screen, those fields will be available in the 'Inbound Field Name' drop down box when ACCOUNT KEYS record type is selected.
Tell me more about VARIABLE mappings
When a Variable is created in an Outbound Template, the data isn't placed into the outbound data. The data becomes available for use in many places, one of which is in a Field. To place the value of a Variable into a Field, select the VARIABLE record type from 'Inbound Record Name'. All Variables found in the Outbound Template will be available in the 'Inbound Field Name' drop down box. Variables can be used to concatenate inbound fields together into a single field, as well as to perform arithmetic functions such as add, subtract, multiply, and divide. Variables can also be used as a counter, but the value is not persistent. Once the transaction is done, the value is gone. To create a persistent counter, use a SEQUENCE.
Tell me more about CUSTOM DB FIELD mappings
When a Custom DB Field is created in an Outbound Template, the data isn't placed into the outbound data. The data becomes available for use in many places, one of which is in a Field. To place the value of a Custom DB Field into a Field, select the CUSTOM DB FIELD record type from 'Inbound Record Name'. All data found for Custom DB Fields in the Outbound Template will be available in the 'Inbound Field Name' drop down box. A Custom DB Field allows you to perform a SQL Query on any database BridgeGate" allows. The SQL query can be constructed using inbound data as the criteria in the WHERE clause. Any values returned from the SQL query are then available through this CUSTOM DB FIELD record type. BridgeGate" currently has a limitation to only recognize a single record returned from a database, so multiple records returned from a SQL query will only allow the first one found to be used. If multiple records are required, consider using an Inbound Template set as Database.
Tell me more about SEQUENCE mappings
A sequence is used when a persistent counter is needed. When a sequence is created in an Outbound Template, the value isn't placed into the outbound data. The value becomes available for use in many places, one of which is in a Field. To place the value of a Sequence into a Field, select the SEQUENCE record type from 'Inbound Record Name'. All sequences found in this Outbound Template will be available in the 'Inbound Field Name' drop down box. Select the one to use as the value for this Field.
Tell me more about SESSION DATA mappings
Workflow Session Data is data from other fields or variables you choose to have placed in the Workflow Session. A Workflow Session is created when a transaction starts and ends when the transaction ends. To place the value of this field into the Session, select the check box 'Add to Workflow Session'. In addition to data you place in the Session, transaction level information and workflow item parameters are available as well. To use data from the Workflow Session, select the SESSION DATA record type from Inbound Record Name. Then select the '...' button to the right of the Inbound Field Name. A wizard will pop up that will guide you through the process of mapping to all available data fond in the session.
The workflow session also has a facility to store data in a global manner. Regardless of where the data comes from, you can retrieve it using the name you assigned to the value (known as the 'key'). Everytime a value is placed into the workflow session, it is also placed into a global area. This feature enables you to retrieve the 'last known value' for a key, in the event you are using workflow logic that makes other types of retrieval unreliable. To use data from the Workflow Session, select the SESSION DATA record type from Inbound Record Name, then enter the following syntax into the Inbound Field Name: %GLOBAL_DATA%,keyname where keyname equals the name you entered from another field or variable using the 'Add to Workflow Session' checkbox.
Tell me more about PLUGIN mappings
When a Plugin is created in an Outbound Template, any data returned by the Plugin isn't placed into the outbound data. The data is merely available for use in many places, one of which is in a Field. To place a return value from a Plugin into a Field, select the record type "PLUGIN" and the Inbound Field Name list will contain a list of all the return values of the plugin. If you select a plugin to return values in the Inbound Field Name, the value returned by the plugin will be included in the outbound data.
Tell me more about using CONSTANTS
When you want to 'hard code' a value directly into a Field, select the FIELD TYPE of CONSTANT. Enter the value for the Constant in the Constant Value drop down box or select one of the preset values in the drop down. You will notice the 'Inbound Record Name' and 'Inbound Field Name' drop downs are disabled because no mapping exists for a field that is a CONSTANT.
Tell me more about CHAR field type
The CHAR field type is for any Alpha-Numeric fields you may need. This is the most common type of field. CHAR comes with a unique property the other field types do not have; 'Convert Case'. This allows you to set the data to all UPPER CASE, lower case or Proper Case.
Tell me more about DATE field type
The DATE field type is for using Dates in your data. This field type is only needed if you wish to set the Pattern for the Date. If a field from the inbound data is a date and is already in the format you want it, it's ok to map it to the Outbound Template as CHAR. If you are using the Record/Field of SYSTEM/TODAY to use today's date, then this should be set as a DATE so you can set the Pattern for it.
Tell me more about INTEGER field type
The INTEGER field type is used for numbers that are to be formatted without a decimal point, although they can be used to output a decimal number with an implied fractional component; see the Outbound Precision setting below. A Pattern can be applied to the field to allow formatting of the field with commas or other types of formatting such as currency symbols or percent signs. Like the DATE field type above, if the number is already in the proper format, it should be mapped to the Outbound Template and setting the Field as CHAR will suffice. Rounding may occur if a Pattern is applied to the Field.
Tell me more about FLOAT field type
The FLOAT field type is used for numbers that require decimal point precision. A Pattern can be applied to the field to allow formatting to the field with commas or other types of formatting such as currency symbols or percent signs. Also, placeholders can be assigned to always require a specific number of decimal points, in which case a 0 will be assigned to the empty positions. You may also have to use the PRECISION property in conjunction with the Pattern to get the desired number. PRECISION is valuable when the number in the inbound data is 200 but 2.00 is intended for the outbound data. In order for BridgeGate" to understand the last two zeros are decimal places, the PRECISION should be set to 2. Then a Pattern of $#.## can applied to create $2.00 out of 200.
Tell me more about Patterns
A Pattern can be applied to field types DATE, INTEGER, and FLOAT. For DATE, a Date format can be entered. For INTEGER and FLOAT, a number pattern can be applied. Click on the '...' next to the Pattern textbox for help on creating Patterns. When you create a Pattern using the Pattern Screen (...), the Pattern is tested and allows you to approve the Pattern before setting it. Rounding may occur with number patterns, depending on the Pattern you set.
Tell me more about Padding Direction
Padding Direction is used in conjunction with Fill Character and/or Length. It is usually used for FIXED LENGTH formats, where extra space is sometimes left over in the field. If you set a Field to a Length of 10, but the data only occupies 5 characters, the remaining 5 characters can be set to the left or right of the data. To do this, set the Padding Direction to LEFT to allow the extra space to be on the left or set it to RIGHT to do it for the right side.
Tell me more about Fill Characters
Fill Characters are used with Padding Direction to tell BridgeGate" what to put in the extra space that occupies the field. The drop down is editable to allow you to type in any character(s) to use for filler. A common practice is to use a SPACE character for CHAR fields and a 0 for numeric fields. The drop down is populated with the word SPACE which you can use to set the character to be a single space. You can also hit the space bar once in the drop down to produce the same effect.
Tell me more about Length
Length is usually used with FIXED LENGTH formats. However, it can be used for any data format. If a Length is specified, then exactly that many characters will occupy the field. It's a good practice to set the Padding Direction and Fill Character when setting the Length. This way, BridgeGate" knows what to do with the additional space that may occur. If these are not specified, then BridgeGate" defaults to a space for the Fill Character and a Padding Direction of LEFT. If the data for this field is larger than the Length specified, the remaining data is lost. To ignore the Length property and use the true Length of the data, set the Length to 0. It is set to 0 by default.
Tell me more about Quote Data
If this check box is set, the Data in this Field will be quoted using double quotes (" "). You can quickly set every field to quoted by checking the Quote All Fields checkbox in the Template Properties editor. CSV data format automatically quotes all fields.
Tell me more about Trim Data
If this check box is set, any remaining white space before and after the data will be trimmed off. This is valuable if the Inbound Template data format is FIXED LENGTH and fields contain extra empty space. However, it is important not to set any Outbound Template fields to trim data if the Outbound Template data format is FIXED LENGTH as the data will be trimmed and the fields will not be the proper length. To quickly set all fields to be trimmed, check the Trim All Fields checkbox in the Template Properties editor.
Tell me more about Advanced Properties Dialog
The Advanced Properties Dialog contains many features that allow data manipulation. The first tab is for Field Portioning.
This tab allows you to only use a piece of the actual field's data. Exact Portioning is the easier of the 2 types to understand. Specify the Starting Position for the piece of the data you wish to use and the Number of Characters to use. For example, Starting Position of 1 and Number of Characters of 3 will use only the first 3 characters of the field. Relative Portioning allows you to specify the value to search for in the field to start and an end value to stop. In addition, you can set it to use the 1st occurrence of the start value, the 2nd occurrence...etc.
The second tab is for replacement of characters within the field.
This tab allows BridgeGate" to perform a search and replace on the field for as many changes as needed. To create a Replacement, right click on the list or click on the down arrow shown. The first Replace in this image uses Regular Expression to perform the search. The expression is '\D', which means search for all non-digits. The replace value is 'Q', so the result of the data '34as' will become '34QQ'. The second Replace in this image is a verbatim search and replace and all asterisks (*) found will be replaced with a dash (-). Because there are 2 Replaces for this field, both will take affect on the data. If the value of '34*as' was entered for the Test Data here, the Result would become '34-QQ'.
The third tab is for stripping of characters within the field.
This tab tells BridgeGate" to search and strip all Strips created on this screen for the Field. The example in this image has only a single Strip, set to search for asterisk (*). The test data of '*note' would become 'note' with the character removed. You create the Strips by right clicking on the list or selecting the down arrow shown above. Regular Expressions can be used here as well.
The fourth tab is for adding Alpha Masks to the field.
This tab allows you to create an Alpha Mask for the data. This is valuable for formatting phone numbers, Social Security Numbers (SSNs), zip codes...etc. The example in the image includes the test data for the mask of (XXX)XXX-XXXX. The result on the test data is shown.
The fifth tab is for advanced Conversion Functions.
This tab allows you to the field data using one of many conversion function. An example would be to convert Fahrenheit to Celsius. Detailed help is on the Conversion Function tab.
Field Editor Database
Overview
A field represents a single data value. Fields are grouped together into collections known as a record. Fields have a character or set of characters that are used to separate themselves from other fields within a record. If the file type is Fixed Length, no delimiter character(s) is used to separate the fields since each field has a set length.
The value you place in the field typically comes from a mapped field from the Inbound Template. However, the value can come from many other places. If you click on the drop down box for the 'Inbound Record Name', you will notice the following internal types available:
- SYSTEM
- TRADING PARTNER KEYS
- ACCOUNT KEYS
- VARIABLE
- CUSTOM DB FIELD
- SEQUENCE
- SESSION DATA
- PLUGIN
You may also 'hard code' a value to this field using a CONSTANT field type. After assigning a value to this field, the data itself can be manipulated into any form desired. This can be accomplished by specifying the field type:
- CHAR
- DATE
- INTEGER
- FLOAT
The data set in this field can also be manipulated by using any of the properties available in the Field Properties editor. These properties include:
- Pattern (DATE, INTEGER, FLOAT)
- Padding Direction (Used in conjunction with LENGTH)
- Fill Character (Used in conjunction with LENGTH)
- Length
- Precision (FLOAT)
- Quote Data
- Trim Data
- Advanced Properties Dialog (many settings here)
If the field does not contain a mapping, an icon will appear for the
field. When you see this icon, the translation will most likely not
produce a value for this field and it will be blank in the data
produced. Allowing a field to stay unmapped will not cause problems
during translation. In fact, some data formats expect this for
certain fields. To map a field properly, you will need to select an
'Inbound Record Name' and an 'Inbound Field Name'. Also, you may
choose the field type of CONSTANT which lets you 'hard code' the
value.
If the Field is designated as a 'Database Key', the icon shown for the Field will change from gray to red. A 'Database Key' is either a Primary Key or a Composite Key.
Tell me more about SYSTEM mappings
The SYSTEM record type allows you to insert information about the translation into the data:
- IN CHAR COUNT - Total character count of the entire inbound data.
- IN RECORD COUNT - Total character count of the entire current record of inbound data.
- OUT CHAR COUNT - Total character count of the entire outbound data.
- OUT RECORD COUNT - Total character count of the entire current record of outbound data being created.
- TODAY - Timestamp of today's current date. Use in conjunction with PATTERN to specify the format you want it in.
- TRANSACTION ID - The BridgeGate Transaction ID assigned to the current transaction.
- XML VERSION TAG - Places the tag in the field.
Tell me more about TRADING PARTNER KEY mappings
BridgeGate™ allows you to create trading partner data, which is stored internally in BridgeGate's own MySql database. The trading partner data can be retrieved by looking up specific criteria such as a Vendor ID or Customer ID from the inbound data. If you specify 'Lookup Fields' in the Template Properties editor, the data found for the Lookup field is used to query BridgeGate's MySql database to retrieve the trading partner data. All the information entered for the trading partner can then be accessed using this TRADING PARTNER KEYS record type. Information such as Vendor Name, Address and Contact Information can be entered in and then used in this manner. This is valuable when all you get from inbound data is a unique ID, but need additional information to be put in the translated outbound data that isn't available from the inbound data. When trading partner data is entered into the Trading Partner Data Repository screen, those fields will be available in the 'Inbound Field Name' drop down box when TRADING PARTNER KEYS record type is selected. For more information, see the Template Properties editor help screen as well as the Trading Partner Data Repository help screen.
Tell me more about ACCOUNT KEY mappings
BridgeGate™ allows you to create account data which is stored internally in BridgeGate's own MySql database. The account key data is identical to the trading partner data, except that only one account is created to store information. For trading partner keys, you can create as many as needed. For more information, see the Template Properties editor help screen as well as the Account Data Repository help screen. When account data is entered into the Account Data Repository screen, those fields will be available in the 'Inbound Field Name' drop down box when ACCOUNT KEYS record type is selected.
Tell me more about VARIABLE mappings
When a variable is created in an Outbound Template, the data isn't placed into the outbound data. The data becomes available for use in many places, one of which is in a field. To place the value of a variable into a field, select the VARIABLE record type from 'Inbound Record Name'. All variables found in the Outbound Template will be available in the 'Inbound Field Name' drop down box. Variables can be used to concatenate inbound fields together into a single field, as well as to perform arithmetic functions such as add, subtract, multiply, and divide. Variables can also be used as a counter, but the value is not persistent. Once the transaction is done, the value is gone. To create a persistent counter, use a SEQUENCE.
Tell me more about CUSTOM DB FIELD mappings
When a Custom DB field is created in an Outbound Template, the data isn't placed into the outbound data. The data becomes available for use in many places, one of which is in a field. To place the value of a Custom DB field into a field, select the CUSTOM DB FIELD record type from 'Inbound Record Name'. All data found for Custom DB fields in the Outbound Template will be available in the 'Inbound Field Name' drop down box. A Custom DB field allows you to perform a SQL Query on any database BridgeGate™ allows. The SQL query can be constructed using inbound data as the criteria in the WHERE clause. Any values returned from the SQL query are then available through this CUSTOM DB FIELD record type. BridgeGate™ currently has a limitation to only recognize a single record returned from a database, so multiple records returned from a SQL query will only allow the first one found to be used. If multiple records are required, consider using an Inbound Template set as Database.
Tell me more about SEQUENCE mappings
A sequence is used when a persistent counter is needed. When a sequence is created in an Outbound Template, the value isn't placed into the outbound data. The value becomes available for use in many places, one of which is in a field. To place the value of a Sequence into a field, select the SEQUENCE record type from 'Inbound Record Name'. All sequences found in this Outbound Template will be available in the 'Inbound Field Name' drop down box. Select the one to use as the value for this field.
Tell me more about SESSION DATA mappings
Workflow Session Data is data from other fields or variables you choose to have placed in the Workflow Session. A Workflow Session is created when a transaction starts and ends when the transaction ends. To place the value of this database field into the Session, select the check box 'Add to Workflow Session'. In addition to data you place in the Session, transaction level information and workflow item parameters are available as well. To use data from the Workflow Session, select the SESSION DATA record type from Inbound Record Name. Then select the '...' button to the right of the Inbound Field Name. A wizard will pop up that will guide you through the process of mapping to all available data fond in the session.
The workflow session also has a facility to store data in a global manner. Regardless of where the data comes from, you can retrieve it using the name you assigned to the value (known as the 'key'). Every time a value is placed into the workflow session, it is also placed into a global area. This feature enables you to retrieve the 'last known value' for a key, in the event you are using workflow logic that makes other types of retrieval unreliable. To use data from the Workflow Session, select the SESSION DATA record type from Inbound Record Name, then enter the following syntax into the Inbound Field Name: %GLOBAL_DATA%,keyname where keyname equals the name you entered from another field or variable using the 'Add to Workflow Session' checkbox.
Tell me more about PLUGIN mappings
When a plugin is created in an Outbound Template, any data returned by the plugin isn't placed into the outbound data. The data is merely available for use in many places, one of which is in a field. To place a return value from a plugin into a field, select the record type "PLUGIN" and the Inbound Field Name list will contain a list of all the return values of the plugin. If you select a plugin to return values in the Inbound Field Name, the value returned by the plugin will be included in the outbound data.
Tell me more about using CONSTANTS
When you want to 'hard code' a value directly into a field, select the FIELD TYPE of CONSTANT. Enter the value for the Constant in the Constant Value drop down box or select one of the preset values in the drop down. You will notice the 'Inbound Record Name' and 'Inbound Field Name' drop downs are disabled because no mapping exists for a field that is a CONSTANT.
Tell me more about CHAR field type
The CHAR field type is for any Alpha-Numeric fields you may need. This is the most common type of field. CHAR comes with a unique property the other field types do not have, 'Convert Case'. This allows you to set the data to all UPPER CASE, lower case, or Proper Case.
Tell me more about DATE field type
The DATE field type is for using dates in your data. This field type is only needed if you wish to set the pattern for the date. If a field from the inbound data is a date and is already in the format you want it, it's ok to map it to the Outbound Template as CHAR. If you are using the record/field of SYSTEM/TODAY to use the current date, then this should be set as a DATE so you can set the pattern for it.
If you are creating a date to be stored in a database note that each database vendor has its own default date pattern. Please reference your database manual for the default date pattern. BridgeGate™ has included some of the popular formats in the pattern builder.
The following are some of the popular formats. Use the text/pattern in the "Pattern Syntax" column get convert a BridgeGate™ date into the database default date format.
| Database Vendor | Pattern Syntax | Default Date Format |
| Oracle | oracle | to_date('2005-01-01 20:19:00','YYYY-MM-DD HH24:MI:SS') |
| MS SQL Server | sqlserver | yyyy-MM-dd HH:mm:ss |
| MySQL | mysql | yyyy-MM-dd HH:mm:ss |
| IBM DB2 | db2 | yyyy-MM-dd HH:mm:ss |
On the outbound Field Properties panel enter the above date pattern or the vendor name to convert a date into the correct database format. If you do not use the correct date pattern you will get a SQL error. You can use the pattern builder to view had today's date will look like using the vendor default format.
Tell me more about INTEGER field type
The INTEGER field type is used for numbers that are to be formatted without a decimal point, although they can be used to output a decimal number with an implied fractional component; see the Outbound Precision setting below. A pattern can be applied to the field to allow formatting of the field with commas or other types of formatting such as currency symbols or percent signs. Like the DATE field type above, if the number is already in the proper format, it should be mapped to the Outbound Template and setting the field as CHAR will suffice. Rounding may occur if a pattern is applied to the field.
Tell me more about FLOAT field type
The FLOAT field type is used for numbers that require decimal point precision. A pattern can be applied to the field to allow formatting to the field with commas or other types of formatting such as currency symbols or percent signs. Also, placeholders can be assigned to always require a specific number of decimal points, in which case a 0 will be assigned to the empty positions. You may also have to use the PRECISION property in conjunction with the pattern to get the desired number. PRECISION is valuable when the number in the inbound data is 200 but 2.00 is intended for the outbound data. In order for BridgeGate™ to understand the last two zeros are decimal places, the PRECISION should be set to 2. Then a pattern of $#.## can applied to create $2.00 out of 200.
Tell me more about Patterns
A pattern can be applied to field types DATE, INTEGER, and FLOAT. For DATE, a date format can be entered. For INTEGER and FLOAT, a number pattern can be applied. Click on the '...' next to the pattern textbox for help on creating patterns. When you create a pattern using the Pattern Screen (...), the pattern is tested and allows you to approve the pattern before setting it. Rounding may occur with number patterns, depending on the pattern you set.
Tell me more about Padding Direction
Padding Direction is used in conjunction with Fill Character and/or Length. It is usually used for FIXED LENGTH formats, where extra space is sometimes left over in the field. If you set a field to a Length of 10, but the data only occupies 5 characters, the remaining 5 characters can be set to the left or right of the data. To do this, set the Padding Direction to LEFT to allow the extra space to be on the left or set it to RIGHT to do it for the right side.
Tell me more about Fill Characters
Fill Characters are used with Padding Direction to tell BridgeGate™ what to put in the extra space that occupies the field. The drop down is editable to allow you to type in any character(s) to use for filler. A common practice is to use a SPACE character for CHAR fields and a 0 for numeric fields. The drop down is populated with the word SPACE which you can use to set the character to be a single space. You can also hit the space bar once in the drop down to produce the same effect.
Tell me more about Length
Length is usually used with FIXED LENGTH formats. However, it can be used for any data format. If a length is specified, then exactly that many characters will occupy the field. It is good practice to set the Padding Direction and Fill Character when setting the length and BridgeGate™ is then instructed on what to do with the additional space that may occur. If these are not specified, then BridgeGate™ defaults to a space for the Fill Character and a Padding Direction of LEFT. If the data for this field is larger than the length specified, the remaining data is lost. To ignore the Length property and use the true length of the data, set the length to 0. It is set to 0 by default.
Tell me more about Quote Data
If this check box is set, the data in this field will be quoted using double quotes (" "). You can quickly set every field to Quoted by checking the Quote All Fields checkbox in the Template Properties editor. CSV data format automatically quotes all fields.
Tell me more about Trim Data
If this check box is set, any remaining white space before and after the data will be trimmed off. This is valuable if the Inbound Template data format is FIXED LENGTH and fields contain extra empty space. However, it is important not to set any Outbound Template fields to trim data if the Outbound Template data format is FIXED LENGTH as the data will be trimmed and the fields will not be the proper length. To quickly set all fields to be trimmed, check the Trim All Fields checkbox in the Template Properties editor.
Tell me more about Add to Workflow Session
To place the value of this database field in the Session, select the check box for the field or variable named 'Add to Workflow Session'. The value will be available on other Outbound Templates that execute after this one during a workflow execution. It will also be available in the Workflow itself, such as in Item Lists and Send Datas.
Apply Field Properties
The default value placed in the Workflow Session is the raw value derived from the inbound data. If you want the properties on this screen to be applied to the value BEFORE it is placed in the Workflow Session, check the box 'Apply Field Properties'.
Field Group Editor
Overview
A Field Group in BridgeGate is a field which contains multiple components. Field Groups may be used across multiple data types, HL7 and EDI being most common, and use the respectful separator which is located on the Template Properties Tab.
When using the EDI data type in BridgeGate, a Field Group is used to support Composite Elements. The Fields inside the Field Group are Components and are separated by the Component Separator. Field Groups may only exist one level deep and you may not place a Record inside of a Field Group.
In HL7 a Field may contain discernible parts called Components. Field Groups existing at the 1st level under a Record are considered Fields that contains Components. During translation, the Component Separator will be used. If a Component is a Field Group then the Fields under the Component are Sub Components thus the Sub Component Separator will be used during processing. Field Groups may only exist two levels deep. You may not place a Record inside of a Field Group. Fields cannot be repeatable when within a Field Group.
XML Element Editor
Overview
An XML element is similar to a self-describing field that contains a value and can contain a list of its own sub elements. An XML element can also contain attributes which are additional field-like values specific to the element.
If the XML element does not contain a mapping, an icon will appear over the
element name. When you see this icon, the translation generally does
not produce a value for this XML element and, it will be blank in the
resultant data produced. Allowing an XML element to stay unmapped
will not cause problems during translation. Many XML elements
typically do not contain a value, but they act instead as a container
for attributes or sub elements. To map an XML element properly, you
will need to select an 'Inbound Record Name' and an 'Inbound Field
Name'. Also, you may choose the Field Type of CONSTANT which lets you
'hard code' the value.
NOTE: For optimal performance during translation, set all XML elements that will not contain a value to CONSTANT/NONE. This will speed up the translation.
Tell me more about Element Properties
An element's properties are identical to a field's properties. To learn more about the element's properties, see the Field Properties section of the documentation. Generally, the type CHAR is adequate for most situations. If the type is DATE and the date format requires a change during translation, then it is a good practice to set the type to DATE and specify the PATTERN for the date. Use the '...' button next to the PATTERN text field to create and test a pattern for the field. Each element needs to be given a name and must start with a letter and cannot contain spaces.
XML Attribute Editor
Overview
An XML attribute is the equivalent to a field in that it is a single data value. As a result, it is treated by BridgeGate™ as a field and can be used in any way a field is used. When the attribute is written, it is written as an attribute of the XML element to which it belongs, rather than as the value of an element itself.
Conditional Field List Editor
Overview
A Conditional Field List is a subset of items (records, fields, variables, sequences, custom database fields, plugins, and even other Conditional Field Lists) that are used if a specific condition is true. A condition consists of 1 or 2 pieces of data being compared. The data to compare can come from Inbound Template fields or from any other item that contains a value (variable, plugin, custom database field).
A condition used to compare is extremely flexible and for the most part, will allow you to compare "anything to anything". For Mapping #1, you can specify the value to start the comparison as an Inbound Template field, or as any of the variable, sequence, custom database field, or plugin values. Select the record type in the 'Inbound Record Name' for Mapping #1 and the 'Inbound Field Name' drop down box will fill accordingly to allow you to choose the Field.
A comparator allows you to choose the type of comparison to be performed.
For Mapping #2, the same types of values can be used to compare against as ere used in Mapping #1. However, the second mapping allows you to 'hard code' a value to compare against. This is normally the case for using Conditional Field Lists. To 'hard code' a value to compare against, choose the field type of CONSTANT. Next, set the Constant Value. If the comparator is Regular Expression AND the field type is CONSTANT, a '...' button will show up next to the Constant Value textbox. This allows you to test the Regular Expression that will be used for the condition. Regular Expression implies that the value must contain at least 1 match of the Regular Expression for the condition to be successful.
TIPS
When comparing a Field in Mapping #1 to a 'hard coded' value that is a number, set the Field Type in Mapping #2 to INTEGER or FLOAT. If using any of the numeric type comparators, such as GREATER_THAN or LESS_THAN, this is a required action.
EMPTY and NOT EMPTY are the equivalent to saying the Field either has a value (NOT EMPTY) or does not have a value (EMPTY).
You cannot perform a condition on a DATE other than to see if the field exists by using EMPTY or NOT EMPTY. You cannot check if the DATE is equal to, before, or after another DATE.
Custom DB Field Editor
Overview
A Custom DB field allows you to perform a SQL Query on any database to which BridgeGate™ allows a connection and returns data that can be used in the translated data. The real power behind this feature is that the values entered into the SQL Query can come from any item that contains data (field, variable, sequence, plugin, another Custom DB field). For each column returned from the SQL Query, a new piece of data is created. The Custom DB field itself does not write this data to the outbound translated data. To do this, you have to map a field to the any of the columns returned. What makes this unique is that the value(s) produced by the Custom DB field can be used by any other item (field, variable, sequence, another Custom DB field, plugin, Conditional Field List).
"Cache This Custom DB Field's Results" option: When the custom database field executes the SQL query, it will keep the query and the results. When it processes again and the SQL query is the same as the first time it executed, it will use the previous results without making another connection to the database.
Only two properties belong to the Custom DB field, all others belong to either the Dynamic Clause Values, or the Column Return Values. These two properties are:
Predefined Connection
SQL Query
Tell me more about Predefined Connection
The Predefined Connection describes all of the information needed to connect to the data on which this SQL Query will execute. Predefined Connections are created from the Repository menu. To get to the Predefined Connections screen, navigate to Repository|Predefined Connections in the menu bar, or simply click the '...' button next to the Predefined Connection drop down.
BridgeGate™ uses JDBC connections to connect to a database. The format for JDBC is:
Examples are provided below for different types of databases:
MySQL - jdbc:mysql://192.168.10.11/bridgegate <--the last field is Database name
Oracle - jdbc:Oracle:thin:@192.168.10.11:1521:qa9i <--the last field is Database name
SQL Server - jdbc:jtds:sqlserver://192.168.10.11/bridgegate <--the last field is Database name
Tell me more about SQL Query
This is the SQL Query that is executed on the database. Enter in the complete SQL Query here. This query can accept values from inbound data for the where clause, allowing you to customize it dynamically as the translation occurs. The query can also return values that can be written to the outbound translated data via a field, or used in any other Outbound item that accepts data. The following example shows how to insert a vendor id into the query from inbound data:
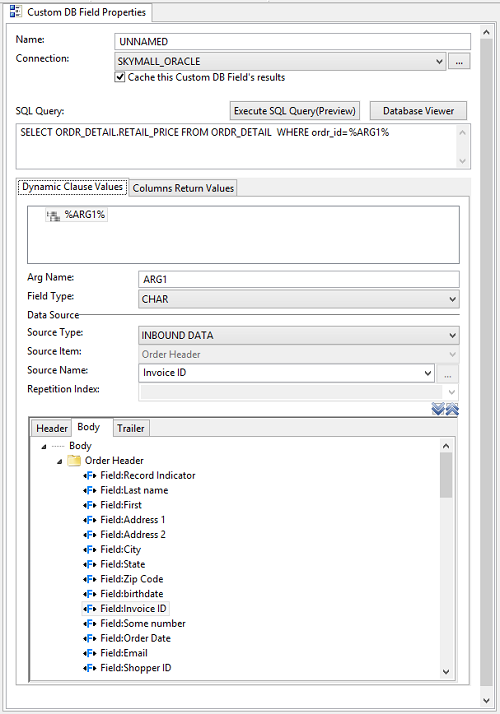
To place a value from inbound data into the query, mark the value using % %. We named our Arg name ARG1, but you can use anything you want to identify it. Then create a new Dynamic Clause Value and set the Arg name to be the same as it was entered in the SQL Query in the % %. Do not enter the % % around the Arg name. Finally, select the Inbound record name and Inbound field name to use for the value. To use the column value returned from this query, 'vendor_name', we would create a Column Return Value as shown below:
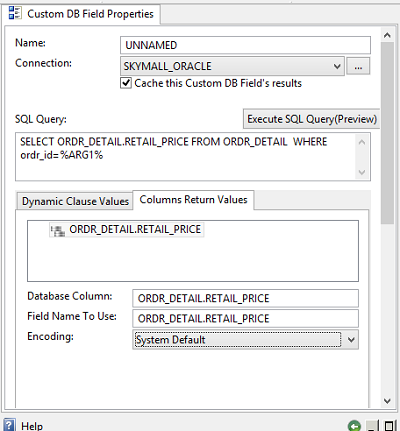
The Column Name property must be the exact same as specified in the query (shown circled in red). If you wanted to use a SQL function such as:
SELECT COUNT(vendor_name) FROM vendors WHERE vendor_id=%ARG1%
You would need to specify the Column Name property as COUNT(vendor_name). It is important that these values match. The only exception to this would be if you assigned an alias to the return column using the SQL 'as' designator. If your SQL query used an alias like this: SELECT vendor_name as myval FROM vendors WHERE vendor_id=%ARG1% you would need to specify the Column Name property as myval. The Field Name To Use property is the name of the value that will appear in the Inbound Field Name drop down when you use the value returned.
Tell me more about Dynamic Clause Values
To create a Dynamic Clause Value, select the first tab and right click on the list to display the menu. Alternatively, click on the down arrow at the top of the Custom DB field editor:
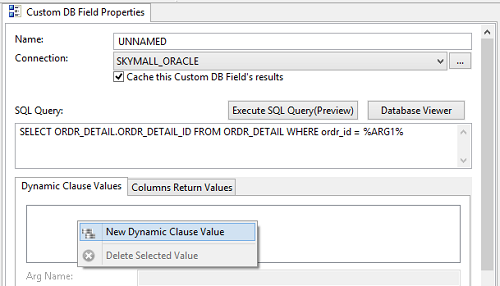
Tell me more about Column Return Values
To create a Column Return Values, select the second tab and right click on the list to display the menu. Alternatively, click on the down arrow at the top of the Custom DB field editor:
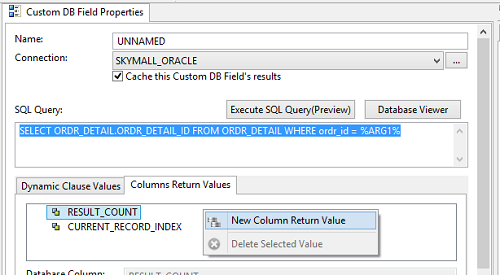
Plugin Editor
Overview
A plugin is used when an external program is needed to perform business logic. You have the option of sending that external program data to use as well as returning data back. To use a plugin, you create a Java Interface. This Java Interface can then be used to call another program or script.
NOTE: To use a Plugin, you must create a Java Interface. Contact BridgeGate support or see the BridgeGate Plugin Developers Guide for information and examples of creating plugins.
You can pass any value into a plugin that needs to be passed into the external program or script. These are set in the Java Interface and show up here in the tabs for In Values and Out Values. If the plugin returns data back, this data is not written to the outbound translated data. To do this, you must map a Field to any of the values returned from the plugin. This approach allows the value(s) produced by the plugin (such as a Variable or Conditional Field List, or even a Custom DB Field) to be used by any other item for additional processing.
The only property that belongs to the plugin is the Java Plugin Class. All other properties belong to the In Value and Out Values.
Tell me more about Java Plugin Class
The Java Plugin Class is the fully qualified Java Class Name including the package name if any exists. If your plugin was packaged as 'com.foo', the Java Plugin Class would be com.foo.YourClassName
After creating the Java plugin, it needs to be added to the bg_plugins_customer.jar and copied to both the BridgeGate Workbench and the BridgeGate Server. Contact BridgeGate Support or see the BridgeGate Plugin Developers Guide for more details.
Tell me more about In Values
After you enter the Java Plugin Class and press the 'Locate' button next to it, all Inbound and Outbound Values discovered in the plugin are automatically created and populated in the lists on both tabs. You then must 'link' each In Value to the appropriate value needed. To do so, select each In Value in the list and set the Inbound Record Name/Inbound Field Name for the value. be sure to include any of the familiar Field properties that are required to customize the value being sent into the plugin. To create a 'hard-coded' value to pass into the plugin, select the Field Type CONSTANT and enter in the Constant Value.
Tell me more about Out Values
The Out Values tab displays the Outbound values that will be returned from the plugin. However, will notice there is no action required for this tab. Any values returned from a plugin are automatically placed into the Inbound Record Name 'PLUGIN' for use.
Sequence Editor
Overview
A sequence is used to increment a counter that remembers its value translation after translation, day after day. It is the persistent version of a variable being used as a counter. When a sequence is used in an Outbound Template, the result is a new piece of data. The sequence itself does not write the data. To do this, you must map a field to the sequence's value. The value produced by the variable can be used by any other item (Field, Variable, another Sequence, Custom DB Field, Plugin, and Conditional Field List).
A sequence has the following properties:
- Sequence Name
- Sequence Group
- Field Type
- Constant Value (CONSTANT only)
- Inbound Record Name (Everything exception CONSTANT)
- Inbound Field Name (Everything exception CONSTANT)
- Increment By
- Maximum Value
- Increment Only Once
Sequence Name
When a sequence is created in an Outbound Template, it only increments the sequence value. The sequences name is used as a reference to the sequence. To write the value of the sequence to a field, you would select Inbound Record Name 'SEQUENCE', Inbound Field Name [the Sequence Name].
NOTE: The Sequence Name is not the unique ID of the sequence that is persisted. It is only used to reference the sequence in a field or other outbound item. The unique ID for the sequence is created using the value from the selected Inbound Record Name/Inbound Field Name or from a CONSTANT entered as the Constant Value.
Sequence Group
Sequence Groups enable you to have multiple persistent counters for the same Sequence Name. For example, if you create outbound translated data for a specific vendor for four different formats of data, you could create four different sequences for the same vendor using the name of the data format as the Sequence Group. This property is required, so if you only have a need for a single Sequence Group, you still need to enter this.
Field Type
To use a value from a field or other Outbound Item for the unique Sequence ID, select a Field Type of CHAR, DATE, INTEGER or FLOAT that corresponds with the value being retrieved. To enter a 'hard coded' value to use as the unique Sequence ID, select Field Type of CONSTANT and enter in the 'hard coded' value as the Constant Value.
Constant Value
To enter a 'hard coded' value to use as the unique Sequence ID, select Field Type of CONSTANT and enter in the 'hard coded' value as the Constant Value.
Inbound Record Name
To use a value from a field or other Outbound Item for the unique Sequence ID, select a Field Type of CHAR, DATE, INTEGER or FLOAT that corresponds with the value being retrieved. Next, select the Inbound Record Name that contains the field or Outbound Item to use. The value to use as the unique Sequence ID does not have to come from an Inbound Field only. The value can also come from an Outbound Variable, Trading Partner Data, Account Data, Custom DB Field or Sequence. When an Inbound Record Name is selected, the Inbound Field Name drop down is populated with that record's items.
Inbound Field Name
After an Inbound Record Name has been selected, the Inbound Field Name drop down is populated with that record's items. Select the field or other type of Outbound item from the Inbound Field Name drop down that contains the value to use as the unique Sequence ID.
Increment By
Since this is a persistent counter, you can specify the value to increment the sequence. While this is typically 1, you can enter any value needed here.
Maximum Value
Since this is a persistent counter, the value will continue counting to a maximum value of approximately 4 billion. To set a limit to the maximum value, such as 9999, enter it here. When the value reaches the maximum value, it will be reset back to 0.
Increment Only Once
If the value can only be incremented once per translation, select this check box. Depending on where the sequence is created (header, body, footer), the sequence may be triggered more than once. Checking this box ensures that no matter how many times the sequence is triggered during a translation, the value is only incremented the first time.
Variable Editor
Overview
A variable is used to perform a mathematical calculation or to concatenate multiple pieces of data. The result is a new piece of data. The variable itself does not write the data. To do this, you must map a field to the variable's value. The value produced by the variable can be used by any other item (field, another variable, Sequence, Custom DB Field, Plugin, Conditional Field List).
A variable is composed of one or more variable actions. To add the value of two fields together, you would use two variable actions. Likewise, to concatenate two fields, you would use two variable actions. Variable actions are displayed in a list in the middle of the variable editor. To create a new variable action, right-click on the list of variable actions.
The variable itself has only three properties. Everything else belongs to its actions. These properties are:
- Variable Name
- Initial Value
- Add to Workflow Session
Variable actions and fields have similar properties, but variable actions have one addition that identifies their type.
Tell me more about Variable Name
The variable name is simply the name of the variable. The name is important because it allows you to reuse the variable. For variable action types of CONCATENATE, ADD, SUBTRACT, MULTIPLY and DIVIDE, the name may not used. For variable action type COUNT, reuse is important so names are typically used. When creating a variable, enter the name from the Variable Name drop down list. This new variable will be available in the drop down for reuse. When reusing a variable, select it from the Variable Name drop down menu. For an example of reusing a variable, see the Samples and Tutorials section of the documentation.
Tell me more about Initial Value
When a variable is first created, the value is set to 0 or blank by default. This is dependent on whether the variable is being used to perform a mathematical calculation or to concatenate multiple pieces of data. To set the initial value to something else, enter the value here.
Tell me more about Add to Workflow Session
Workflow Session Data is any data from other fields or variables you choose to have placed in the Workflow Session. A Workflow Session starts when a transaction starts and ends when the transaction ends. To place field or variable values in the Session, select the check box for the field or variable named 'Add to Workflow Session'. By placing the value of this variable into the Workflow Session, you can access the value from another Outbound Template that processes after this one during a Transaction. You can also access the value of this variable for use in a file name or file directory.
Apply Field Properties
The default value placed in the Workflow Session is the raw value derived from the inbound data. If you want the properties on this screen to be applied to the value BEFORE it is placed in the Workflow Session, check the box 'Apply Field Properties'.
Tell me more about Variable Actions
Variable actions can be of the following types:
- COUNT
- SET
- RESET
- CONCATENATE
- ADD
- SUBTRACT
- MULTIPLY
- DATE DIFF
- DIVIDE
- Conversion Functions
All other properties for a variable action are the same as for a field. For an explanation of these properties, please refer to the help section for Outbound Template Fields.
Tell me more about COUNT
COUNT is used to perform a non-persistent count value for use within the template. A common use for COUNT is to count the number of records created in the outbound translated data and place the count value in the data trailer. To create a count value that retains its value for more than a single translation, use a sequence instead of a variable.
Tell me more about SET
SET is used to set the value of the variable to a specific value. If any value existed before this SET action is called, that value is now lost. If you are joining a first and last name value together, first select the variable action of SET. Then, map the first name value to this variable action. Next, create a second variable action of CONCATENATE and map the last name to this variable action. Refer to the section: 'Tell me more about CONCATENATE.'
Tell me more about RESET
RESET is similar to SET. It is used to set the value of the variable to the value specified in the 'Initial Value' textbox. If any value existed before this RESET action is called, that value is now lost. When the 'Reset before use' checkbox is checked, a 'RESET' action occurs before the first use of the variable. Otherwise, the 'Initial Value' is preserved until it has been used.
Tell me more about CONCATENATE
CONCATENATE allows you to append multiple values to create a new value. A common use for this is to append a first and last name together. Remember to create a variable action of SET in order to clear the field. Map your first value (i.e. first name) of your concatenation/join in the SET variable action. Create a second variable action of CONCATENATE and map your next value in the CONCATENATE variable action (i.e. last name). Because the individual variable actions allow advanced properties for CHAR field type, it is even possible to append portions of field values together.
NOTE: When using CONCATENATE, set the first variable action type to SET. This action initializes or 'sets' the initial value of the variable. Each variable action after that should be of type CONCATENATE.
Tell me more about ADD
ADD allows you to add the numerical values of multiple fields together. A common use for this function is to add individual order item costs together while looping over an order and then displaying the order total at the end of the outbound translated data. Because variable values can be used in any other Outbound item, it is also possible to use a Conditional Field List to check if the total order cost is greater than a specific amount and perform additional business logic. Another example would be to pass the variable value into a plugin which then calls an external program to calculate tax and return the total tax to place in the outbound translated data.
ADD can also be used to add time increments to a DATE. For example, if you create the first action as SET and assign a DATE field to it. You can then create a second action as ADD and add minutes, hours, days...etc. to the value of the DATE field.
NOTE: When using ADD, set the first variable action type to SET. This initializes or 'sets' the initial value of the variable. Each variable action after that should be of type ADD. It is possible to perform more than the ADD calculation to this variable. The first variable action would be SET, the second variable action could be ADD, and the third variable action could be MULTIPLY. You cannot perform CONCATENATE operations on a variable that contains an ADD type.
Tell me more about SUBTRACT
SUBTRACT allows you to subtract the numerical values of multiple fields together.
NOTE: When using SUBTRACT, set the first variable action type to SET. This initializes or 'sets' the initial value of the variable. Each variable action after that should be of type SUBTRACT. It is possible to perform more than the SUBTRACT calculation to this variable. The first variable action would be SET, the second variable action could be SUBTRACT, and the third variable action could be MULTIPLY. You cannot perform CONCATENATE operations on a variable that contains a SUBTRACT type.
Tell me more about MULTIPLY
MULTIPLY allows you to multiply the numerical values of multiple fields together.
NOTE: When using MULTIPLY, set the first variable action type to SET. This initializes or 'sets' the initial value of the variable. Each variable action after that should be type MULTIPLY. It is possible to perform more than the MULTIPLY calculation to this variable. The first variable action would be SET, the second variable action could be MULTIPLY, and the third variable action could be DIVIDE. You cannot perform CONCATENATE operations on a variable that contains a MULTIPLY type.
Tell me more about DATE DIFF
DATE DIFF Variable Action returns the count (as an integer value) of the specified date part boundaries crossed between the specified first Set Date Variable Action and the second Date Diff variable Action. The DATE DIFF Variable Action provides the ability to specify the Interval in the calculation.
NOTE: IF First
Variable Action is Set to Date data type, then on the next action add
DATE DIFF to the list of Variable Actions.Upon selecting DATE DIFF,add Date
to the Field Types.
Date Interval:
year = Yearmonth = month
day = Day
week = Week
hour = hour
minute = Minute
second = Second
date1 and date2 maxformat: yyyy/MM/dd HH:mm:ss:SS
Tell me more about DIVIDE
DIVIDE allows you to divide the numerical values of multiple fields together.
NOTE: When using DIVIDE, set the first variable action type to SET. This initializes or 'sets' the initial value of the variable. Each variable action after that should be of type DIVIDE. It is possible to perform more than the DIVIDE calculation to this variable. The first variable action would be SET, the second variable action could be DIVIDE, and the third variable action could be ADD. You cannot perform CONCATENATE operations on a variable that contains a DIVIDE type. It is important to ensure that the divisor does not equal 0 as it is impossible to divide by zero.
Additional Variable Actions
All actions listed below, except for POWER, MODULUS, and ROUND, are available as field property actions, and a more detailed explanation is available in the Outbound Template Field section of the documentation.
- POWER
- MODULUS
- ROUND
- ABS
- Area conversions
- CEILING
- FLOOR
- Temperature conversions
- Length conversions
- Volume conversions
Variable Collection Editor
Overview
A Variable Collection is used to collect sets of variables, which perform a mathematical calculation or to concatenate multiple pieces of data. The result is a new collection of data that you can use elsewhere. The Variable Collection itself does not write the data. To do this, you must map a field to the variable's Collection index, to determine which value in the set to write out. The values produced by the Variable Collection can be used by any other item (field, another variable, sequence, Custom DB field, plugin, Conditional Field List).
A Variable Collection is composed of one or more variable actions. To add the value of two fields together, you would use two variable actions. Likewise, to concatenate two fields, you would use two variable actions. Variable actions are displayed in a list in the middle of the variable editor. To create a new variable action, right-click on the list of variable actions.
The variable itself has only three properties. Everything else belongs to its variable actions. These properties are:
- Variable Name
- Initial Value
- Add to Workflow Session
Variable actions and fields have similar properties. Variable actions have one addition that identifies their type.
Tell me more about Variable Name
The variable Name is simply the name of the variable. The name is important because it allows you to reuse the variable. For variable action types of CONCATENATE, ADD, SUBTRACT, MULTIPLY and DIVIDE, the name may not used. For variable action type COUNT, reuse is important so names are typically used. When creating a variable, enter the name from the Variable Name drop down menu. This new variable will be available in the drop down for reuse. When reusing a variable, select it from the Variable Name drop down menu. For an example of reusing a variable, see the Samples and Tutorials.
Tell me more about Initial Value
When a variable is first created, the value is set to 0 or blank by default. This is dependent on whether the variable is being used to perform a mathematical calculation or to concatenate multiple pieces of data. To set the initial value to something else, enter the value here.
Tell me more about Add to Workflow Session
Workflow Session Data is any data from other fields or variables you choose to have placed in the Workflow Session. A Workflow Session starts when a transaction starts and ends when the transaction ends. To place field or variable values in the Session, select the check box for the field or variable named 'Add to Workflow Session'. By placing the value of this variable into the Workflow Session, you can access the value from another Outbound Template that processes after this one during a transaction. You can also access the value of this variable for use in a file name or file directory.
Apply Field Properties
The default value placed in the Workflow Session is the raw value derived from the inbound data. If you want the properties on this screen to be applied to the value BEFORE it is placed in the Workflow Session, check the box 'Apply Field Properties'.
Tell me more about Variable Actions
Variable actions can be of the following types:
- COUNT
- SET
- RESET
- CONCATENATE
- ADD
- SUBTRACT
- MULTIPLY
- DATE DIFF
- DIVIDE
- Conversion Functions
All other properties for a variable action are the same as for a field. For an explanation of these properties, please refer to the help section for Outbound Template fields.
Tell me more about COUNT
COUNT is used to perform a non-persistent count value for use within the Template. A common use for COUNT is to count the number of records created in the outbound translated data and place the count value in the data trailer. To create a count value that retains its value for more than a single translation, use a sequence instead of a variable.
Tell me more about SET
SET is used to set the value of the variable to the value specified. If any value existed before this SET action is called, that value is now lost. If you are joining a first and last name value together, you must first select the variable action of SET. Map the first name value to this variable action. Next, create a second variable action of CONCATENATE and map the last name to this variable action. Refer to the section: 'Tell me more about CONCATENATE.'
Tell me more about RESET
RESET is similar to SET. It is used to set the value of the variable to the value specified in the 'Initial Value' textbox. If any value existed before this RESET action is called, that value is now lost. When the 'Reset before use' checkbox is checked, a 'RESET' action occurs before the first use of the variable. Otherwise, the 'Initial Value' is preserved until it has been used.
Tell me more about CONCATENATE
CONCATENATE allows you to append multiple values to create a new value. A common use for this is to append a first and last name together. Remember to create a variable action of SET in order to clear the field. Map your first value (i.e. first name) of your concatenation/join in the SET variable action. Create a second variable action of CONCATENATE and map your next value in the CONCATENATE variable action (i.e. last name). Because the individual variable actions allow advanced properties for CHAR field type, it is even possible to append portions of field values together.
NOTE: When using CONCATENATE, set the first variable action type to SET. This action 'sets' the initial value of the variable. Each variable action after that should be of type CONCATENATE.
Tell me more about ADD
ADD allows you to add the numerical values of multiple fields together. A common use for this is to add individual order item costs together while looping over an order and then displaying the order total at the end of the outbound translated data. Because variable values can be used in any other Outbound item, it is also possible to use a Conditional Field List to check if the total order cost is greater than a specific amount and perform additional business logic. Another example would be to pass the variable value into a plugin which then calls an external program to calculate tax and return the total tax to place in the outbound translated data.
ADD can also be used to add time increments to a DATE. For example, if you create the first action as SET and assign a DATE field to it. You can then create a second action as ADD and add minutes, hours, days...etc. to the value of the DATE field.
NOTE: When using ADD, set the first variable action type to SET. This 'sets' the initial value of the variable. Each variable action after that should be of type ADD. It is possible to perform more than the ADD calculation to this variable. The first variable action would be SET, the second variable action could be ADD, and the third variable action could be MULTIPLY. You cannot perform CONCATENATE operations on a variable that contains an ADD type.
Tell me more about SUBTRACT
SUBTRACT allows you to subtract the numerical values of multiple fields together.
NOTE: When using SUBTRACT, set the first variable action type to SET. This 'sets' the initial value of the variable. Each variable action after that should be of type SUBTRACT. It is possible to perform more than the SUBTRACT calculation to this variable. The first variable action would be SET, the second variable action could be SUBTRACT, and the third variable action could be MULTIPLY. You cannot perform CONCATENATE operations on a variable that contains a SUBTRACT type.
Tell me more about MULTIPLY
MULTIPLY allows you to multiply the numerical values of multiple fields together.
NOTE: When using MULTIPLY, set the first variable action type to SET. This 'sets' the initial value of the variable. Each variable action after that should be type MULTIPLY. It is possible to perform more than the MULTIPLY calculation to this variable. The first variable action would be SET, the second variable action could be MULTIPLY, and the third variable action could be DIVIDE. You cannot perform CONCATENATE operations on a variable that contains a MULTIPLY type.
Tell me more about DATE DIFF
DATE DIFF Variable Action returns the count (as an integer value) of the specified date part boundaries crossed between the specified first Set Date Variable Action and the second Date Diff variable Action. The DATE DIFF Variable Action provides the ability to specify the Interval in the calculation.
NOTE: IF First
Variable Action is Set to Date data type, then on the next action add
DATE DIFF to the list of Variable Actions.Upon selecting DATE DIFF,add Date
to the Field Types.
Date Interval:
year = Yearmonth = month
day = Day
week = Week
hour = hour
minute = Minute
second = Second
date1 and date2 maxformat: yyyy/MM/dd HH:mm:ss:SS
Tell me more about DIVIDE
DIVIDE allows you to divide the numerical values of multiple fields together.
NOTE: When using DIVIDE, set the first variable action type to SET. This 'sets' the initial value of the variable. Each variable action after that should be of type DIVIDE. It is possible to perform more than the DIVIDE calculation to this variable. The first variable action would be SET, the second variable action could be DIVIDE, and the third variable action could be ADD. You cannot perform CONCATENATE operations on a variable that contains a DIVIDE type. It is important to ensure that the divisor does not equal 0 as it is impossible to divide by zero.
 Mapping Mode
Overview
When the mapping mode is selected for the Outbound Template screen, the center of the Outbound Template screen is used to display the Source Record layout, which is the Inbound Template Dependendcy selected for this Outbound Template. The center area is used to display where the outbound data is mapped from. Black dashed lines indicate inbound data, blue lines indicate mapping from an Item (Variable, CustomDB, Plugin, Field, etc).
Drag and Drop fields
From the Mapping panel, you can drag Records and Fields ("items") directly from the Source Record Layout to the Record Navigator for this Outbound Template. This allows you to quickly add these items to the Outbound Template. When an item is dragged, all of its properties are brought with it, including the mapping to the item itself.
Two options are available in drag and drop mode; adding and linking. To add an item to the Outbound Template, simply drag it over to the Record Navigator for the Outbound Template and let go on the outbound item you wish to have it placed under. This will create a new item in the Outbound Template.
Linking fields
Linking allows a dragged field to have its properties set on the field onto which it is dropped. Linking does not create a new Field in the outbound template, it only changes the mapping of the field onto which it is dropped. By default, 'Adding' mode is selected. To enable the 'Linking' mode, select the check box next to the Drag and Drop button in the tool bar above as shown:
Show Mapping Structure
Several buttons allow the user to display or hide all mappings, show/hide all Records and Sub-records.
By clicking on the Show All References button, purple lines will be displayed to show where the selected Item is being used. This allows the user to see where an Item is being set and where its being used throughout the outbound template.
NOTE: To go back to the normal mode, click on the Mapping icon that is depressed in the main Tool Bar. The Source Layout will disappear and the normal item editor and help screens will return. In addition, this help screen will disappear and the Template Properties editor will return.
Comment Editor
Overview
A Comment is used for documentation purposes on the template. A Comment Item does not produce data during translation.
Tell me more about Comment
A Comment item provides the ability to add text for documentation purposes. A tool tip will display when hovering over the Comment item in the Tree.
Action Editor
Overview
An Action is used to perform an action while the outbound template is being processed. The only supported Action at this time is "Close CustomDB Results".
The action "Close CustomDB Results" will be applied against the selected CustomDBField and will close the associated Database Cursor and Result Set. It's useful when you execute a CustomDBField and do not loop over the results. The Cursor and Result Set for a CustomDBFields are automatically closed when you finish looping over the CustomDBField with a outbound Record.
The Action itself has only three properties. These properties are:
- Action Name - The name of the Action.
- Action - The action to perform. I.e Close CustomDB Result
- Custom DB Field - The Custom DB Field that the Action will be performed against.
Tell me more about Action Name
The Action Name is simply the name of the Action.
Tell me more about Action
- Close CustomDB Results
Tell me more about Close CustomDB Results
Close CustomDB Results is used to close the DB connection for the selected Custom DB Field.
Tell me more about Custom DB Field
The Custom DB Field is the item that the Action will be performed against.
Workflow Screen
Overview
A Workflow is used to emulate a business process within your organization or to integrate BridgeGate with existing systems to accomplish a similar purpose. A typical Workflow involves capturing data from one or more locations, translating it into other data formats and then sending the resulting translated data to one or more destinations. Additionally, you can forward captured data to one or more destinations without it being translated.
This is accomplished by using the following types of actions within a Workflow:
- Get Data - (Captures data from a source by using virtually any protocol.)
- Translate - (Action used to perform the actual translation.)
- Send Data - (Sends data to a destination. You can send captured data that has not been translated or you can send translated data that was the result of a Translate action.)
- Variable - (Create and reference variables at the workflow level.)
- Item List - (Logically group actions together. The grouped actions will be triggered based on a failed IF condition.)
- Item List(ELSE) - (Logically group actions together. The grouped actions can be triggered based on a condition.)
- Plugin - (Call a program or script outside of BridgeGate. Data can be passed to this external process as well as returned from it.)
- Call Workflow - (Used to call another Workflow which becomes a sub-workflow to the current one.)
- Trading partner Lookup - (Perform a lookup of Trading Partner data.)
- Action - (Perform actions
against adapters or the workflow session.)
- Rollback - (Used to undo a transaction on the adapter.)
- Commit - (Used to finalize a transaction on the adapter.)
- CloseAllCachedConnections - (Used to close all currently cached DataBase connections.)
- Stop All Workflow Processing - (Used to stop all transactions associated with a workflow execution.)
- Comment - (Used to document the workflow.)
- Error Handler - (Trap errors or other events/messages to alter flow, or to notify users or processes.)
These workflow items can occur in any order and can execute conditionally, based on any number of parameters needed to determine their execution.
The screen consists of the following sections:
- Workflow Group Navigator
- Item Navigator
- Item Editors
- Help Screens
Workflow Group Navigator
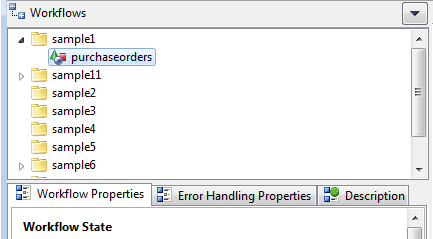
The Workflow Group Navigator displays all Workflows for the BridgeGate Account, organized by Workflow Group. This is where you select the Workflow to work with. This is also where you create/rename/delete Workflows. Click on the down arrow in the title bar area of this navigator to create/rename/delete an Workflows or simply right click on a template in this navigator. When you create a new Workflows, a wizard is displayed to help you create the type of Workflow you need:

Descriptions Tab
Descriptions are optional and used for documenting the Workflow.
If a description is entered then the Icon on the description tab will have a green dot placed to the right of the existing icon so it is easy to distinguish that the workflow has description content.
Template Properties Editor
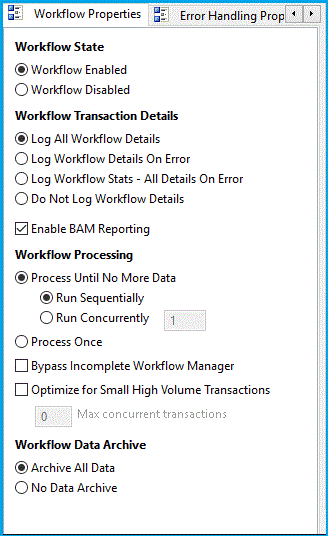
When you select a Workflow from the Workflow Group Navigator, the Workflow will open. The general properties for the Workflow are displayed in the Workflow Properties Editor. Various logging, processing, and archiving options are available here. You can change these settings to customize each Workflow individually.
The Workflow Properties editor is located on the lower left side of the screen below the Workflow Group Navigator. Workflow Properties are located on the 'Workflow Properties' tab. The Workflow Properties Tab is located next to the Error Handling Properties tab. Workflow Properties have been designed to offer optimum processing performance.
Workflow State
This setting controls if the Workflow should be allowed to run.
- Workflow Enabled
- Workflow Disabled
Workflow Transaction Details
This setting controls if a Transaction / Workflow should be logged for future research/reporting in the Portal.
- Log All Workflow Details - Log all Transaction / Workflow Details during processing in Real Time as each workflow item is executed.
- Log Workflow Details On Error - The Workflow / Transaction will only be logged if one of the workflow items has an error.
- Log Workflow Stats - All Details on Error- This option will Log the Transaction / Workflow Details put will not log any Workflow Items. (ie GetData, SendData) All Workflow Item details will be logged on error. This is the preferred Logging for higher volume small transactions.
- Do Not Log Workflow Details - No Logging of Transaction / Workflow Details.
- Log Workflow Details If Data Found True or On Error - Log all Transaction / Workflow Details if the first Get Data in a workflow has data found equals True. It will also log details if no data is found but a Communication, Validation, Translation or Processing error is found.
- Enable BAM Reporting - If this option is selected additional information will be stored about the Workflow that can be used by the Business Activity Monitory Portal Feature.
Workflow Processing
- Process Until No More
Data/Process Once- portion of this section only applies when
the first Get Data Workflow Item has certain connection types.
Otherwise, these controls will be disabled and have no effect.
This setting controls how many files will be processed
when a Workflow processes from a Schedule or
on demand.
- Process until no more data - is selected, the
workflow Get Data will process all files that exist in the Data
Source when the schedule executes. This behavior differs if the
GetData is a BridgeGate capable Service. In the latter case ,
setting this option with a concurrent value greater than 1 will
reject any calls to this workflow after the actual number of
concurrently running workflows exceeds this value, and will
continue to reject until the actual number decreases below the set
value.
- Run Sequentially - one file will be processed at a time. For example, if five files exist for processing, the Get Data will pick up one file at a time and process it.
- Run Concurrently - the amount of files processed will be determined based on the amount entered in the box. Valid values are 1 - 50. For Example, if 20 files exist for processing and the Concurrent amount is set to 5, then 5 files will be picked up and processed at once.
- Process Once - is selected, the workflow Get Data will process only one file from the Data Source when the Schedule executes.
The three options above only work with the following Adapter types:
- BridgeGateFTP
- BridgeGateMSMQ
- BridgeGateMQSeries
- MSMQ
- MQSeries
- File
- SSH
- FTP
- Process until no more data - is selected, the
workflow Get Data will process all files that exist in the Data
Source when the schedule executes. This behavior differs if the
GetData is a BridgeGate capable Service. In the latter case ,
setting this option with a concurrent value greater than 1 will
reject any calls to this workflow after the actual number of
concurrently running workflows exceeds this value, and will
continue to reject until the actual number decreases below the set
value.
- Bypass Incomplete Workflow Manager - feature is used to control what will happen to the Workflow if it is in a Processing Status and the BridgeGate Server restarts. If checked then this Workflow and the respectful Workflow Item(s) that are in a Processing Status will be set to an Error Status instead of continuing to process via Incomplete Workflow Manager.
- Optimize for Small High Volume Transactions - feature
should be used for small inbound data and high volume transactions.
This feature will enable the optimization for small transactions.
- Max concurrent transactions - The Max Concurrent Transaction box should be the upper limit or peak of concurrent transactions for the selected workflow.
Workflow Data Archive
This setting will allow you to control if data should be archived or not. When transactions process, a copy of the inbound and translated data is saved to the following location C:\bridgegate\data_archive (this setting is configurable in the Bridgegate.xml). This setting helps save disk space by eliminating the need to save a copy of the inbound or translated data. You will not be able to obtain a copy of the inbound data or translated data via the Portal if you select this option.
- Archive All Data
- No Data Archive
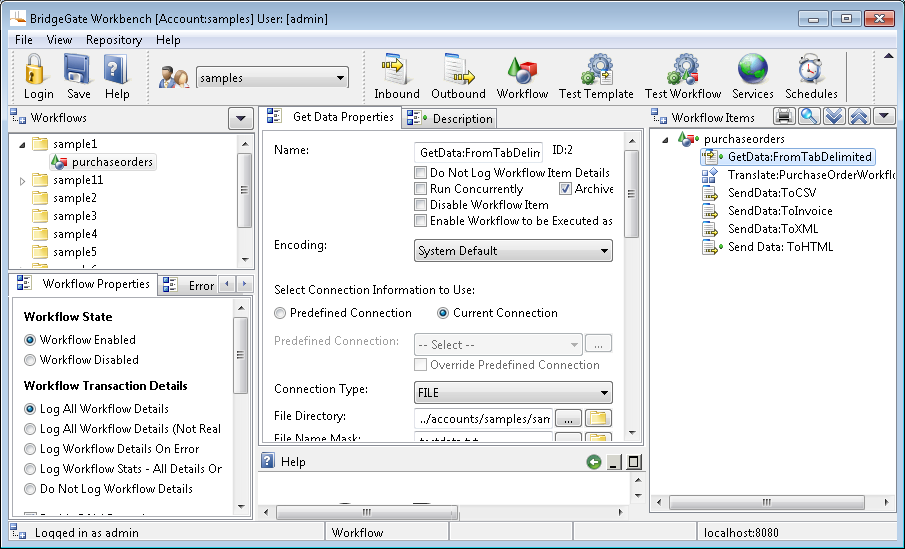
Workflow Item Descriptions Tab
Workflow Item Descriptions are optional and used for documenting the Workflow Item.
If a description is entered then the Icon on the description tab will have a green dot placed to the right of the existing icon so it is easy to distinguish that the workflow has description content.
Additionally the icon next to the Workflow item in the Workflow Item Navigator will have a green dot placed to the right of the existing icon so it is easy to distinguish that the workflow item has description content.
Workflow Item Navigator
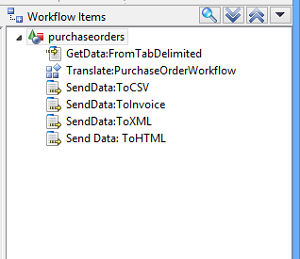
The Workflow Item Navigator displays all of the Workflow items that make up the Workflow. To create new Workflow items, click on the down arrow in the title bar of the Workflow Item Navigator or right click in the Workflow Item Navigator to show the following popup menu:
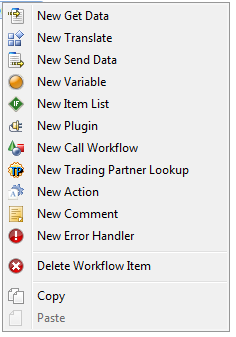
The new Get Data, Translate, Send Data, Variable, Item List, Plugin, Call Workflow, Trading Partner Lookup, Action or Error Handler will be created directly under the currently selected item in the Workflow Item Navigator. If you select Delete, the currently selected item will be deleted. You can copy/paste items as well as drag them around within the Item Navigator.
Get Data Editor
Overview
A Get Data action tells the Workflow to capture data from the location specified using the protocol specified. You can specify the information for the connection on the Get Data screen. Select the type of connection, then enter the information needed for the specific connection.
It is recommended that you set up Predefined Connections and use them for your Connection information. This way, you can reuse the information for the connection in other GetData actions. If you use a Predefined Connection, the connection information is still displayed. This enables you to override some of the connection details. For example, if a Predefined Connection was created for an FTP connection, you can override the directory on the FTP server from which the data is being captured.
Tell me more about File Decompression
You can configure a GetData to retrieve and uncompress files in the ZIP, GZ, TGZ, TAR, JAR or RAR formats and optionally decrypt ZIP, JAR and RAR files by providing the appropriate password. The Compressed file can contain one or many files. The Compressed file can contain one or many files. If the Compressed file contains more than one file you must use the Specify Decompression Directory feature and use a Second Get Data to get the desired file.
Decompression applies only to the following Connection Types:
- BridgeGateFTP
- BridgeGateHTTP
- Email (with attachment)
- File
- HTTP
- FTP
- Command Prompt
To set up a Workflow to Get and Decompress a compressed file, you must have two GetDatas when the Compressed file contains more than one file:
- The first GetData Retrieves the Compressed file, and Uncompresses it to a directory location that you specify. This is the only action that this GetData will perform.
- The second GetData will actually retrieve the Uncompressed files for Workflow processing, from the directory you decompressed the files to on the first GetData. It works the same as a normal GetData.
To configure the first GetData to retrieve and decompress files, check the Use Decompression checkbox. Two fields will appear, allowing you to enter the following parameters:
| Field Name | Description |
| Specify Decompression Directory | Indicates that you want to place the decompressed files in a location other than the BridgeGate™ default location. |
| Decompression Directory | The name of the directory where the uncompressed files should be placed. You must configure the second GetData in your Workflow to point to this directory. |
| Password | Indicates that you want to decrypt the file using the provided password. Only available for ZIP, JAR, RAR types. |
| The password that should be used for decryption. |
To configure the second GetData to retrieve the uncompressed files for processing, set it up like a normal GetData, and enter the following:
- In the File Directory field, enter the location you entered in the Decompression Directory field on the first GetData.
- In the FileNameMask field, enter the mask for the file(s) you want to process.
Note: Do not check the Use Decompression checkbox on the second GetData, because this GetData is not actually decompressing anything; it's retrieving uncompressed files for further workflow processing.
Tell me more about Quality of Service
You can configure this Get Data action to continue retrying to capture the data in the event an attempt failed. To use this feature, check the box for Quality of Service. Enter in the number of retries before failing and the amount of time (in seconds) to wait between retries. Optionally you may specify the Retry Interval using Session Data by checking the "Use Session Data" checkbox and then making the desired selections via the button that launches the "Second(s) Workflow Session Value Wizard".
Tell me more about File Transfer Protocols
Available protocols include FTP (non secure, SSL, SSH) and SSH.
-
What is
FTP : (F)ile (T)ransfer (P)rotocol is used to
connect two computers over the Internet so that the
user of one computer can transfer files and perform
file commands on the other computer.
Specifically, FTP is a commonly used protocol for exchanging files over any network that supports the TCP/IP protocol (such as the Internet or an intranet). There are two computers involved in an FTP transfer: a server and a client. - When to use FTP: FTP is easy to use and can be used when security is not a primary issue. For example, if a transmission is to occur over an intra-net connection, rather than over the Internet. When you select FTP as the Connection Type, a group of entry fields will be displayed that are specific to setting up this type of connection. In addition, an 'Options' button will be displayed after the last of these fields. This allows you to specify whether or not a secure connection should be used, and the type of security to be used. You can select SSL or SSH. If an unsecured FTP connection is satisfactory, do not select either of these two options.
- What is FTP over SSH : Sometimes referred to as secure FTP. This refers to the practice of tunneling a normal FTP session over an SSH connection.
- What is SFTP: This is a network protocol that provides secure file transfer and manipulation facilities over the secure shell (SSH) protocol. This is typically meant in the context of file transfer.
- What is FTPS : Commonly referred to as FTP/SSL, is a name used to encompass a number of ways in which FTP software can perform secure file transfers. Each way involves the use of SSL/TLS layer below the standard FTP protocol to encrypt the control and/or data channels. It should not be confused with SSH file transfer protocol.
- When to use FTPS: The most common uses of FTP and SSL are: AUTH TLS or Explicit FTPS, named for the command issued to indicate that TLS security should be used. The client connects to the server port 21 and starts an unencrypted FTP session as normal, but requests that TLS security be used and performs the appropriate handshake before sending any sensitive data. AUTH as defined in RFC 2228. Implicit FTPS is an older, but still widely implemented style in which the client connects to a different port - usually 990, and a SSL handshake is performed before any FTP commands are sent.
- What is SSH : SSH or Secure Shell is a set of standards and an associated network protocol that allows establishing a secure channel between a local and a remote computer. It uses public-key cryptography to authenticate the remote computer and, optionally to allow the remote computer to authenticate the user. SSH provides confidentiality and integrity of data exchanged between the two computers using encryption and message authentication codes (MACs).
- When to use SSH: SSH is typically used to log into a remote machine and execute commands, but it also supports tunneling, forwarding arbitrary TCP ports and X11 connections; it can transfer files using the associated SFTP protocols. An SSH server, by default, listens on the standard TCP port 22.
Tell me more about Email
You can tell this Get Data action to retrieve data from a POP3 or IMAP Server
BridgeGate™ supports POP3 and IMAP Servers. Connections can be secured with TLS and/or SSL. You will need to have your username and password along with the URI for the desired mail server.
Emails can be processed in three ways; process the body of the email, process the first attachment, or store all attachments in a folder that can be processed by a file GetData in a child workflow.
- When the "Read Data" drop down is set to "From Body" only the contents(body) of the email will be processed.
- When the "Read Data" drop down is set to "From Attachment" only the first attachment is processed.
-
When the "Read Data" drop down is set to "Write
Attachments" all attachments are stored in a
temporary folder in the data archive location. The
temporary folder's name can be retrieved from this
email adapter's session variable called: "Email
Attachment Folder"
- To loop over the attachments, create a child workflow with a File GetData whose file location is set to the parent workflow's "Email Attachment Folder." Files can be filtered using the standard File GetData syntax.
- Also note that when "Write Attachments" is selected the body of the email is still the output data of the GetData, allowing the processing of all attachments and the body of an email.
Tell me more about Decryption
You can tell this Get Data action to decrypt the data captured using any of the available Decryption algorithms. Each type of decryption requires different information and usually involves a decryption key or password.
When a Get Data is being archived and Decryption is completed, a copy of the Encrypted and Decrypted file is available in the Portal. The 'Remove Archive of Decrypted File' checkbox provides the ability to only keep a copy of the Encrypted file in the Data Archive.
GPG Decryption
BridgeGate™ supports GPG encryption and decryption. To utilize this feature, you must first install the GPG software and configure BridgeGate™ accordingly. See the PGP-GPG Configuration Guide for instructions.
To configure a SendData for GPG decryption, check the box for using Decryption, then enter the password for the keypair used when the file was encrypted. The file should decrypt properly when the workflow is executed.
Tell me more about Database Connections
If you are creating your own Database Connection, the format for the database URL is as follows:
://:/ (note that the port may be optional) or for Oracle, @:/
As an example for some commonly-used databases:
- For MySQL, you may use: jdbc:mysql://192.168.0.100/myDatabaseName?useSSL=false
- For SQLServer, you may use: jdbc:jtds:sqlserver://192.168.0.100.123/myDatabaseName
- For Oracle, you may use: jdbc:Oracle:thin:@192.168.0.100:1521:myDatabaseName (SID)
- For DB2 you may use: jdbc:db2://192.168.0.100:50000/sample
- For Microsoft Access, use the jdbc:odbc bridge driver in the URL: jdbc:odbc:myDatabaseName
For MySQL databases using Unicode characters, you
may need to specify a UTF-8 character encoding. For
example:
jdbc:mysql://192.168.0.100/myDatabaseName?useUnicode=true&characterEncoding=UTF-8&useSSL=false
If you are using ODBC with Microsoft Access, you may connect from your templates as with the other database types, but you will not be able to use the quick field feature to add fields directly from the database like you can with the other supported databases. You may also be required to first register your Access database in the System DSN.
Tell me more about FTP Connections
The "File Directory" is the root directory where BridgeGate™ will begin looking for files on the FTP Server that meet the"File Name Mask". The "File Name Mask" can be a filename or a combination of sub-directory and filename. The FileName Mask supports wild card pattern matching on both the File Name and sub-directories.
If you use a Wild Card pattern in the File Name Mask field for File or FTP Get Data types, a transaction/workflow will be instantiated for every file meeting the wild card pattern. For example, if you use FTM*.txt in the File Name Mask and the following files exist (FTM01.txt, FTM02.txt, FTM03.txt), three transactions/workflows will be generated. This happens regardless of where the Get Data is located in the workflow.
Examples:
| EDI*.txt | will process all files that start with EDI and ends with .txt |
| **/EDI*.txt | will process all files that start with EDI and ends with .txt in any sub-directory under the File Directory |
| ** | will process all files in all sub-directories under the "File Directory" |
| **/*.txt | will process all files in all sub-directories that ends with .txt |
| **/in/** | will process all files in any "in" folder or subfolder |
| **/in*/*.txt | will process all *.txt files in any subfolder that starts with "in" Example: income |
When connnecting to a BridgeGate™ FTP server using SSH
the standard usage would be to NOT provide a "File
Directory" or to NOT start the "File Directory" with a
slash so that the root directory is relative to the
User's default account configured via the Portal's User
administration section.
When a "File Directory" begins with a slash the root
directory is relative to the VFS_ROOT configured in the
bridgegate.xml's FTP_SSH_CONFIG section.
Contact customer support for additional help.
Tell me more about File Processing
File processing using BridgeGate™ can include fully qualified file and directory paths, using local files or remote network files. The "File Directory" is the root directory where BridgeGate™ will begin looking for files that meet the "File Name Mask". The "File Name Mask" can be a filename or a combination of sub-directory and filename. The File Name Mask supports wild card pattern matching on both the File Name and sub-directories.
If you use a Wild Card pattern in the File Name Mask field for File or FTP Get Data types, a transaction/workflow will be instantiated for every file meeting the wild card pattern. For example, if you use FTM*.txt in the File Name Mask and the following files exist (FTM01.txt, FTM02.txt, FTM03.txt), three transactions/workflows will be generated. This happens regardless of where the Get Data is located in the workflow.
Examples:
| EDI*.txt | will process all files that start with EDI and ends with .txt |
| **/EDI*.txt | will process all files that start with EDI and ends with .txt in any sub-directory under the File Directory |
| ** | will process all files in all sub-directories under the "File Directory" |
| EDI????.txt | will process all files that start with EDI and have four more characters and ends with .txt If a file has five characters it will not be processed |
| **/in/** | will process all files in any "in" folder or subfolder |
| **/test/**/XYZ* | will process all files that start with "XYZ" and where there is a parent directory called test (e.g. "abc/test/def/ghi/XYZ123"). |
| *.txt;*.xml | If you have multiple file masks you can
separate them with a ; This example will process all files that have the file extision .txt OR .xml |
| *3k*;*5m*;*111m* | This example will only get files that have 3k or 5m or 111m in the file name. All other files will remain in the folder. |
Options
The 'Minimum File Age' option specifies the shortest amount of time a file must exist before being selected for processing.
The 'Sort By' option specifies the order in which to process the available files, e.g. by largest/smallest file(File Size), or Alphabetically a-z/z-a (File Name), or oldest/newest first(File Age)
The File and Directory names can be dynamically generated by using the ... button next to the text area. This option will allow the File or Directory name to be created by using other Session or System variables or data.
An additional option for file processing is "Do Not Delete Files". If this option is enabled, BridgeGate™ will process the file but will not delete the file after processing. Note that if you have a schedule the same file will be processed multiple times.
When the File Connection Type is Enabled as a Service, and the "Do Not Process Duplicate Files" is checked it will process a file when it meets the File Directory/File Name Mask settings. When it processes the file it retains the file name in memory. If a file with the same name is placed in the same location it will not process it again until BridgeGate™ restarts or another file with a different file name is placed in the same location and processed. If a file with the same name but a different file last modified date is placed in the same location it will process the file. When "Do Not Process Duplicate Files" is unchecked BridgeGate™ will process files with the same file name as they meet the File Directory/File Name Mask settings.
When the File Connection Type is Enabled as a Service, and the "Run On Primary Server" is checked BridgeGate™ will run the service only on the Server identified as the Primary Server:
- In a non-clustered configuration the Primary Server is the local server.
- In a clustered configuration the Primary Server is the server where the Scheduler is currently running at the time the service list is updated.
- When the Scheduler is NOT running on any server in a clustered configuration then the Primary Server is the first server in the Cluster List sorted by IP address. NOTE: ensure that all servers in the Cluster use the same IP entry for each node in the cluster so that all servers will have the list sorted the same way.
When the File Adapter is Enabled as a Service, and the "Enable Distributed File Processing" is checked BridgeGate™ will distribute the File processing across the cluster when BridgeGate™ is running in a clustered environment. The actual service which coordinates and maintains the list of files to be processed will always reside on the Server identified as the Primary Server. See the "Run On Primary Server" section above for more information on what constitutes the Primary server. NOTE: This feature should only be enabled when the File Adapter is referencing a shared file system that all servers in the cluster have read and write permissions.
If multiple files match the file mask BridgeGate™ can be configured to process them concurrently. Select the "Run Concurrently" option on the Workflow Properties screen and enter the number of files to run concurrently. This will greatly increase the overall throughput from processing one file at a time to processing multiple files.
Tell me more about Command Prompt
You can configure this Get Data action to launch an external process on the system hosting BridgeGate™. Whatever this process writes to its standard output stream will become the data passed on to subsequent workflow steps.This adapter uses the following parameters:
- Executable: This is the name of the executable file on the host system. If this file is not on the system path, you must enter the fully-qualified path to it.
- Arguments: These are the command-line arguments that will be passed to the executable. They can include BridgeGate™ session variables using %VAR_NAME% syntax.
- File Name: When a script (see below) is saved with the workflow, BridgeGate™ will use this as the name of the temporary script file. You can leave this field blank and BridgeGate™ will automatically generate a file name for you. However, when executing Windows batch files, you must specify a file name ending in ".bat".
- Script: BridgeGate™ will write the contents of this field to a temporary file using the encoding specified for this Get Data for use by the external process. To pass the file name of the auto-generated script as an argument to the executable, enter it as "%FILENAME%".
- Stream Args: When this option is selected, arguments will be written to the standard input stream for the external process, using the encoding specified for this Get Data.
Note: If you are attempting to execute a Windows Batch File (YOUR_FILE.bat) you must include the following:
- Set the executable to be "cmd".
- Make the first text of the Arguments text box "/c C:/YOUR_FILE.bat". The /c is required to tell the Windows CMD this is a batch file to be executed. The Arguments text box should include the fully-qualified file name for the batch file. (C:/YOUR_FILE.bat).
Tell me more about Web Services
This is not to be confused with BridgeGate™ Web Service. BridgeGate™ Web Service is a feature that allows BridgeGate™ to expose a Web Service for others to connect to, while Web Service allows BridgeGate™ to connect to other external Web Services. You can configure this Get Data action to connect to a Web Service running on a remote machine. The easiest way to configure this type of connection is to use an available WSDL file that defines the operation you wish to invoke. If no WSDL file is available, you can manually enter the necessary configuration.
The Use WSDL option will function as follows:
- Select the Use WSDL check box. This will disable the Target Namespace , Request Element , and SOAP Action inputs. This also disables adding or removing parameters from the In Values and Out Values trees.
- Select or enter the location of a WSDL file, which can either be a local file or a valid URL.
- Select the desired SOAP binding within the WSDL file. Please contact BridgeGate™ support if you need to use a binding type other than SOAP.
- Select an operation from those defined for the selected binding.
- [Optional] If the WSDL has any "service" elements, which indicate a live, running implementation of the binding, then you may select one.
- The Service Endpoint URL (if selected in #5), Target Namespace, Request Element , and SOAP Action attributes will be populated. The In Values and Out Values trees will also be populated, though you still must define the details of how each parameter is populated or used.
At run time, the web service adatper will use the settings from the Operation tab as follows:
- Service Endpoint URL : This is the URL of the "service endpoint" (the actual deployed, functioning location of the service implementation). This attribute is required.
- Target Namespace : This is the target namespace of the XML elements that will be sent to the web service. This attribute is not required for all services, but may be required for the particular web service you are connecting to.
- Request Element : This is the name of the top-level request element to send inside the SOAP request's body. It is typically the same as the name of the web service operation to perform. This attribute is required.
- SOAP Action : This is the URI sent in the "SOAPAction" header. This attribute is not required for all services, but may be required for the particular web service you are connecting to.
- Username and Password : The user name and password to be sent as part of HTTP basic authentication. These attributes are not required for all services, but may be required for the particular web service you are connecting to. If you need to use additional forms of authentication, such as WS-Security, please contact BridgeGate support.
- Timeout : The number of seconds to wait before the web service call will timeout. If empty uses default: 30secs.
- Use SOAP Response Body as Result : If this box is checked, the entire contents of the SOAP Body (XML) will be written to a file as the result of the Get Data. Otherwise, you must select the Use as Result option on one of the out parameters to produce a data file for this Get Data.
The In Values tab allows you to define how the parameters sent to the remote web service are generated. Note the following:
- All attributes for the selected in value are the same as the In Values tab for Plugins.
- The context menu on the In
Values tree has the following two items:
- Add In Value… : Prompts you for the name of the in value and then adds it to the tree.
- Delete Selected In Value : Deletes the selected In Value.
The Out Values tab allows you define how the parameters returned from the invoked web service are processed. Note the following:
- The context menu on the Out
Values tree has the following two items:
- Add Out Value… : Prompts you for the name of the out value and then adds it to the tree.
- Delete Selected Out Value : Deletes the selected Out Value.
- Use as Result : Selecting this will write the textual content of the selected Out Value to a file as the result of the Get Data. This option is ignored (at process time) when Use SOAP Body as Result is selected on the Operation tab.
- Add to Workflow Session : Selecting this allows you to name a session variable where the returned value of this parameter will be stored for use by later workflow items.
Tell me more about BridgeGate™ Web Service
This is not to be confused with Web Service. BridgeGate™ Web Service is a feature that allows BridgeGate™ to expose a Web Service for others to connect to, while Web Service allows BridgeGate™ to connect to other external Web Services. You can configure this Get Data action to listen as a Web Service on the BridgeGate™ server(s) that you transfer this workflow to.
There are two tabs available for configuration:
- Service
- Operation
Service Tab will need the following:
- Service Endpoint URL : This is for display purposes only to show you the Service Endpoint URL that a remote web service client would connect to, based on the BridgeGate™ server you are currently logged in to.
- Service Name : This should be unique for each BridgeGate™ Web Service Adapter. The Service Endpoint URL will reflect the name you enter here. Once the workflow is completed and Transfered to the server, you can verify that the WSDL is accessible by opening the Service Endpoint URL in the browser suffixed with ?WSDL
- Target Namespace : This is the target namespace of the XML elements that will be sent as the response to invoking this web service. This attribute is not required for all services, but may be required for the particular web service you are implementing.
- Result : Select Inbound Value only if the inbound and outbound are non-XML datatypes. Use either SOAP Envelope or SOAP Body if both inbound and outbound are XML datatypes.
- Send Synchronous Response : If this box is checked, a synchronous response will be sent to the client invoking this BridgeGate™ web service.
- Send Synchronous Response as SOAP Body : This box is only available if Send Synchronous Response is checked. Selecting this will stream the entire contents of the Send Data linked to this synchronous response into the SOAP response body. This requires that the Send Data in question produces a valid XML document. For XML datatypes ( most common web services ) this should be checked.
Operation Tab will need the following:
- Operations : More than one operation can be added for the service by right-clicking in the multi-line box and choosing New Operation .
- Operation Name : This should be unique for each operation.
- SOAP Action : While SOAP Action can be same as the Operation Name, it needs to be unique per operation. The selected operation will be executed based on the SOAP Action sent by the Web Service Client.
- Request : The request tab will allow the selection of an inbound template from any workflow group.
- Response : The response tab will allow the selection of an outbound template from any workflow group. It is reccomended to use XML inbound templates with XML outbound templates and non-XML inbound with non-XML outbound templates..
Tell me more about AS2
AS2 (Applicability Statement 2) is a specification about how to transport data securely and reliably over the Internet . It is described in detail in RFC 4130 .
Data can consist of Electronic Data Interchange (EDI) messages but may be of any other message type. AS2 specifies how to connect, deliver, validate and acknowledge data. AS2 creates an envelope for a message which is then sent securely over the Internet. Security is achieved by using digital certificates and encryption.
An implementation of AS2 involves two machines, a client and a server , communicating with each other over the Internet. On the operating system level, the AS2 client may be a server, too, offering its communication services to application software. The client sends data to the server, e.g. a trading partner. On receipt of the message the receiving application sends an acknowledgment or MDN (Message Disposition Notification) back to the sender.
Tell me more about BridgeGateHTTP
BridgeGateHTTP is a service capable connection type, when enabled it allows users to receive HTTP transmissions of data either attached (as a file) or passed across the URL as a parameter.
- URL Preview - the URL preview is constructed as expected parameters are added or certain switches (checkboxes) enabled. This preview should provide an example of how to call (from browser or other http client) the BridgeGateHTTP service.
- Use Decompression - only enabled when expect to "receive POST data", which implies that data will be received as a (compressed) file and not from a URL parameter.
- Send Synchronous Response - will stream the entire contents of the Send Data linked to this synchronous response into the SOAP response body. This requires that the Send Data in question produces a valid XML document.
- Authenticate - when enabled,
will explicitly require all inbound http
transmissions to contain valid user & password
credentials; also this credential must have the
BGHTTP protocol rights enabled (protocol right
located in the user cfg. in the Portal). Caution:
when this option is not enabled will allow any
anonymous http transmission to occur while the
BridgeGateHTTP service is enabled.
There are three places the authentication is received and in this order.
- HTTP BASIC:The http header is checked for key called "Authorization". This will have, as value the word "BASIC" followed by a space or tab followed by Base64 encoded string of username:password
- HTTP Header:The header is checked for keys username and password. If exists will be used to authenticate
- Form Fields or URL Parameters:The URL parameters or the Form fields are checked for username, password fields
- Receive POST Data - when enabled, expect to use source data received in an http transmitted data stream as a POSTed file and not use source data from a URL parameter.
The expected parameters (from the URL) mapping window allows you define what parameters will be accessible.
- Use as Source Data - if receive POST data not enabled, then what parameter will be used as the source data (only one allowed) .
- Add to Workflow Session - what parameters are accessible, hereon, as session data .
Tell me more about MQ Series
This is not to be confused with BridgeGate™ MQ Series. MQ Series is a feature that allows BridgeGate™ to deliver and retrieve binary or character data to and from an IBM WebSphere MQ Service.
This adapter uses the following parameters:
- Queue Manager Name: The Name of the IBM WebSphere MQ Queue Manager that this workflow will connect too. This attribute is required.
- Destination Type: Queue is point-to-point and Topic is publish-subscriber.
- Destination Name: The Name of the IBM WebSphere MQ Message Queue belonging to the Queue Manager that this workflow will connect too. This attribute is required.
- Host name: The IP or DNS Name of the server where the IBM WebSphere MQ service is running that this workflow will connect too. If the Host Name is entered then BridgeGate™ will connect in Client Mode. If the Host Name is left blank, BridgeGate™ will connect in Binding Mode.
- Port: The Port to be used when connecting to the IBM WebSphere MQ service. This attribute is required.
- User name: The user name to be sent as part of basic authentication. This attribute is optional.
- Password: The password to be sent as part of basic authentication. This attribute is optional.
- Channel: The Name of the channel to use for transport with the IBM WebSphere MQ Queue Manager that this workflow will connect too. This attribute is required.
- Timeout(secs): The number of seconds to wait for a message to arrive in the Queue before the workflow will timeout. If left empty then NO timeout will be used and the workflow will attempt to retrieve the message and if NO message is available the workflow will immediately disconnect. If the timeout is set to 0 then the workflow will wait indefinitely or until the IBM WebSphere MQ Queue Manager is shutdown
- Auto Commit: When using Auto Commit, the message will be consumed from the Queue as soon as BridgeGate™ gets the message.
- Transactional Commit : When using Transactional Commit, an Action Workflow Item should be used within the Workflow. The Action Workflow Item will allow the ability for you to control when to Commit or Rollback the message from the Queue. If Transactional Commit is used and an Action Workflow Item does not exist in the Workflow or it exists but doesn't get executed (ie. It is inside an Item List that never executes) then when the workflow completes, the Get Data will Commit.
- Binding Mode: Binding mode is currently triggered by leaving the host name blank. No other Workflow Adapter setting is required. NOTE:Ensure that the BridgeGate™ server was installed following the "Configuring BridgeGate™ to use IBM WebSphere MQ binding Mode" instructions found in the BridgeGate™ Server Installation and Configuration Document.
Tell me more about HTTP
BridgeGate™ can connect to a web location via HTTP. BridgeGate™ allows for the following settings to be configured for HTTP data transmission:
- URL location.
- Custom Header Fields - key/value pairs that will be added to the connection as HTTP Header(s). These keys will be sent exactly as typed.
- UserName, Password fields: These fields when entered will be transmitted as HTTP BASIC Authentication, where the receiver will get a "Authorization" key in the HTTP header and for the value will have the word "BASIC " followed by Base 64 encoded value of the username:password. If recipient required authentication via URL Query String, form fields or specific HTTP Header fields, those have to be used instead.
- Options for file handling:
- Use Decompression - Automatically decompresses compressed files.
- URLEncode - Automatically converts characters into a format that can be transmitted over the Internet.
- Force SSL Host Verification - This should be unchecked by default. This can be enabled if there is problem connection with an HTTPS server URL ( on SSL ) and there is a problem with SSLHandshake. The most common error message in those cases is "unrecognized_name"
- Send Synchronous Response.
Tell me more about BridgeGate™ MQ Series
BridgeGate™ MQ Series is a service capable connection type, when enabled it allows users to continually monitor and retrieve binary or character data from IBM WebSphere MQ as the messages arrive in the designated queue.
This adapter uses the following parameters:
- Queue Manager Name: The Name of the IBM WebSphere MQ Queue Manager that this workflow will connect too. This attribute is required.
- Destination Type: Queue is point-to-point and Topic is publish-subscriber.
- Destination Name: The Name of the IBM WebSphere MQ Message Queue belonging to the Queue Manager that this workflow will connect too. This attribute is required.
- Host name: The IP or DNS Name of the server where the IBM WebSphere MQ service is running that this workflow will connect too. This attribute is required. If the Host Name is entered then BridgeGate™ will connect in Client Mode. If the Host Name is left blank, BridgeGate™ will connect in Binding Mode.
- Port: The Port to be used when connecting to the IBM WebSphere MQ service. This attribute is required.
- User name: The user name to be sent as part of basic authentication. This attribute is optional.
- Password: The password to be sent as part of basic authentication. This attribute is optional.
- Channel: The Name of the channel to use for transport with the IBM WebSphere MQ Queue Manager that this workflow will connect too. This attribute is required.
- Auto Commit: When using Auto Commit, the message will be consumed from the Queue as soon as BridgeGate™ gets the message.
- Transactional Commit : When using Transactional Commit, an Action Workflow Item should be used within the Workflow. The Action Workflow Item will allow the ability for you to control when to Commit or Rollback the message from the Queue. If Transactional Commit is used and an Action Workflow Item does not exist in the Workflow or it exists but doesn't get executed (ie. It is inside an Item List that never executes) then when the workflow completes, the Get Data will Commit.
- Binding Mode: Binding mode is currently triggered by leaving the host name blank. No other Workflow Adapter setting is required. NOTE:Ensure that the BridgeGate™ server was installed following the "Configuring BridgeGate™ to use IBM WebSphere MQ binding Mode" instructions found in the BridgeGate™ Server Installation and Configuration Document.
Tell me more about MSMQ
This is not to be confused with BridgeGate™ MSMQ. MSMQ is a feature that allows BridgeGate™ to deliver and retrieve binary or character data to and from an MSMQ Service.
This adapter uses the following parameters:
- Destination Type: Private or Public Queue. This attribute is required.
- Queue Name: The Name of the MSMQ Message Queue that this workflow will connect too. This attribute is required.
- URL: The URL of the server where the MSMQ service is running that this workflow will connect too. This attribute is required.
- Domain: The Domain to be used when connecting to the MSMQ service. This attribute is required.
- User name: The user name to be sent as part of basic authentication. This attribute is optional.
- Password: The password to be sent as part of basic authentication. This attribute is optional.
-
Transactional:
- Auto Commit: When using Auto Commit, the message will be consumed from the Queue as soon as BridgeGate™ gets the message.
- Transactional Commit : When using Transactional Commit, an Action Workflow Item should be used within the Workflow. The Action Workflow Item will allow the ability for you to control when to Commit or Rollback the message from the Queue. If Transactional Commit is used and an Action Workflow Item does not exist in the Workflow or it exists but doesn't get executed (ie. It is inside an Item List that never executes) then when the workflow completes, the Get Data will Commit.
Tell me more about BridgeGate™ MSMQ
BridgeGate™ MSMQ is a service capable connection type, when enabled it allows users to continually monitor and retrieve binary or character data from MSMQ as the messages arrive in the designated queue.
This adapter uses the following parameters:
- Destination Type: Private or Public Queue. This attribute is required.
- Queue Name: The Name of the MSMQ Message Queue that this workflow will connect too. This attribute is required.
- URL: The URL of the server where the MSMQ service is running that this workflow will connect too. This attribute is required.
- Domain: The Domain to be used when connecting to the MSMQ service. This attribute is required.
- User name: The user name to be sent as part of basic authentication. This attribute is optional.
- Password: The password to be sent as part of basic authentication. This attribute is optional.
-
Transactional:
- Auto Commit: When using Auto Commit, the message will be consumed from the Queue as soon as BridgeGate™ gets the message.
- Transactional Commit : When using Transactional Commit, an Action Workflow Item should be used within the Workflow. The Action Workflow Item will allow the ability for you to control when to Commit or Rollback the message from the Queue. If Transactional Commit is used and an Action Workflow Item does not exist in the Workflow or it exists but doesn't get executed (ie. It is inside an Item List that never executes) then when the workflow completes, the Get Data will Commit.
Tell me more about Data String
Data String is the data from a Get Data or Send Data that will be stored on the Workflow Session for subsequent use by other Workflow Items within the current workflow such as Variables or another GetData or SendData Item. The Data String object is acccessed within the existing workflow as Session data by selecting SESSION_DATA as the Source Record Name then selecting the Data String Get Data or Send Data as the Workflow Item and finally selecting "Data String" from the Source Field Name list.
NOTE: Data String is stored in memory so it's use should be restricted to small sized data sources.
Tell me more about BridgeGate™ Socket
BridgeGate™ Socket is a service capable connection type, when enabled it allows users to continually monitor and receive data via a TCP socket endpoint.
This adapter uses the following parameters:
- Port: The Port to be used when listening for incoming data.
- End Of Data Termination: The value to use to identify the end of a stream of data.
- Timeout(secs): The number of seconds to wait before the socket connection will timeout.
- Keep Client Socket Alive: When checked instructs system to NOT close connection.
Tell me more about BAM Connection Monitoring
BAM Connection Monitoring can be Enabled for a Get Data that uses a BridgeGate™ Socket adapter type. Connection Monitoring can be used in conjunction with any of the following BAM Rules, as well as for a Broken Connection.
- SLA Data Received - Will warn/alert you if you have not received data within the Interval
- SLA Data Sent - Will warn/alert you if you have not sent data within the Interval
- Workflow Error - Will Alert you if a Workflow ends in an Error status
- SLA Max Time - Will warn/alert if the workflow processing time has exceeded the set limits (designated as Interval)
- Workflow Queued - Will Alert you if a Workflow ends in an Queued status
NOTE: When Enabled Connection information will be saved in memory for display in the Portal on the BAM Connection Monitor tab.
Translate Item Editor
Overview
A Translate action tells the Workflow to perform a translation on data captured from a specific Get Data action. Basically, a Translate action involves selecting the Inbound Template to use for the inbound data read in and the Outbound Templates to use to translate the data into. For every Get Data action this Workflow contains, at least one Translate needs to occur if the data is to be translated. If the data captured from a Get Data action is to be forwarded only, no Translate action is necessary.
Since BridgeGate" can be used to figure out if the data found is valid and should be read, Inbound Templates are set on items known as Inbound Conditions. Most cases involve using a single Inbound Condition and setting it as the default. For scenarios that are more complex, Inbound Conditions can be used to 'peek' into each file found and determine if they contain the proper Inbound Template to use.
For each Inbound Condition created, one or more Outbound are created and the Outbound Template to use for translation is specified. The data sent to each Outbound Template for translation can be filtered allowing data to be divided among various Outbound Templates. To avoid accidental selection of an Outbound Template that belongs to a different translation, only Outbound Templates that map to the Inbound Template specified in the Inbound Condition are available to choose from.
Tell me more about Inbound Conditions
By creating more than one Inbound Condition for the Translate action, you are telling BridgeGate to 'peek' into the data captured by the Get Data action and determine which Inbound Template to use when reading in the data. This type of Condition is very similar to an Inbound Template's record mappings. In fact, BridgeGate uses the same logic to determine if the condition is true. Consider the case of the following inbound data which is of DELIMITED format:
00,1/25/2002,5:58,1 10,1020992
				20,399,24.95,1,SPECIALIZED WIDGET,GREEN 30,John,,Doe,123 Main
				Street,Jacksonville,FL,32256,904-555-2315
				40,VISA,4111111111111111,7/2004
A comma is used as a Field Delimiter and a Carriage Return (CRLF) is used as the Line Delimiter. Each line will be read and processed serially. This particular format uses the first Field as the record type. If we were specifying the Order Record, we would know when defining the Inbound Template for it that '10' means the line is an Order Record. (00 would be the HEADER, 20 would be the Order Line Item, 30 would be the billing information and 40 would be the payment information). To have this Translate action determine if the file is an Order file, we could look for the second Record to contain the value '10' as the first Field:
- Comparator: EQUALS
- Comparator Value: 10
- Comparator Scope: Field Level
- Record Delimiter: CRLF
- Record Number: 2
- Field Delimiter: , (comma)
- Field Number: 1
BridgeGate" will then check the first Field of the second Record line, as specified by both delimiters, for the exact value of '10'. If this condition is true, then BridgeGate" will assume this Inbound Condition is true and use the Inbound Template specified for this Inbound Condition to read in the data. Furthermore, it will then translate the data using the Outbound Templates specified by the Outbound listed for this Inbound Condition.
Record Mappings are flexible enough to allow comparison at the Field Level or Record Level. For Field Level, a Field is used to evaluate the condition. For Record Level, an exact Begin and End position must be specified for BridgeGate" to extract that portion of data to compare against. The first character is always considered 1 in BridgeGate", not 0. After determining the data to be compared against, the type of comparator and the value to compare against must be specified. The following comparators are currently allowed:
- EQUALS - Exact match of comparator value
- CONTAINS - Comparator value must exist somewhere in the data to be compared
- START_WITH - Data must start with the comparator value
- GREATER THAN - Data must be greater than the comparator value
- LESS THAN - Data must be less than the comparator value
- IS RECORD NUMBER - Data must equal to the current record number.
- IS NUMERIC - Data must be numeric.
- IS DATE - The data must be a Date that matches a specified Pattern entered. If a Pattern is not entered it will validate against the following:"yyyymmdd","yyyy-MM-dd HH:mm:ss.SSSSSS","yyyy-MM-dd HH:mm:ss.SSS","yyyy-MM-dd HH:mm:ss","yyyy-MM-dd","HH:mm:ss","hh:mm:ss a","M/dd/yyyy","dd.M.yyyy","M/dd/yyyy hh:mm:ss a","dd.M.yyyy hh:mm:ss a","dd.MMM.yyyy","dd-MMM-yyyy" If it matches the Pattern then it will return True else False.
- FIELD LENGTH GREATER THAN - Data length must be greater than comparator value.
- FIELD LENGTH LESS THAN - Data length must be less than comparator value.
- ENDS_WITH - Data must end with the comparator value
- EMPTY - Data to be compared must be empty. The Comparator Value is not used
- REGULAR_EXPRESSION - Use the Expression Builder, available using the button '...' to the right of the Comparator Value text field to build and test any POSIX Regular Expression you want. If a value is found for this regular expression, then the condition is true.
Send Data Editor
Overview
It is recommended that you set up Predefined Connections and use them for your Connection information. This way, you can reuse the information for the connection in other SendData actions. If you use a Predefined Connection, the connection information is still displayed. This enables you to override some of the connection details. For example, if a Predefined Connection was created for an FTP connection, you can override the directory on the FTP server to which the data is sent.
Tell me more about File Compression
You can configure a SendData to compress and send files in ZIP, GZ, TGZ, TAR, JAR or RAR formats and optionally encrypt the results for ZIP, JAR and RAR. Each Compressed file can contain one or many files.
Compression applies only to the following Connection Types:
- BridgeGateFTP
- Email (with attachment)
- File
- HTTP
- FTP
- Command Prompt
To Compress and Send one or multiple files, select the Use Compression checkbox and then enter the following parameters:
| Field Name | Description |
| Data Source Type | To Compress and Send one file, select the source of the data (Translated Data, Forward Only, or Static Data). To Compress and Send multiple files, select Local File System. |
| Source File Directory | Replaces Source Workflow Item field when Local File System is selected as the data source type. Enter the directory location of the files you want to compress and send. |
| Source Name Mask | Replaces Outbound Condition field when Local File System is selected as the data source type. Enter the mask for the file(s) to be compressed and sent. You can specify multiple file name masks if you wish to compress and send more than one type of file in the same compressed file. To do this, separate the filename masks with a colon, like this: *.xml:*.csv:*.jpg |
| Filename Within ZIP | Appears only if one or more of Translated Data, Forward Only, or Static Data as the Data Source is selected, and the Use Compression checkbox is checked, indicating that you want to send only one file. Enter the mask for the file to be compressed and sent. |
| Append Archive | Select this checkbox if you want to send a single Compressed file with multiple files within, meaning the Workflow will append each file processed to the existing Compressed file. Leave blank if you want to send each file in a separate Compressed file. |
| Compression Type | The file format for the compressed file(s), either ZIP, JAR, TAR, GZ, TGZ or RAR. |
| Password | Indicates that you want to encrypt the file using the provided password. Only available for ZIP, JAR, RAR types. |
| The password that should be used for encryption. |
Tell me more about Quality of Service
You can configure this Send Data action to continue retrying to send the data in the event an attempt failed. To use this feature, check the box for Quality of Service. BridgeGate has two types of QoS for Send Data actions:
- Retry Logic
- Guaranteed Delivery
Retry Logic
To use Retry Logic, enter the number of times to retry sending the data before delivery ultimately fails and the error handler (if any) is executed. You may also specify the amount of time between retries in hours, minutes, and/or seconds.
Guaranteed Delivery
To use Guaranteed Delivery, enter or select the following three items:
- Notify of failure after x attempts. This is the number of failed attempts before BridgeGate will execute the Error Handler specified for this Workflow. The SendData will continue to be retried until the data is sent successfully or you stop the workflow from trying by telling it to cease via the BridgeGate Portal.
- Retry Interval. This is the amount of time in hours, minutes and/or seconds between retries.
- Error Handler. This is which error handler should be executed when encountering an error.
For example: If you have the attempts set to 3 and the retry interval set to 10 minutes, BridgeGate will continually execute the SendData every 10 minutes and every third failure or 30 minutes, will notify via the Error Handler until the SendData returns no communication errors.
NOTE: Guaranteed Delivery is supported only when Workflow Transaction Details are Logged.
Tell me more about File Transfer Protocols
Available protocols include FTP (non secure, SSL, SSH) and SSH.
What is FTP : (F)ile (T)ransfer (P)rotocol is used to connect two computers over the Internet so that the user of one computer can transfer files and perform file commands on the other computer.
Specifically, FTP is a commonly used protocol for exchanging files over any network that supports the TCP/IP protocol (such as the Internet or an intranet). There are two computers involved in an FTP transfer: a server and a client.
When to use FTP: FTP is easy to use and can be used when security is not a primary issue. For example, if a transmission is to occur over an intra-net connection, rather than over the Internet. When you select FTP as the Connection Type, a group of entry fields will be displayed that are specific to setting up this type of connection. In addition, an 'Options' button will be displayed after the last of these fields. This allows you to specify whether or not a secure connection should be used, and the type of security to be used. You can select SSL or SSH. If an unsecured FTP connection is satisfactory, do not select either of these two options.
What is FTP over SSH : Sometimes referred to as secure FTP. This refers to the practice of tunneling a normal FTP session over an SSH connection.
What is SFTP: This is a network protocol that provides secure file transfer and manipulation facilities over the secure shell (SSH) protocol. This is typically meant in the context of file transfer.
What is FTPS : Commonly referred to as FTP/SSL, is a name used to encompass a number of ways in which FTP software can perform secure file transfers. Each way involves the use of SSL/TLS layer below the standard FTP protocol to encrypt the control and/or data channels. It should not be confused with SSH file transfer protocol.
When to use FTPS: The most common uses of FTP and SSL are: AUTH TLS or Explicit FTPS, named for the command issued to indicate that TLS security should be used. The client connects to the server port 21 and starts an unencrypted FTP session as normal, but requests that TLS security be used and performs the appropriate handshake before sending any sensitive data. AUTH as defined in RFC 2228. Implicit FTPS is an older, but still widely implemented style in which the client connects to a different port - usually 990, and a SSL handshake is performed before any FTP commands are sent.
What is SSH : SSH or Secure Shell is a set of standards and an associated network protocol that allows establishing a secure channel between a local and a remote computer. It uses public-key cryptography to authenticate the remote computer and, optionally to allow the remote computer to authenticate the user. SSH provides confidentiality and integrity of data exchanged between the two computers using encryption and message authentication codes (MACs).
When to use SSH: SSH is typically used to log into a remote machine and execute commands, but it also supports tunneling, forwarding arbitrary TCP ports and X11 connections; it can transfer files using the associated SFTP protocols. An SSH server, by default, listens on the standard TCP port 22.
Tell me more about Encryption
You can tell the Send Data action to encrypt the data being sent using any of the available Encryption algorithms. Each type of encryption requires different information and usually involves an encryption key or password.
When a Send Data is being archived and Encryption is completed, a copy of the Encrypted and Decrypted file is available in the Portal. The 'Remove Archive of Decrypted File' checkbox provides the ability to only keep a copy of the Encrypted file in the Data Archive.
GPG Encryption
BridgeGate supports GPG encryption and decryption. To utilize this feature, you must first install the GPG software and configure BridgeGate accordingly. See the PGP-GPG Configuration Guide for instructions.
To configure a SendData for GPG encryption, check the box for using Encryption, then enter the password for the keypair used when the file was encrypted. The file should decrypt properly when the workflow is executed.
Tell me more about Database Connections
If you are creating your own Database Connection, the format for the database URL is as follows:
<driver>://<host>:<port>/<database name> (note that the port may be optional) or for Oracle, <driver>@<host>:<port>/<database name>- As an example for some of the more popular databases:
- For MySQL, you may use:
jdbc:mysql://192.168.0.100/myDatabaseName?useSSL=false - For SQLServer, you may use: jdbc:jtds:sqlserver://192.168.0.100.123/myDatabaseName
- For Oracle, you may use:
jdbc:Oracle:thin:@192.168.0.100:1521:myDatabaseName(SID) - For DB2, you may use:
jdbc:db2://192.168.0.100:50000/sample - For Microsoft Access, use the jdbc:odbc bridge driver in the
URL:
jdbc:odbc:myDatabaseName
For MySQL databases using Unicode characters, you may need to
specify a UTF-8 character encoding. For example:
jdbc:mysql://192.168.0.100/myDatabaseName?useUnicode=true&characterEncoding=UTF-8&useSSL=false
If you are using ODBC with Microsoft Access, you may connect from your templates as with the other database types, but you will not be able to use the quick field feature to add fields directly from the database as you can with the other supported databases. You may also be required to first register your Access database in the System DSN.
Tell me more about Command Prompt
You can configure this Get Data action to launch an external process on the system hosting BridgeGate. Whatever this process writes to its standard output stream will become the data passed on to subsequent workflow steps. This adapter uses the following parameters:
Executable: This is the name of the executable file on the host system. If this file is not on the system path, you must enter the fully-qualified path to it.
Arguments: These are the command-line arguments that will be passed to the executable. They can include BridgeGate session variables using %VAR_NAME% syntax.
File Name: When a script (see below) is saved with the workflow, BridgeGate will use this as the name of the temporary script file. You can leave this field blank and BridgeGate will automatically generate a file name for you. However, when executing Windows batch files, you must specify a file name ending in ".bat".
Script: BridgeGate will write the contents of this field to a temporary file using the encoding specified for this Get Data for use by the external process. To pass the file name of the auto-generated script as an argument to the executable, enter it as "%FILENAME%".
Stream Args: When this option is selected, arguments will be written to the standard input stream for the external process, using the encoding specified for this Get Data.
Note: If you are attempting to execute a Windows Batch File (YOUR_FILE.bat) you must include the following:
Set the executable to be "cmd".
Make the first text of the Arguments text box "/c C:\YOUR_FILE.bat". The /c is required to tell the Windows CMD this is a batch file to be exectued.
The Arguments text box should include the fully-qualified file name for the batch file. (C:\YOUR_FILE.bat).
Tell me more about Using Variables
BridgeGate can use account data in certain fields within a Send Data, based on the Connection Type selected. To Use this feature account keys and data must be entered using the Repository, under the Account Data menu item.
The format for using account data is: %ACCOUNT_DATA, keyname%
Example:
To send a file to a directory specified by an account key:
Create an account key in the repository. Lets call it out_dir, and the value will be c:/outdata.
Set your Send Data Connection Type to File.
In the File Directory field, type %ACCOUNT_DATA,out_dir%
Set the File Name field to testfile.txt.
Set all the other fields as you would normally.
When the workflow is executed, the data will be sent to c:/outdata/testfile.txt
Tell me more about Append and Zip
BridgeGate will overwrite files of the same name unless you check the Append Archive checkbox. Checking the Append Archive checkbox will instruct BridgeGate to append the data to the end of the named file.
You can also compress files using Zip or Rar by checking the Use Compression checkbox, selecting the Compression Type and supplying the name for the file (e.g. MyData.zip). On Windows systems, UNC paths are supported.
Tell me more about AS2
AS2 (Applicability Statement 2) is a specification about how to transport data securely and reliably over the Internet . It is described in detail in RFC 4130 .
Data can consist of Electronic Data Interchange (EDI) messages but may be of any other message type. AS2 specifies how to connect, deliver, validate and acknowledge data. AS2 creates an envelope for a message which is then sent securely over the Internet. Security is achieved by using digital certificates and encryption.
An implementation of AS2 involves two machines, a client and a server , communicating with each other over the Internet. On the operating system level, the AS2 client may be a server, too, offering its communication services to application software. The client sends data to the server, e.g. a trading partner. On receipt of the message the receiving application sends an acknowledgment or MDN (Message Disposition Notification) back to the sender.
Tell me more about Web Service
You can configure this Send Data action to connect to a Web Service running on a remote machine. The easiest way to configure this type of connection is to use an available WSDL file that defines the operation you wish to invoke. If no WSDL file is available, you can manually enter the necessary configuration.
The Use WSDL option will function as follows:
Select the Use WSDL check box. This will disable the Target Namespace , Request Element , and SOAP Action inputs. This also disables adding or removing parameters from the In Values and Out Values trees.
Select or enter the location of a WSDL file, which can either be a local file or a valid URL.
Select the desired SOAP binding within the WSDL file. Please contact BridgeGate support if you need to use a binding type other than SOAP.
Select an operation from those defined for the selected binding.
[Optional] If the WSDL has any "service" elements, which indicate a live, running implementation of the binding, then you may select one.
The Service Endpoint URL (if selected in #5), Target Namespace, Request Element , and SOAP Action attributes will be populated. The In Values and Out Values trees will also be populated, though you still must define the details of how each parameter is populated or used.
At run time, the web service adapter will use the settings from the Operation tab as follows:
Service Endpoint URL : This is the URL of the service endpoint (the actual deployed, functioning location of the service implementation). This attribute is required.
Target Namespace : This is the target namespace of the XML elements that will be sent to the web service. This attribute is not required for all services, but may be required for the particular web service you are connecting to.
Request Element : This is the name of the top-level request element to send inside the SOAP requests body. It is typically the same as the name of the web service operation to perform. This attribute is required when the Send Source as SOAP Body option is not checked.
SOAP Action : This is the URI sent in the SOAPAction header. This attribute is not required for all services, but may be required for the particular web service you are connecting to.
Username and Password : The user name and password to be sent as part of HTTP basic authentication. These attributes are not required for all services, but may be required for the particular web service you are connecting to. If you need to use additional forms of authentication, such as WS-Security, please contact BridgeGate support.
Send Source as SOAP Body : When checked, BridgeGate will send the Send Datas source (which must be valid XML) as the literal SOAP Body to the web service. This effectively ignores the Target Namespace , Request Element Name , and In Values (tab) settings.
Receive Synchronous Response : Checking this will cause BridgeGate to wait for a response to the web service request it initiates. Deselecting this option effectively ignores the Use SOAP Response Body as Result option and the Out Values (tab) settings.
Use SOAP Response Body as Result : If this box is checked, the entire contents of the SOAP Body (XML) will be written to a file as the synchronous response result of this Send Data. Otherwise, you must select the Use as Result option on one of the out parameters to produce a synchronous response file for this Send Data.
The In Values tab allows you to define how the parameters sent to the remote web service are generated. Note the following:
All attributes for the selected in value are the same as the In Values tab for Plugins, except as noted below.
Web Service Send Data in values have a special Field Type option of TRANSLATED / FORWARDED DATA . Selecting this option will place the contents of the Send Datas source input into this in value at processing time. Also note that selecting this option will disable all of the other inputs inside this tab, except for the Dont Escape XML Markup option.
The Dont Escape XML Markup option is only enabled for the Field Type option of TRANSLATED / FORWARDED DATA . Enabling this option will cause the input to this parameter to be parsed as an XML document, for supporting XML document parameters used in web services.
The context menu on the In Values tree has the following two items:
Add In Value : Prompts you for the name of the in value and then adds it to the tree.
Delete Selected In Value : Deletes the selected In Value.
The Out Values tab allows you define how the parameters returned from the invoked web service are processed. Note the following:
The context menu on the Out Values tree has the following two items:
Add Out Value : Prompts you for the name of the out value and then adds it to the tree.
Delete Selected Out Value : Deletes the selected Out Value.
Use as Result : Selecting this will write the textual content of the selected Out Value to a file as the synchronous response result of the Send Data. This option is ignored (at process time) when Use SOAP Body as Result is selected on the Operation tab.
Add to Workflow Session : Selecting this allows you to name a session variable where the returned value of this parameter will be stored for use by later workflow items.
Variable Editor
Overview
A Variable is used to perform a mathematical calculation or to concatenate multiple pieces of data. The result is a new piece of data. The Variable itself does not write the data. To do this, you must map a Field to the Variable's value. The value produced by the Variable can be used by any other item (Outbound Templates, another Variables, Plugin, Item List, or used in Directory or File names).
A Variable is composed of one or more Variable Actions. To add the value of two values together, you would use two Variable Actions. Likewise, to concatenate two value, you would use two Variable Actions. Variable Actions are displayed in a list in the middle of the Variable editor. To create a new Variable Action, right-click on the list of Variable Actions.
The Variable itself has only three properties. Everything else belongs to its Variable Actions. These properties are:
- Variable Name
- Initial Value
Tell me more about Variable Name
The Variable Name is simply the name of the Variable. The name is important because it allows you to reuse the variable. For Variable Action types of CONCATENATE, ADD, SUBTRACT, MULTIPLY, DIVIDE and other ConversionFunctions , the name may not used. For Variable Action type COUNT, reuse is important so names are typically used. When creating a Variable, enter the name from the Variable Name drop down. This new Variable will be available in the drop down for reuse. When reusing a Variable, select it from the Variable Name drop down. For an example of reusing a Variable, see the Samples and Tutorials.
Tell me more about Initial Value
When a Variable is first created, the value is set to 0 or blank by default. This is dependent on whether the Variable is being used to perform a mathematical calculation or to concatenate multiple pieces of data. To set the initial value to something else, enter the value here.
Tell me more about Variable Actions
Variable actions can be of the following types:
- COUNT
- SET
- RESET
- CONCATENATE
- ADD
- SUBTRACT
- MULTIPLY
- DATE DIFF
- DIVIDE
Conversion Functions
All other properties for a Variable Action are described below. Additional supporting help can be referenced on the Outbound Field Screen.
Tell me more about COUNT
COUNT is used to perform a non-persistent count value for use within the Template. A common use for COUNT is to count the number of records created in the outbound translated data and place the count value in the data trailer. To create a count value that retains its value for more than a single translation, use a Sequence instead of a Variable.
Tell me more about SET
SET is used to set the value of the Variable to the value specified. If any value existed before this SET action is called, that value is now lost. If you are joining a first and last name value together, you must first select the Variable action of SET. Map the first name value to this Variable action. Next, create a second Variable action of CONCATENATE and map the last name to this Variable action. Refer to the section: 'Tell me more about CONCATENATE.'
Tell me more about RESET
RESET is similar to SET. It is used to set the value of the Variable to the value specified in the 'Initial Value' textbox. If any value existed before this RESET action is called, that value is now lost. When the 'Reset before use' checkbox is checked, a 'RESET' action occurs before the first use of the variable. Otherwise, the 'Initial Value' is preserved until it has been used.
Tell me more about CONCATENATE
CONCATENATE allows you to append multiple values to create a new value. A common use for this is to append a first and last name together. Remember to create a Variable action of SET in order to clear the value. Map your first value (i.e. first name) of your concatenation/join in the SET Variable action. Create a second Variable action of CONCATENATE and map your next value in the CONCATENATE Variable action (i.e. last name). Because the individual Variable Actions allow advanced properties for CHAR field type, it is even possible to append portions of data values together.
NOTE: When using CONCATENATE, set the first Variable Action type to SET. This action 'sets' the initial value of the Variable. Each Variable Action after that should be of type CONCATENATE.
Tell me more about ADD
ADD allows you to add the numerical values of multiple values together. A common use for this is to add individual order item costs together while looping over an order and then displaying the order total at the end of the outbound translated data. Because Variable values can be used in any other Outbound item, it is also possible to use an Item List to check if the total order cost is greater than a specific amount and perform additional business logic. Another example would be to pass the Variable value into a Plugin which then calls an external program to calculate tax and return the total tax to place in the outbound translated data.
ADD can also be used to add time increments to a DATE. For example, if you create the first action as SET and assign a DATE field to it. You can then create a second action as ADD and add minutes, hours, days...etc. to the value of the DATE field.
NOTE: When using ADD, set the first Variable Action type to SET. This 'sets' the initial value of the Variable. Each Variable Action after that should be of type ADD. It is possible to perform more than the ADD calculation to this Variable. The first Variable Action would be SET, the second Variable Action could be ADD, and the third Variable Action could be MULTIPLY. You cannot perform CONCATENATE operations on a Variable that contains an ADD type.
Tell me more about SUBTRACT
SUBTRACT allows you to subtract the numerical values of multiple Fields together.
NOTE: When using SUBTRACT, set the first Variable Action type to SET. This 'sets' the initial value of the Variable. Each Variable Action after that should be of type SUBTRACT. It is possible to perform more than the SUBTRACT calculation to this Variable. The first Variable Action would be SET, the second Variable Action could be SUBTRACT, and the third Variable Action could be MULTIPLY. You cannot perform CONCATENATE operations on a Variable that contains a SUBTRACT type.
Tell me more about MULTIPLY
MULTIPLY allows you to multiply the numerical values of multiple Fields together.
NOTE: When using MULTIPLY, set the first Variable Action type to SET. This 'sets' the initial value of the Variable. Each Variable Action after that should be type MULTIPLY. It is possible to perform more than the MULTIPLY calculation to this Variable. The first Variable Action would be SET, the second Variable Action could be MULTIPLY, and the third Variable Action could be DIVIDE. You cannot perform CONCATENATE operations on a Variable that contains a MULTIPLY type.
Tell me more about DATE DIFF
DATE DIFF Variable Action returns the count (as an integer value) of the specified date part boundaries crossed between the specified first Set Date Variable Action and the second Date Diff variable Action. The DATE DIFF Variable Action provides the ability to specify the Interval in the calculation.
NOTE: IF First
Variable Action is Set to Date data type, then on the next action add
DATE DIFF to the list of Variable Actions.Upon selecting DATE DIFF,add Date
to the Field Types.
Date Interval:
year = Yearmonth = month
day = Day
week = Week
hour = hour
minute = Minute
second = Second
date1 and date2 maxformat: yyyy/MM/dd HH:mm:ss:SS
Tell me more about DIVIDE
DIVIDE allows you to divide the numerical values of multiple Fields together.
NOTE: When using DIVIDE, set the first Variable Action type to SET. This 'sets' the initial value of the Variable. Each Variable Action after that should be of type DIVIDE. It is possible to perform more than the DIVIDE calculation to this Variable. The first Variable Action would be SET, the second Variable Action could be DIVIDE, and the third Variable Action could be ADD. You cannot perform CONCATENATE operations on a Variable that contains a DIVIDE type. It is important to ensure that the divisor does not equal 0 as it is impossible to divide by zero.
Additional Variable Actions
All actions listed below, except for POWER, MODULUS, and ROUND, are available as field property actions, and a more detailed explanation is available on the "Advanced Properties Dialog" screen. Conversion Functions
- POWER
- MODULUS
- ROUND
- ABS
- Area conversions
- CEILING
- FLOOR
- Temperature conversions
- Length conversions
- Volume conversions
Item List Editor
Overview
An Item List allows you to group Workflow actions together for the purpose of conditionally executing them. If you need specific Workflow actions to only occur under specific conditions, then use this item. The Item List IF Block contains Workflow Items that will execute if the Conditions you create in the Item List are met.
An Item List can use the following in its condition to determine if the Workflow items under the Item List should be executed.
SESSION DATA - Allows the Item List to evaluate any attributes of the previously executed Items. Depending on the Workflow Item you select, you will have access to different attributes. Example: GET DATA from a FTP server you can check the FILE SIZE, FILENAME, etc.
SYSTEM DATA - Allows the Item List to evaluate if any Communication, Translation or Validation error has occurred in the previously executed Items. This can be used to create an alternate flow if any errors occur.
TRADING PARTNER KEYS - Allows the Item List to evaluate if the specific trading partner information matches any of the SESSION, SYSTEM...etc. data.
Plugin Editor
Overview
A Workflow Plugin is used when an external program is needed to perform business logic. You have the option of sending that external program data for use as well as returning data back. To use a Plugin, you create a Java Interface. This Java Interface, (which is based on Sun's JINI technology) can then be used to call another program or script.
Typical examples of using a Plugin within a Workflow are to notify another system that BridgeGate has just sent data to it or to call another process to get back notification that it is OK for this BridgeGate workflow to proceed.
NOTE: To use a Plugin, you must create a Java Interface. See the BridgeGate Developer Guide for information and examples for creating a Plugin.
You can pass any value into a Plugin that needs to be passed into the external program or script. These are set in the Java Interface and show up here in the tabs for In Values and Out Values. If the Plugin returns data back, this data is not written to the outbound translated data. To do this, you must map a Field to any of the values returned from the Plugin. This approach allows the value(s) produced by the Plugin (such as a Variable or Conditional Field List, or even a Custom DB Field) to be used by any other item for additional processing, .
The only property that belongs to the Plugin is the Java Plugin Class. All other properties belong to the In Value and Out Values.
Tell me more about Java Plugin Class
The Java Plugin Class is the fully qualified Java Class Name, including the package name if any exists. If your Plugin was packaged as 'com.foo', the Java Plugin Class would be com.foo.YourClassName
After creating the Java Plugin, it needs to be in the "classpath" for both the BridgeGate Workbench and the BridgeGate Server. To add the Java Plugin to the client, create a jar file and place it in the %BRIDGEGATE_INSTALLATION%\lib folder. Then, modify the BGClient.lax file in %BRIDGEGATE_INSTALLATION%\client to contain the jar file in the classpath entry of the lax file.
Tell me more about In Values
After you enter the Java Plugin Class and press the 'Locate' button next to it, all Inbound and Outbound Values discovered in the Plugin are automatically created and populated in the lists on both tabs. You must then 'link' each In Value to the appropriate value needed. To do so, select each In Value in the list and set the Inbound Record Name/Inbound Field Name for the value. Be sure to include any of the familiar Field properties that are required to customize the value being sent to the Plugin. To create a 'hard-coded' value to pass into the Plugin, select the Field Type CONSTANT and enter in the Constant Value.
Tell me more about Out Values
The Out Values tab displays the Outbound values that will be returned from the Plugin. You will notice there is no action required for this tab. Any values returned from a Plugin are automatically placed into the Inbound Record Name 'PLUGIN' for use.
Call Workflow Editor
Overview
The Call Workflow action allows you to call another Workflow from within the current Workflow. The Workflow called becomes a child (sub-workflow) of the current Workflow. If the sub-workflow only needs to be called under certain circumstances, include this Call Workflow within an Item List and specify the conditions for it to run on the Item List. If the Call Workflow should always be called, then just include it in the Workflow like any other action.
Comment Editor
Overview
A Comment is used for documentation purposes on the workflow.
The Comment Item optionally executes based on the "Do Not Log Workflow Item Details" setting. When the "Do Not Log Workflow Item Details" setting is checked the Comment does not Execute and does not get persisted to the database. When unchecked the Comment will Execute, gets persisted to the database and will be displayed in the Portal. The Comment will show in the list of items in Test By Workflow and will Execute or Not based on the "Do Not Log Workflow Item Details" setting.
Tell me more about Comment Name
The Comment Name is simply the name of the Comment.
Tell me more about Comment
A Comment item provides the ability to add text for documentation purposes. A tool tip will display when hovering over the Comment item in the Tree.
Error Handler Usage Editor
Overview
Error Handlers are created from the Workflow Properties panel on the bottom left-hand side of the Workflow screen. However, creating these does not actually mean they are being used. They will 'catch' and remember any errors that occur during the workflow translation. To use one, you must select 'Use Error Handler' by right-clicking in the Workflow Items.
Explanation of the four error types:
- Processing Errors
- encompass any internal errors that occur while processing
a workflow, provided they are not considered translation errors.
- Examples:
- An error occurs while processing a workflow plugin.
- An SQL insert statement fails to process correctly and an error message is returned by the database server.
- Temporary BridgeGate files are deleted during processing.
- Examples:
- encompass any internal errors that occur while processing
a workflow, provided they are not considered translation errors.
- Translation Errors
- are logged when an error occurs when BridgeGate attempts
to manipulate data.
- Examples:
- An inbound date field contains something other than a date.
- An outbound integer or float field attempts to apply a pattern to non-numeric data.
- An inbound fixed length template expects more data than the inbound data supplies.
- Examples:
- are logged when an error occurs when BridgeGate attempts
to manipulate data.
- Communication Errors
- occur when communication with a data source or data
destination is not possible or is interrupted.
- Examples:
- A data source points to an FTP server that does not exist.
- A network / internet connection is not available and an HTTP data destination attempts to send data.
- The database used by a data Source is not available.
- Examples:
- occur when communication with a data source or data
destination is not possible or is interrupted.
- Validation Errors
- are encountered when any of the inbound validation rules
are violated.
- Examples:
- The maximum number of inbound records is exceeded.
- Any of the situational field rules for an inbound record are violated.
- Examples:
- are encountered when any of the inbound validation rules
are violated.
Explanation of processing options:
-
Retain All Errors
If any of the 4 error types trigger, upon completion of the error handler, the errors will still exist. -
Clear All Errors
If any of the 4 error types trigger, upon completion of the error handler, the errors will no longer exist. -
Retain Unreported Errors Only
This will retain any errors that may exist but the error handler did not check for them.For example:
If a workflow executes and has 2 errors, Communication and Validation, you might have an error handler that only looks for Communication errors and will execute, clear the Comm errors and retain the Validation errors to be caught later in the workflow.
Workflow Session Value Wizard
For many workflow items, you have the ability to dynamically assign property values at runtime, based on the value of various workflow session variables. This wizard is available on the right side of many text boxes and drop downs as a ellipses button.
Workflow Items that can use this wizard include:
- GetData
- SendData
- Variable
- Error Handler
- Error Handler Usage
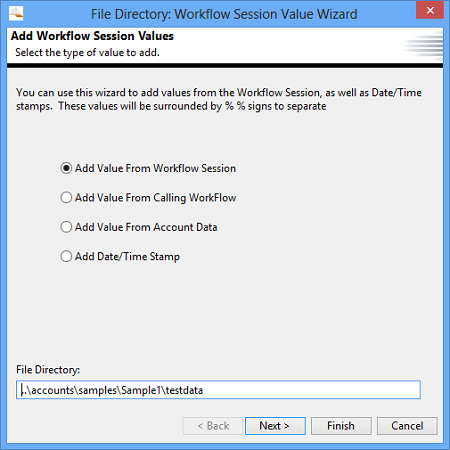
Add Value From Workflow Session
To access values from Outbound Templates, which you have explicitly chosen to have added to the workflow session, you would use the first option Add Value From Workflow Session. You would also use this first option to access values from any Workflow Item that has executed already in the current Workflow. Finally, you would access Trading Partner Data as well from this first option.
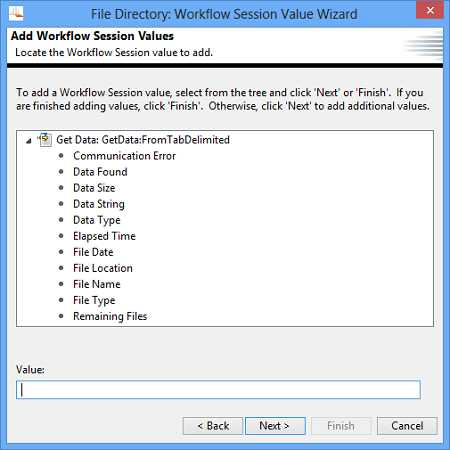
Add Value From Account Data
Account Data is added from the second option Add Value From Account Data. Account Data is static data added at the account level, via the Account Data Dialog which is available in the main menu bars Repository menu.

Add Date/Time Stamp
To add the current date/time in any date/time format needed, use the third option. This feature is useful for file names and/or directory names when writing data.

Synchronous Response Workflows
For Workflows that require synchronous communication, there are several connection types available.
These types are:
- AS2
- HTTP
- Socket
- Web Service
When using a GetData to retrieve data, and you need to send back a synchronous response, you will create a SendData and choose the connection type of Synchronous Response. If your GetData is a connection type that allows returning synchronous responses, it will appear in the drop down on the SendData screen.
When using a SendData to send data, and you need to receive back a synchronous response, you will create a GetData and choose the connection type of Synchronous Response. If your SendData is a connection type that allows receiving synchronous responses, it will appear in the drop down on the GetData screen.
Visual Workflow Mode
The Visual Workflow Mode changes the Workflow screen to include a graphical view of the Workflow items in the order of their execution. It allows the workflow to be modified by making additions, deletions and relocations of workflow items via drag and drop mouse actions, menu and keyboard selections.
Toggling Visual mode.
![]() Visual Workflow Mode is toggled on or off by clicking the Visual icon found on the right portion of the toolbar at the top of the Workbench application.
Visual Workflow Mode is toggled on or off by clicking the Visual icon found on the right portion of the toolbar at the top of the Workbench application.
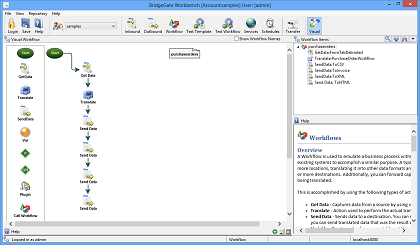 With the Visual Workflow Mode toggled on, the original workflow screen is changed to hide the left section's Workflows tree and Workflow Properties panels and relocates the center sections Help and Item properties panels to the lower right section.
Visual Workflow Layout
A new panel is created, occupying those left and center sections, to display the Visual representation of the workflow and associated Palette and Help.
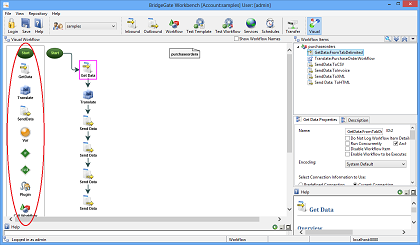 The new panels layout includes a Workflow Item Palette, along the Left side of the panel, from which you may add items to the Workflow.
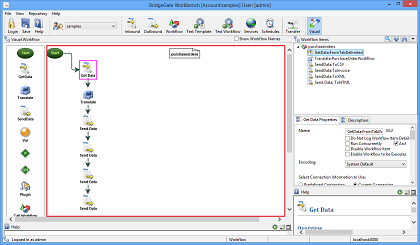 Adjacent to the Palette is the actual visual display of the workflow.
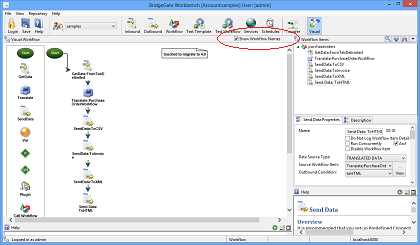 At the very top of the panel is a checkbox labeled Show Workflow Names. When checked the visual display will show the actual Workflow item name rather than the item type.
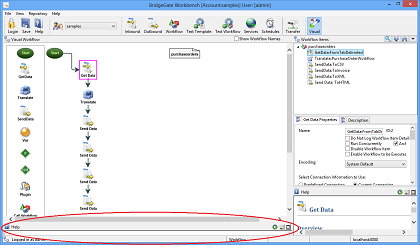 At the very bottom of the panel is a new Help section devoted to the Visual mode. Click the Maximize icon to enlarge the Help window.
Adding new items to the Workflow from the Palette.
Adding new items from the Palette will cause a modification of the Workflow which will be reflected in the tree display to the right of the visual display section. Standard BridgeGate™ rules apply when adding new items such as ELSE items can only be added to IF items and the user will be prompted for inserting inside or outside IF and ELSE items, etc.
- Mouse Drag and Drop
- From the Visual Palette, using the Mouse, click and drag any single item to the main visual display section. Then drop the item either anywhere in the background or onto an existing item.
- Dropping the palette item onto the background will add the new item as the last item in the workflow.
- While dropping the palette item onto an existing workflow item will insert the new item as the next item in the workflow. If the target item was an IF or ELSE item then you'll be prompted to choose whether the new item should be inserted inside or immediately after the existing item.
- Menu Copy/Paste
- From the Visual Palette, using the Mouse, right-click and from the menu select "Copy". Then right click again on one of the existing Workflow items and choose "Paste".
- This will insert the new item as the next item in the workflow. Following standard BridgeGate™ rules for new items.
Changing an existing Workflow item's execution order from the main visual display.
Existing workflow items can be re-ordered and deleted from the main visual display section. These modifications will be reflected in the tree display to the right of the visual display section. Standard BridgeGate™ rules apply when moving, copying or deleting items such as deleting an IF or ELSE item will delete all of its associated items. Copying or Moving items may impact references to that item from other existing items.
- Mouse Drag and Drop
- From the main visual display, using the Mouse, click and drag any single existing Workflow item and then drop that item onto a different existing item.
- This will move the dragged item from its original position and insert it as the next item in the workflow. If the target item was an IF or ELSE item then you'll be prompted to choose whether the new item should be inserted inside or immediately after the existing item.
- Menu Copy/Paste
- From the main visual display, using the Mouse, right-click and from the menu select "Copy". Then right click again on a different existing Workflow item and choose "Paste".
- This will insert a copy of the selected item as the next item in the workflow. If the target item was an IF or ELSE item then you'll be prompted to choose whether the new item should be inserted inside or immediately after the existing item.
- Menu Move/Paste
- From the main visual display, using the Mouse, right-click and from the menu select "Move". Then right click again on a different existing Workflow item and choose "Paste".
- This will move the selected item from its original position and insert it as the next item in the workflow. Following standard BridgeGate™ rules for IF and ELSE items and prompting the user for decisions when necessary.
Deleting an existing Workflow item from the main visual display.
- Keyboard Delete
- From the main visual display, using the Mouse, select any existing workflow item which draws a red block around the item and press the Delete key on the keyboard.
- This will initiate a delete of the selected item. The user will be prompted to confirm the delete and if Yes is selected the item will be deleted and the workflow tree refreshed. If the selected item was an IF or ELSE all associated child items will also be deleted.
- Menu Delete
- From the main visual display, using the Mouse, right-click and from the menu select "Delete".
- This will initiate a delete of the selected item. The user will be prompted to confirm the delete and if Yes is selected the item will be deleted and the workflow tree refreshed. If the selected item was an IF or ELSE all associated child items will also be deleted.
Changing the Visual display location of existing items.
Existing workflow items can be moved around within the visual display section for display purposes only. The location of each item is saved in the workflow xml file so the visual display will retain the desired look. Care should be taken to NOT drop a dragged item onto an existing item since this will trigger an Item Move and the execution order of the items will be altered.
- Drag and Drop
- From the main visual display, using the Mouse, click and drag any single existing Workflow item and then drop that item onto the desired location within the background of the display section.
- This will initiate a display location change of the selected item. The new location will be set on the in-memory workflow object and when the workflow is saved this location will be preserved in the xml file.
- Multi-Select Drag and Drop
- It is possible to select more than one item at a time in-order to move them as a group. From the main visual display, press the Ctrl button while clicking on each item that you will want to move. Then once all are selected drag them all as a group to the new desired location.
- This will initiate a display location change of all the selected items. If the workflow is subsequently ssaved the new locations will be preserved in the xml file.
Changing the Visual display links between existing items.
Existing workflow items have a link between them indicating the execution order of the items. These links can be attached to and from different sides of the workflow items for display purposes only. These changes have no effect on the execution of the workflow.
- Re-Linking items
- From the main visual display, using the Mouse, click on the link between any 2 items. This will select the item and display icons for the links endpoints. Then select an endpoint to re-link to a different side of the existing item. you may want to show the items from left to right -vs- top to bottom.
Zooming the Visual display.
Use the mouse wheel to zoom-in and zoom-out from the Visual display.
Test Template Screen
The BridgeGate Workbench has a built-in testing mechanism for Inbound and Outbound Templates. To get to the Test Template screen, click the Test Template button in the Tool Bar.
 Test Template
Icon
Test Template
Icon
The following screen is displayed.
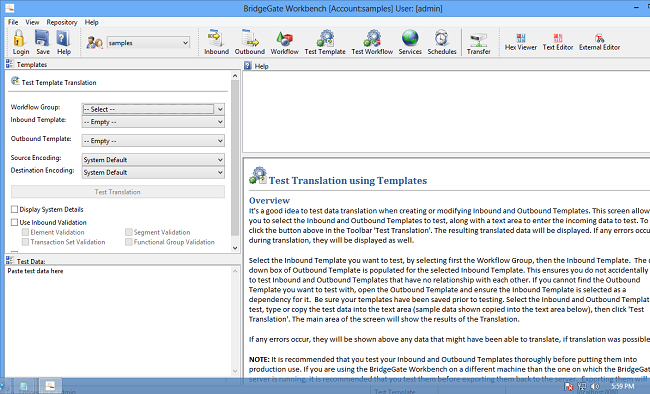
Select the Inbound Template you want to test, by selecting first the Workflow Group, then the Inbound Template. The drop down box of Outbound Template is populated for the selected Inbound Template. This ensures you do not accidentally try to test Inbound and Outbound Templates that have no relationship with each other. If you cannot find the Outbound Template you want to test with, open the Outbound Template and ensure the Inbound Template is selected as a dependency for it. Be sure your templates have been saved prior to testing. Select the Inbound and Outbound Template to test, type or copy the test data into the text area (sample data shown copied into the text area below), then click 'Test Translation'. The main area of the screen will show the results of the Translation. The following picture presents a successful translation with no errors produced.
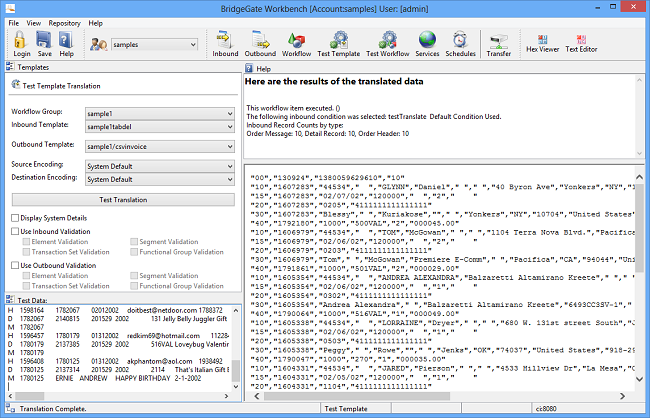
If any errors occur, they will be shown above any data that might have been able to translate, if translation was possible:
If no translation was possible due to malformed Template(s) or bad data, the following screen will be displayed:
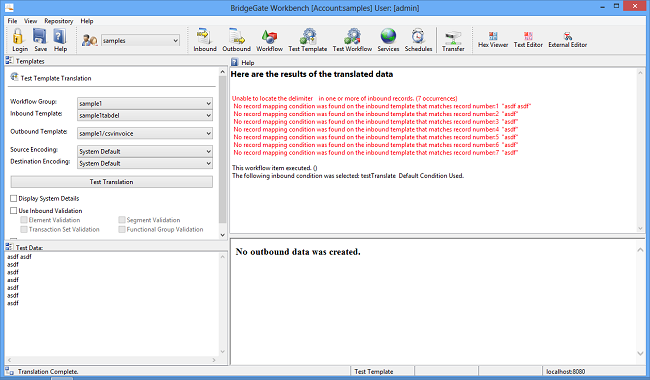
NOTE: It is recommended that you test your Inbound and Outbound Templates thoroughly before putting them into production use. If you are using the BridgeGate Workbench on a different machine than the one on which the BridgeGate server is running, it is recommended that you test them before exporting them back to the server. Exporting them will overwrite the previous version on the BridgeGate server.
Test Workflow Screen
You can also test workflows from start to finish. To get to the Test Workflow screen, click the Test Workflow button in the Tool Bar.
 Test Workflow
Icon
Test Workflow
Icon
The following screen is displayed.
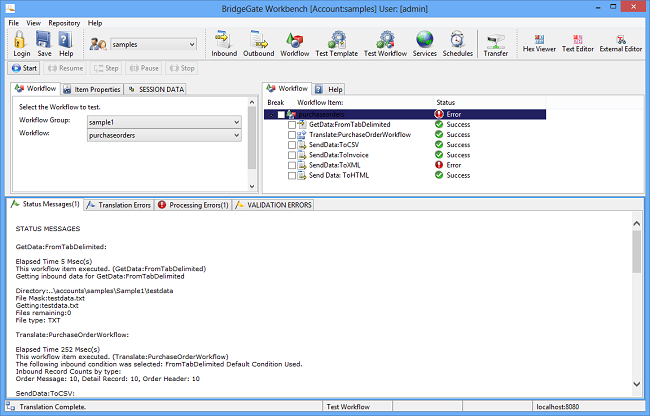
Select the Workflow you want to test by first selecting the Workflow
Group, then selecting the Workflow. Click the ![]() Start
button to execute the Workflow. While executing, the status bar at
the bottom of the BridgeGate Workbench will tell you the translation
is in progress. As each workflow item executes, the right side of the
workspace updates with the status of the item.
Start
button to execute the Workflow. While executing, the status bar at
the bottom of the BridgeGate Workbench will tell you the translation
is in progress. As each workflow item executes, the right side of the
workspace updates with the status of the item.
Debugging the Workflow
If you need to stop the workflow test at any time in order to verify the process, and then continue it, you can accomplish this by checking the box next to the workflow item you wish to stop execution at:
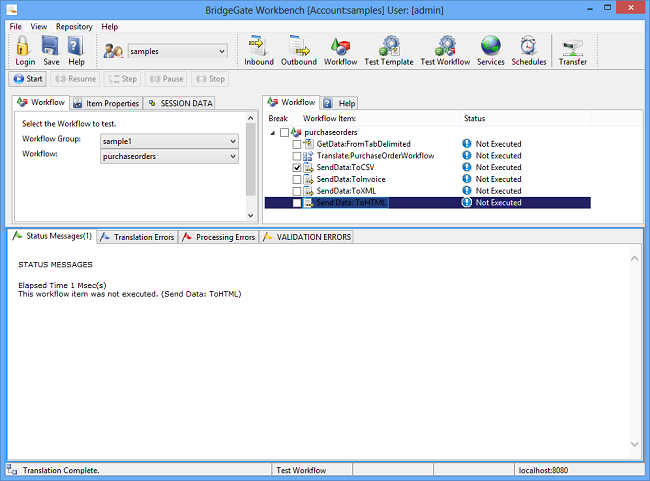
When you click  Start, the workflow will execute
until after the completion of the workflow item you selected.
At this point, you are free to check on the value of session
variables, look at the file system for files, examine a database,
etc. See the screen shot below for the workflow in a paused state:
Start, the workflow will execute
until after the completion of the workflow item you selected.
At this point, you are free to check on the value of session
variables, look at the file system for files, examine a database,
etc. See the screen shot below for the workflow in a paused state:
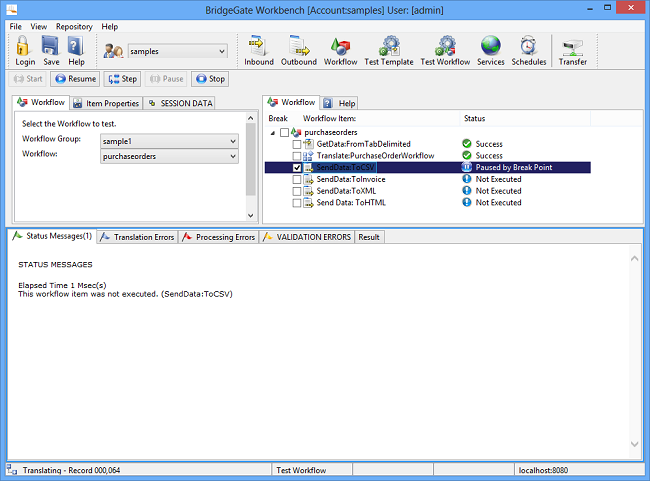
When you are ready to resume the workflow test, click on the Resume
button to finish executing the workflow until it completes, or
another debug checkbox is reached.
You can step one workflow item at a time instead of using resuming by
clicking the  Step
button. You will need to continue to click on the Step button after
every workflow item until it completes, or until you decide to click
on the Resume
button.
Step
button. You will need to continue to click on the Step button after
every workflow item until it completes, or until you decide to click
on the Resume
button.
At any point you want to stop the workflow test, you can click the  Stop
button. The currently executing workflow will complete before the
test stops.
Stop
button. The currently executing workflow will complete before the
test stops.
If at any time during the workflow test, you decide to leave the Test
Workflow screen and go to another screen, the test will automatically
pause at the end of the current workflow item execution, and wait for
you to return. You must click the Resume button upon return if you
wish for the test to resume. Future enhancements will allow you to
chose if you want to pause the workflow, stop the workflow, or let it
continue in the background, when you leave the Test Workflow screen.
Schedule Screen
Schedules are used to trigger a specific Workflow at predefined intervals. When a Schedule is triggered, it will process every data file or stream from the Get Data serially until no more remain. Backup copies are made of both the inbound data and the translated outbound data in the data archive in dated folders. Complete auditing abilities, including time/date/errors and samples of both the inbound and resulting outbound translations are all available in the BridgeGate Portal. Resending of the transaction is also available from there.
The screen consists of the following sections:
- Workflow Group Navigator
- Schedule List
- Schedule Editor
- Available Calendars (used for date ranges to exclude execution) new
- Associated Workflows (workflows that currently use this schedule) new
- Associated Calendars (used for date ranges to exclude execution) new
- Help Screen
Workflow Group Navigator
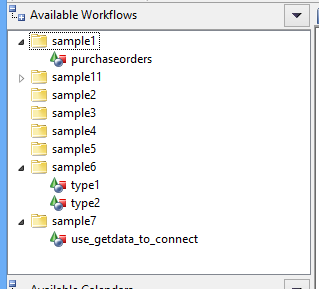
Use the Workflow Group Navigator to associate a workflow to the currently opened Schedule, or to go directly to the Workflow screen for the selected Workflow.
Schedule List
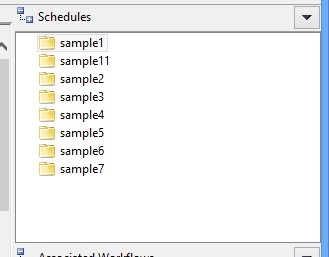
This is the main area of the Schedule screen to focus on. This is where you create a new schedule, by right clicking on the schedule list or using the down arrow on the schedule list. Since BridgeGate, a schedule is no longer a one-to-one relationship to a workflow. You can reference a schedule to as many workflows as necessary. Because of this, it is no longer important which Workflow Group you add a new schedule to. Add it to the Workflow Group that makes the most sense. When a schedule is selected, it opens the Schedule Editor for you to set the schedule times/dates.
Schedule Editor
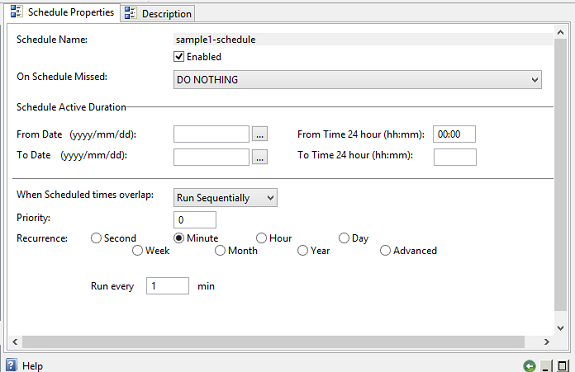
Overview
When a schedule is selected, it opens the Schedule Editor for you to set the schedule times/dates.
Schedules are used to trigger one or more Workflows. A Schedule is configured to run at a specified interval. When a schedule is triggered, the associated Workflows are executed. The workflows may be from any Workflow Group within the selected account. Any number of Workflows may be associated with a Schedule.
Calendars may also be associated with Schedules, causing the specified dates to be excluded from the normal schedule processing. Calendars can be viewed in the BridgeGate Workbench, but they are created and maintained via the BridgeGate Portal.
Another important property of a Schedule is "On Schedule Missed". A schedule trigger might get missed of the scheduler being shutdown, or because there are no available threads in Quartz's thread pool for executing the job. There are two options to be selected when a Schedule is missed.
- DO NOTHING This doesn't do anything with the missed schedule, and the schedule runs during its next trigger interval.
- EXECUTE AS SOON AS POSSIBLE This runs the schedule the first chance the schedule could run again, which is when the scheduler restarts or the Quartz thread pool is available.
The Schedule Screen is divided into three sections:
- Available Workflows & Calendars are
shown on the left.
Schedule Properties, Description, and Help in the center. A list of Schedules with their associated Workflows & Calendars on the right. Schedules, like Workflows, are organized by Workflow Groups (folders). - To create a new Schedule:
In the right-hand section, right-click a Workflow Group and select New Schedule Wizard.This allows you to create a new schedule or copy and existing one. - To edit an existing schedule:
In the right-hand section, select a schedule to work with.
In the center section, define it's Schedule Properties and optionally enter a brief Description.
In the left-hand section, right-click one or more Workflows (from one or more Workflow Groups) to associate them with the currently selected Schedule. One or more Calendars may be associated the same way.
Associated Workflows and Calendars appear under the Schedule List in the right-hand section. You may remove the association by right-clicking them and selecting the remove option. - To delete, rename, or reload an existing
schedule:
In the right-hand section, right-click a schedule and select delete, rename, or reload accordingly. - To View Calendar Dates or Manage Workflows:
In the right or left-hand section, right-click a Calendar and select "View" or right-click a Workflow and select "Manage" accordingly.
Schedule Properties can be set to the following intervals:
- By Second
- By Minute
- Hourly
- Daily
- Weekly
- Monthly
- Annually
- Advanced
Alternatively, you may specify a From Date, From Time, To Date and To Time for the Scheduler. If these are left blank, the schedule is not dependent on a from date to run. Schedules may also be temporarily disabled by un-checking the box for 'Enabled'. A Disabled Schedule's icon appears greyed-out with a red border to make it more noticeable..
For Workflows that may take a long time to complete, it is possible for the next scheduled occurrence to start before the previous one completed. You have the option to have the next Schedule trigger immediately without concern of previous Schedules by selecting 'Run Concurrently'. If the next Workflow should not run again until the previous Workflow finishes, the default option is 'Run Sequentially'.
Tell me more about By Second
Set the interval for the seconds to have the schedule run in the text box for 'Run every'. Schedules can be set to run every 10 seconds (minimum).
Tell me more about By Minute
Set the interval for the minutes to have the schedule run in the text box for 'Run every'. Schedules can be set to run every 1 minute or any number after.
Tell me more about Hourly
Set the interval for the hours to have the schedule run in the text box for 'Run every'. Schedules can be set to run every 1 hour or any number after.
Tell me more about Daily
Set the interval for the days to have the schedule run in the text box for 'Run every'. Schedules can be set to run every 1 day or any number after. Selecting Daily will also display Execute Time field. This will be the time when the daily schedule will be executed. If your schedule falls between 1 and 2 AM, during daylight savings time change, your schedule might get missed and will run using the On Schedule Missed Option, or will run twice.
Tell me more about Weekly
Set the interval for the weeks to have the schedule run in the text box for 'Run every'. Schedules can be set to run every 1 week or any number after. Check the days of the week for the Schedule to trigger. Selecting Weekly will also display Execute Time field. This will be the time when the weekly schedule will be executed. If your schedule falls between 1 and 2 AM, during daylight savings time change, your schedule might get missed and will run using the On Schedule Missed Option, or will run twice.
Tell me more about Monthly
Set the interval for the months to have the schedule run in the text box for 'of every'. Schedules can be set to run (on a specific date or day) every 1 month or any number after. Specify the date (1st) or day (First Monday) of the month for the Schedule to trigger. If you want the Schedule to run on the last day of the month, select the '31st' date. If you select the 29th, 30th, or 31st and those days do not exist for any given month, the last day of the month will be used. Selecting Monthly will also display Execute Time field. This will be the time when the monthly schedule will be executed.If your schedule falls between 1 and 2 AM, during daylight savings time change, your schedule might get missed and will run using the On Schedule Missed Option, or will run twice.
Tell me more about Annual
Specify the date (1st of January) or day (First Monday of January) of the year for the Schedule to trigger. Selecting Yearly will also display Execute Time field. This will be the time when the yearly schedule will be executed. If your schedule falls between 1 and 2 AM, during daylight savings time change, your schedule might get missed and will run using the On Schedule Missed Option, or will run twice.
Tell me more about Advanced
Provides a parser and evaluator for unix-like Cron expressions. Cron expressions provide the ability to specify complex time combinations such as "At 8:00am every Monday through Friday" or "At 1:30am every last Friday of the month".
Cron expressions are comprised of 6 required fields and one optional field separated by white space.
The fields respectively are described as follows:
| Field Name | Allowed Values | Allowed Special Characters |
| Seconds | 0-59 | , - * / |
| Minutes | 0-59 | , - * / |
| Hours | 0-23 | , - * / |
| Day of Month | 1-31 | , - * / ? L W |
| Month | 1-12 or JAN-DEC | , - * / |
| Day of Week | 1-7 or SAT-SUN | , - * / ? L # |
| Year (Optional) | Empty, 1970-2099 | , - * / |
The '*' character is used to specify all values. For example, "*" in the minute field means "every minute".
The '?' character is allowed for the day-of-month and day-of-week fields.
It is used to specify 'no specific value'. This is useful when you need to specify something in one of the two fields, but not the other.
The '-' character is used to specify ranges For example "10-12" in the hour field means "the hours 10, 11 and 12".
The ',' character is used to specify additional values. For example "MON,WED,FRI" in the day-of-week field means "the days Monday, Wednesday, and Friday".
The '/' character is used to specify increments. For example "0/15" in the seconds field means "the seconds 0, 15, 30, and 45". And "5/15" in the seconds field means "the seconds 5, 20, 35, and 50". Specifying '*' before the '/' is equivalent to specifying 0 is the value to start with. Essentially, for each field in the expression, there is a set of numbers that can be turned on or off. For seconds and minutes, the numbers range from 0 to 59. For hours 0 to 23, for days of the month 0 to 31, and for months 1 to 12. The "/" character simply helps you turn on every "nth" value in the given set. Thus "7/6" in the month field only turns on month "7", it does NOT mean every 6th month, please note that subtlety.
The 'L' character is allowed for the day-of-month and day-of-week fields. This character is short-hand for "last", but it has different meaning in each of the two fields. For example, the value "L" in the day-of-month field means "the last day of the month" - day 31 for January, day 28 for February on non-leap years. If used in the day-of-week field by itself, it simply means "7" or "SAT". But if used in the day-of-week field after another value, it means "the last xxx day of the month" - for example "6L" means "the last Friday of the month". When using the 'L' option, it is important not to specify lists, or ranges of values, as you'll get confusing results.
The 'W' character is allowed for the day-of-month field. This character is used to specify the weekday (Monday-Friday) nearest the given day. As an example, if you were to specify "15W" as the value for the day-of-month field, the meaning is: "the nearest weekday to the 15th of the month". So if the 15th is a Saturday, the trigger will fire on Friday the 14th. If the 15th is a Sunday, the trigger will fire on Monday the 16th. If the 15th is a Tuesday, then it will fire on Tuesday the 15th. However if you specify "1W" as the value for day-of-month, and the 1st is a Saturday, the trigger will fire on Monday the 3rd, as it will not 'jump' over the boundary of a month's days. The 'W' character can only be specified when the day-of-month is a single day, not a range or list of days.
The 'L' and 'W' characters can also be combined for the day-of-month expression to yield 'LW', which translates to "last weekday of the month".
The '#' character is allowed for the day-of-week field. This character is used to specify "the nth" XXX day of the month. For example, the value of "6#3" in the day-of-week field means the third Friday of the month (day 6 = Friday and "#3" = the 3rd one in the month). Other examples: "2#1" = the first Monday of the month and "4#5" = the fifth Wednesday of the month. Note that if you specify "#5" and there is not 5 of the given day-of-week in the month, then no firing will occur that month.
The legal characters and the names of months and days of the week are not case sensitive.
Available/Associated Calendars
New for BridgeGate, is the ability to exclude date ranges for the schedule to execute on. This is accomplished using the concept of Calendars. Calendars are created in the BridgeGate Portal, and associated to a Schedule in the BridgeGate Workbench.
Transfer Screen
To get to the Template Transfer screen, click the transfer button in the toolbar.
Transfer
Templates/Workflows/Schedules Icon
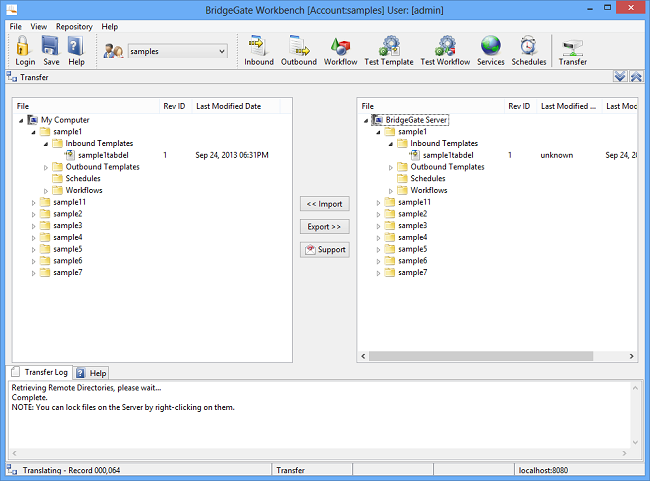
Import/Export of Templates to and from a BridgeGate Server
This screen allows you to send and receive templates between your physical BridgeGate Workbench and the BridgeGate Server to which you are currently connected. To receive templates, select them from the right hand tree and click 'Import'. To receive multiple templates, hold the CRTL button and select them. Alternatively, you can select entire directories of templates to import. For exporting, perform the same actions, except this time click 'Export'.
When a template is exported to a server, the server will first check for differences in the template. If they appear identical, the transfer will abort and a message will be displayed in the Transfer Log at the bottom of the screen. If the template is different than the one found on the server, the 'Revision Id' will be incremented to the next available number found on the server for that specific template. If the Revision Id of the template on the server is higher than the template on your Workbench, you will be prompted and must select 'Yes' to export the template. Likewise, the same holds true for importing templates from the server. If the Revision Id of the template on your Workbench is higher than the one on the server, you will be prompted and must select 'Yes' to import the template.
To retrieve a copy of a template, right click on the template and select 'Revision History. A window will appear that lets you select the Revision Id for the template you wish to import. Additionally, you will notice the time and user that exported each revision of the template to the server. Select the revision you want, then click 'Retrieve'. You will notice a message in the Transfer Log at the bottom of the screen upon completion of the action. Also, the Revision Id of the template on the left tree will now change to reflect the revision you just retrieved. Upon exporting this template back to the server, the new Revision Id will follow the same rules as stated in the second paragraph; it will be incremented to the next available number found on the server for that specific template.
You may lock and unlock templates on the server. This allows you to put a freeze on that template so no one else can export that template to the server until you unlock it. This action is not required and ONLY restricts users from exporting that template to that server. This feature can be used to notify other users that you are currently working on that template. When a template is locked, the name of the user who locked it is displayed.
You may use this screen to delete templates from the server to which you are currently connected . To do this, right click on the template(s) you wish to delete from the right hand tree and select 'Delete'.
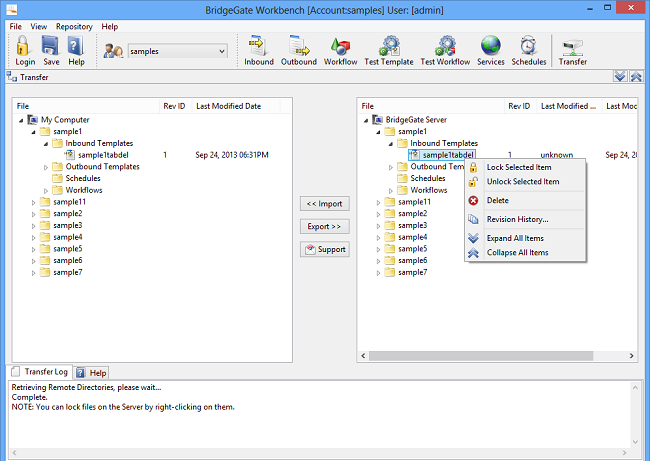
Appendix A Encodings
BridgeGate™ allows you to use various encodings (also known as character encoding schemes or charsets) for reading and writing of data. You specify the type of encoding to use for reading data on the GetData object in the Workflow. You specify the encoding to use for writing on the SendData object in the Workflow. Additionally, for fixed-length file types, you can specify the encoding on a Field-by-Field basis on the Inbound or Outbound Template.
The types of encodings available for BridgeGate™ are:
- System Default
- UTF-8
- UTF-16
- UTF16-BE
- UTF16-LE
- JIS AutoDetect
- Shift-JIS
- JIS ISO2022
- JIS X0201-EUC
- EBCDIC Japan
- EBCDIK Japan
- IBM Kanji (No Mix)
- EBCDIC IBM Kanji
- EBCDIK IBM Kanji
Specify Encoding for Reading Data
To specify the encoding to use when BridgeGate™ reads data, select it on the GetData screen on the Workflow as shown below. The encoding is not available for reading when using the Adapter Type of DATABASE.
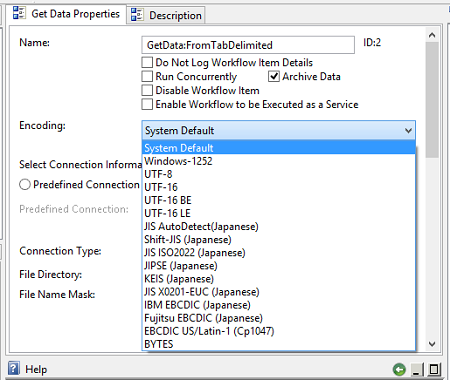
Specify Encoding for Writing Data
To specify the encoding to use when BridgeGate™ writes data, select it on the SendData screen on the Workflow as shown below.
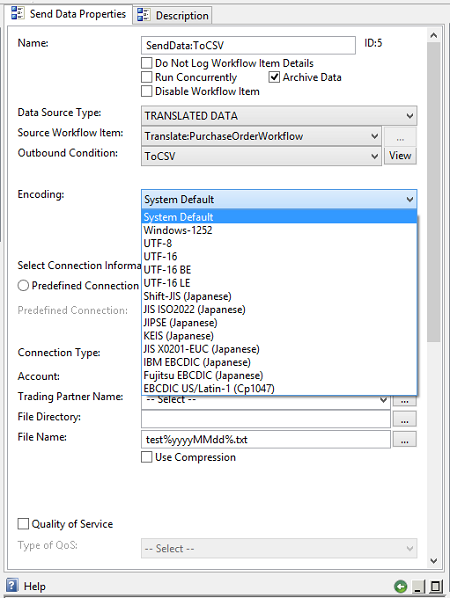
Field Level Encoding Overrides
You can also tell BridgeGate™ what encoding to use as it reads/writes each individual Field of data. This feature is only available for Fixed Length data type. To enable this feature, open the Preferences screen in the Workbench by going to File -> Preferences and then selected the Encoding category:
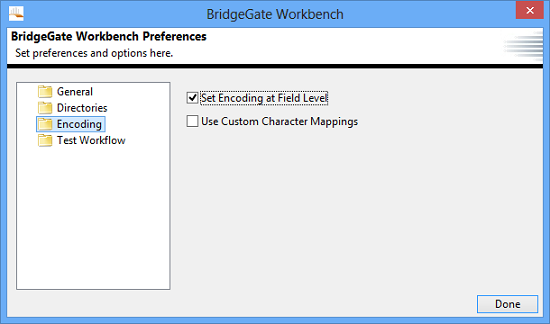
By selecting Override Encoding at Field Level, a new option will appear on the Template Properties editor of both the Inbound and Outbound Template screens.
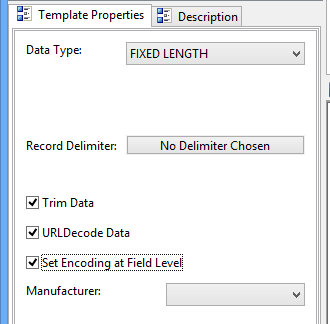 |
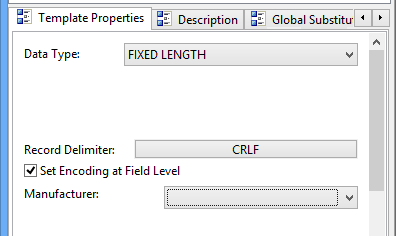 |
Inbound Template Properties editor Outbound Template Properties editor
From the Inbound/Outbound Template, when you select this checkbox Override Encoding at Field Level, you will make visible a new drop down on the Field screen for the Template. This drop down allows you to select the encoding to use for the Field:
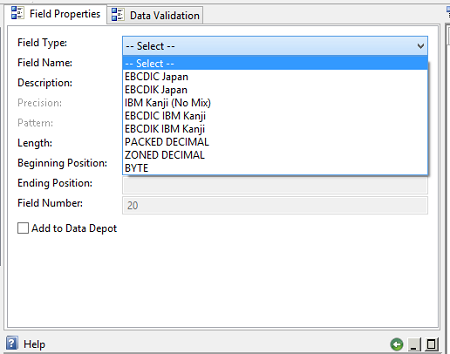 |
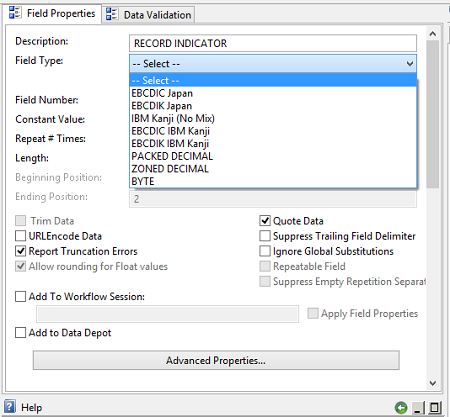 |
For Field level encoding overrides, only a subset of encoding types are allowed:
- EBCDIC Japan
- EBCDIK Japan
- IBM Kanji (No Mix)
- EBCDIC IBM Kanji
- EBCDIK IBM Kanji
Custom Character Mappings (Gaiji)
BridgeGate™ allows you to specify custom character mappings between certain pairs of encodings: Shift-JIS, EBCDIC Japan, EBCDIK Japan, IBM Kanji (No Mix), EBCDIC IBM Kanji, and EBCDIK IBM Kanji. This enables BridgeGate™ to properly translate either user-defined or system-specific characters from one encoding to another.
To enable this feature, open the Preferences screen in the Workbench by going to File -> Preferences and then selecting the Encoding category:
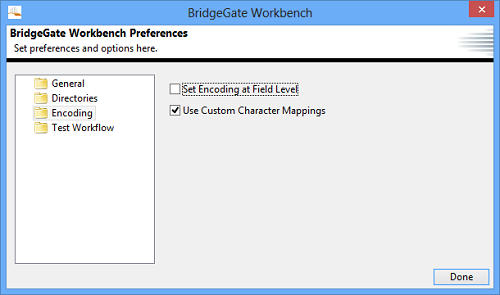
By selecting Use Custom Character Mappings, a new menu item will appear in the Repository menu:
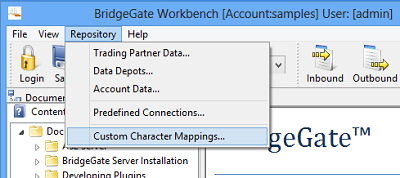
This Custom Character Mappings dialog which behaves similarly to the quick field add dialog:
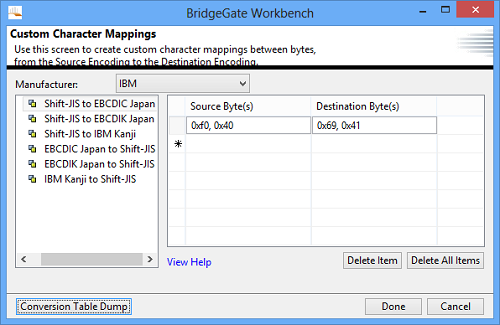
To create a new mapping, click New Character Mapping. Give the mapping a name. This name will be used when you select it on the Workflow screen. Select the source and destination encodings.
These encodings are a subset of the encodings available in BridgeGate™:
- EBCDIC
- EBCDIK
- IBM Kanji (No Mix)
- EBCDIC IBM Kanji
- EBCDIK IBM Kanji
Depending on the source and destination encodings selected, the following ranges of bytes are allowed:
| Encoding | Byte Length | 1st Byte Range | 2nd Byte Range |
| IBM Kanji | 2 | 0x41 - 0x7F | 0x41 to 0xFE |
| EBCDIC | 1 | not 0x0E or 0x0F | n/a |
| EBCDIK | 1 | not 0x0E or 0x0F | n/a |
| Shift JIS | 1 | 0x00 - 0x7F OR 0xA1 - 0xDF | n/a |
| Shift JIS | 2 | 0x81 - 0x9F OR 0xE0 - 0xFC | 0x40 - 0x7E OR 0x80 - 0xFC |
Note: For Kanji mixed with EBCDIC or EBCDIK, either the one-byte or two-byte rule above will apply, dependent on how many bytes you type in for that row.
To use a Custom Character Mapping you have created, you select it from the Translate screen on the Workflow, as shown below:
When using a Custom Character Mapping, you must make sure all GetDatas found on this Translate screen use the same encoding as the source encoding of the selected Custom Character Mapping. Likewise, all SendDatas found on this Translate screen must use the same encoding as the destination encoding of the selected Custom Character Mapping.
Appendix B Database Navigator
Overview
The Database Navigator is a tool that lets you connect to databases
(with Predefined Connections) so you can view data and work with
fields on the associated template record. It will only affect the
currently selected record from which it was launched.
It's
currently available from the Record Screen for Inbound Templates of
Data type DATABASE.
In future releases, it's planned to also
be available from Outbound Templates of Data type DATABASE and
Outbound Custom DB Fields.
Toggle Connections
As a convenience, if a Record-Level or Template-Level Predefined Connection is defined,
The DB Navigator's predefined connection will default accordingly (with Record-Level taking precedence).
It will attempt to "reuse" a PDC that's already in a connected state, but generally doesn't assume you want to open a connection. You can navigate to any PDC, toggle it open, select a schema, run queries and toggle it closed. When you exit the DB Navigator, any existing PDC definitions (and their connection state) remain unaffected.
With one exception ...
When no PDC's are defined, and you use DB Navigator to update fields on the current template record, the PDC used to update the record will be set as the new Record-Level or Template-Level PDC.
Working with SQL Statements
When the DB Navigator is opened, the current template's record (from which it was launched) has it's SQL Statement built and loaded into both the SQL Editor and Template Record SQL tabs.
The Template Record SQL reflects associated Template Record and is not editable.
The SQL Editor can be edited to run any query you enter into (or paste into) it. You can "check" the validity of or "play" the SQL script from either tab. The results of which are shown below in the SQL Results tab.
As a convenience, (after connecting to a database and selecting a table)
You may view a table's Meta Data and Top 25 records. There are also "right-click" menus on the tables and their Meta Data fields that can help you "construct" your SQL statement. It should be noted that DB Navigator limits query results to 500 records so not to adversely impact your database performance.
Compare SQL to the Template
This powerful feature of the DB Navigator compares your SQL Editor's statement against the existing Template Record and lets you choose (field by field) which ones to keep, add, or delete. As we'll as whether or not to replace the remainder of the query clause.
Appendix C SSL Certificate Manager
Overview
BridgeGate™ provides an SSL Certificate Manager interface to manage all aspects of SSL public/private key management. The SSL Certificate Manager is located in the BridgeGate Workbench, in the main menu under File -> SSL Certificate Manager.
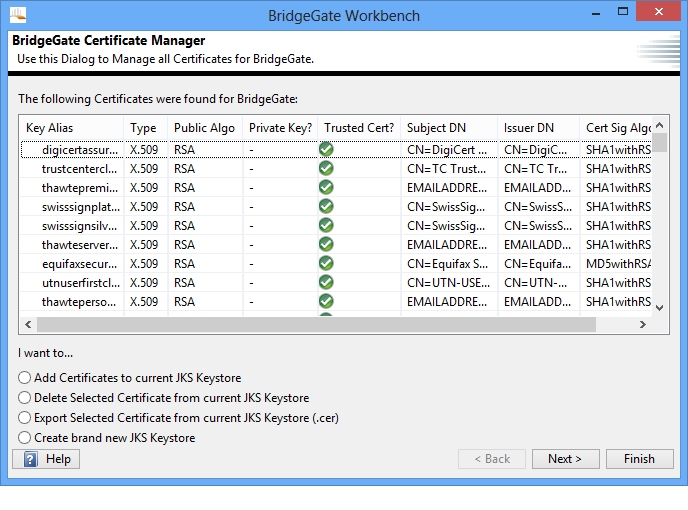
If you have already created a Keystore for BridgeGate™, you can skip the next step, creating a new JKS Keystore.
Creating a New JKS Keystore
Open the BridgeGate Workbench. From the main menu, select File -> SSL Certificate Manager. From the SSL Certificate Manager screen, select the radio button option to Create brand new JKS Keystore and click Next. You will be presented with a screen to enter the information for the new Keystore file, including the file location, password to protect the file with, and the alias to use for the public/private keypair you want to create. You are also provided with several textboxes to enter the information for the Certificate Signing Request (CSR):
| Field | Description |
| File Location | Enter the full path to the new BridgeGate JKS Keystore
file.
|
| Password | Password to protect the public/private key file |
| RepeatPassword | Repeat the password |
| Key AliasTo Use | Nickname for the BridgeGate public/private keypair you are
creating. Recommendation
is: BridgeGate as your alias. Recommendation
is: BridgeGate as your alias.
|
| CountryName | Enter 2 letter code. For US, enter US |
| State orProvince | Enter the full name of the state or province |
| Locality | Enter your city name |
| OrganizationName | Enter a company name, for example |
| OrganizationalUnit Name | Enter a department or section. You could also use BridgeGate |
| CommonName | Enter your name if you wish, a department name, or BridgeGate |
| An optionalemail address | Enter an email address if you wish. Not required. |
When you are done filling in this information, click Finish. The application will pause for a few seconds as it creates the SSL keypair. A message window will appear with the command line information that BridgeGate used to create the keypair, along with an Exit Code. Ensure the Exit Code is 0 for successful creation.
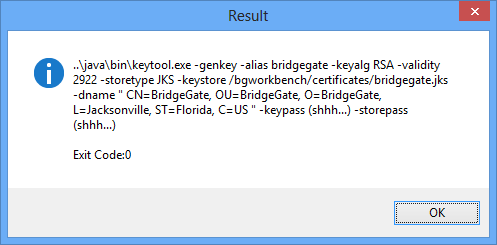
Click ok, and the screen will now display a list of all keys found in your new Keystore. Since you just created it, you will only see yours. The Key Alias is used in the list to identify the key.
Importing additional SSL public keys (SSL Certificates)
Open the BridgeGate Workbench. From the main menu, select File -> SSL Certificate Manager. From the SSL Certificate Manager screen, select the radio button option to Add Certificates to current JKS Keystore and click Next. The next screen presents you with many options for importing SSL public keys, also known as SSL Certificates.
| Field | Description |
| My Certificate(s) are in aJKSKeystore | If you already have an existing Java Keystore that houses private/public keys, and you want all or some of them moved into this Keystore, select this option. You will need to know the password for the Keystore file. |
| My Certificate is Base-64Encoded X.509(.cer) | This is the most common form of an SSL public key. It
usually ends in a .cer file extension, however you may receive the
SSL certificate in the body an email. If opened in a text editor,
the file is ASCII and starts with the line: ------BEGIN CERTIFICATE------ And ends with the line: ------END CERTIFICATE------- |
| My Certificate is DEREncodedBinary X.509 (.der) | This is the binary form of the Base-64 file. It usually ends in a .der extension. |
| My CertificateisCryptographicMessageSyntax PCKS #7(.p7b) | A less common format for an SSL Certificate. You may need to use tools like OpenSSL to convert keys in and out of this format. OpenSSL tools are provided with the installation of the BridgeGate Server, at %BG_ROOT%/utils/openssl |
| File Location | Enter the path to the file containing the SSL public key |
| Password | Some radio options above require a password for the file |
| Key Alias To Use | Nickname to display the SSL public key. |
Exporting your BridgeGate SSL public key
Companies you exchange data with may need a copy of your SSL Certificate from Bridgegate. When they do, you will use the BridgeGate Workbench to retrieve it. From the main menu of the BridgeGate Workbench, select File -> SSL Certificate Manager. From the SSL Certificate Manager screen, select the key with the alias of BridgeGate (or whatever else you may have used), then select the radio button option to Export Selected Certificate from JKS Keystore and click Next. It should be the only key in your list with the Private Key column marked. The next screen will allow you to specify the directory and filename for the SSL public key you are exporting. The public key file will be created as Base-64 Encoded X.509 .cer file.
Appendix D Trading Partner Data Dialog
Overview
The Trading Partner dialog allows you to add, update, and delete trading partners, and the static sets of data for them. Trading Partner configuration comes in three steps, represented by the three tabs on the dialog: creating the trading partner(s), defining the set of keys to use, and finally setting the values for the keys of each set. This is similar to Account Data dialog, except that trading partners allow multiple sets, and you choose the name of each set (herein called the Trading Partner).
Creating Trading Partners
To create a trading partner, click on the first tab. Click on the New Partner button and choose a name. To rename a trading partner, select it in the list to the left and click on the Rename Partner button, then type in a new name. To delete a trading partner, select it in the list to the left and click on the Delete Partner button.
Creating Trading Partner Keys
The keys for trading partners are the same type of feature as for the Account Data dialog, where you define key=value sets. You create the keys in the second tab, but add the values in the third tab. This is because you can only have a single set of keys, but they span across all trading partners. If you add a new key, every trading partner will have it, and it will be a blank value by default. When you delete a key, you will delete it for all trading partners as well.
Click on the New Key button and choose a name. To rename a trading partner, select it in the list to the left and click on the Rename Partner button, then type in a new name. To delete a trading partner, select it in the list to the left and click on the Delete Partner button.
Making a Trading Partner Key Searchable
To make a key searchable means you plan on using the key for Trading Partner Lookups in an Outbound Template. Under no circumstance should you check this box if you do not use it for lookups, as it degrades performance when doing trading partner lookups. Examples of using Trading Partners and how to use lookups on an Outbound Template is covered in the Samples and Tutorials.
Setting Trading Partner Key Set Values
Click on the third tab of the dialog. You will see the complete list of trading partners on the left, just like on the first tab. However, when you click on a trading partner in the list, the right side allows you to type the values for each key. When you are done entering values for each key set for each trading partner, click Done. It is ok to leave values blank.
Appendix E Data Depot Dialog
Overview
The Data Depot dialog allows you to add, update, and delete data depots. Data depots allow you to store inbound and outbound data for further analysis, reporting, and charting.
To create a data depot, select the Repository menu item, and select Data Depot. From this dialog, you can add a new data depot by clicking on the New Data Depot button.
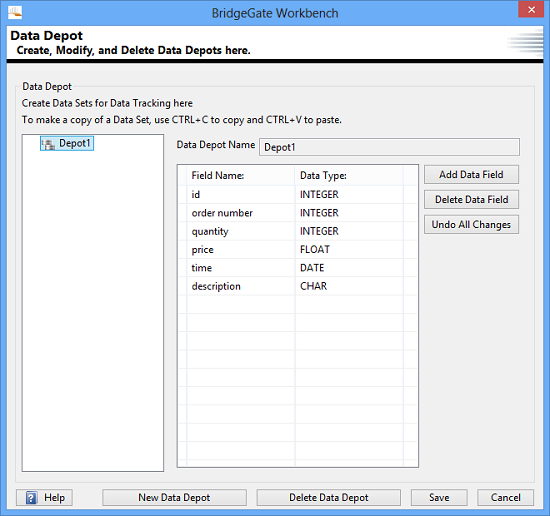
At this point, the data depot has been created, but fields must be added. To add a new data field, click the Add Data Field button, which will launch the Add Data Field dialog:
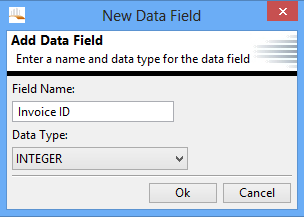
At this point, enter in the name of the field, and the data type. The possible data types are INTEGER, FLOAT, DATE, and CHAR. If any of INTEGER, FLOAT, or DATE is selected, only values of that type may be written to these fields, while any data type may be written to an CHAR field. Note, however, that CHAR values may not be usable for grouping or sorting during reporting and analysis. You may later change the data type of the field by selecting the data type in the list. Note that any data values may only be changed to CHAR it is not possible, for instance, to change a FLOAT to an INTEGER.

To remove a data depot field, simply select the data field and click on the Remove Data Field button.
Example Usage
Data depots are used to store both inbound and outbound data for further analysis at a future date. An example of this would be to store the date, item number, and price of an order for each item sold. This would allow analysts to later build reports for item sales and overall sales based on time of day, day of week, or the day of the year.
To save a value to a data depot, first select the field in either the inbound or outbound template. From the Field Properties screen, check the box for Add to Data Depot. This will display two drop-down lists for Data Depot and Data Field. The Data Depot list will be populated with all available data depots for this account. When a data depot is selected from this list, the Data Field list will be populated with all data fields that correspond to the data type of the field as described above. In the screen shot below, the INTEGER value QUANTITY has been selected to be saved. When the user selects the ORDERS data depot, the two INTEGER fields (Invoice ID and Quantity) are included in the list, as well as the CHAR field, Bill to Zip. This is because any data type may be written to an CHAR field.
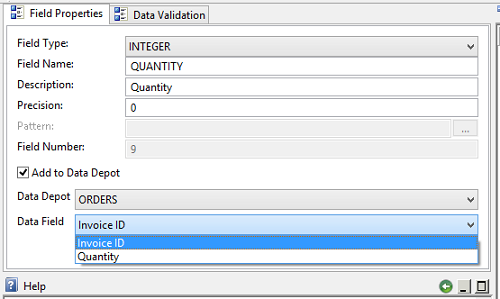
Note that for each looping record, only one value will be written to the data depot. For example, if the inbound template writes a field to Invoice ID, and the outbound template also writes out to Invoice ID, only the value from the outbound template will be stored in the data depot. If both the inbound and outbound data values need to be stored, please store them in separate data fields in the data depot.
Appendix F Account Data Dialog
Overview
The Account Data dialog allows you to add, update, and delete account data. Account Data allows you to create key=value pairs of data that are accessible during workflow execution from within Outbound Templates and Workflows. The data is static, and is only changed from this dialog. The key=value pairs of data you create are only accessible from within the account they are created for. Unlike trading partner data, there are no special requirements for looking up account data; it is always available from any Outbound Template or Workflow from within its account.
You create Account Data from the menu bar of the Workbench, by going to Repository | Account Data. From this dialog, you simply select the New Key button, and name the key. This creates a new key in the table. You can then select the value for the key in the table and edit is freely. When you are done, click the Done button. Whenever you need to change a value for a key, open the Account Data dialog, click on the value for the key you want to edit, and then edit. To rename a key, select the row in the table for the key=value pair, then select the Rename Key button and change the name of the key. To delete a key, select the row in the table for the key=value pair, and then select the Delete Key button. You cannot create a new key using the same name as an existing key in the same account.
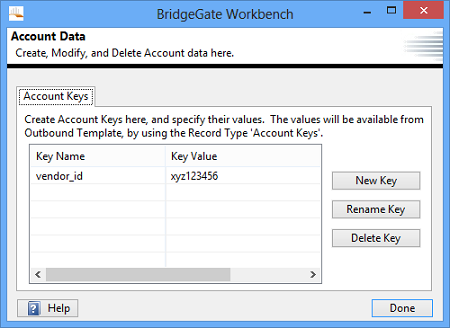
Example Usage
Usage of account data varies customer by customer depending on their business process requirements and how they use BridgeGate™. However, a common scenario for using account data would be to hold configuration information for connections to servers or applications from other departments, as well as your companys address and contact information.
In the following example, the vendor id from the screen shot above needs to be written to your data in an Outbound Template using a field. Below is a screen shot of the field editor, and the Inbound Record Name of Account Data is selected. Then, all account data keys are listed in the next drop down, Inbound Field Name. Selecting vendor_id is all you have to do to access the value for this key.
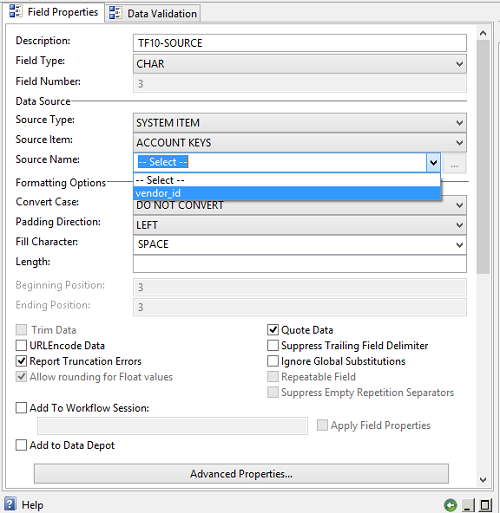
In the following screenshot, the same vendor_id key is placed in the filename of a Send Data.
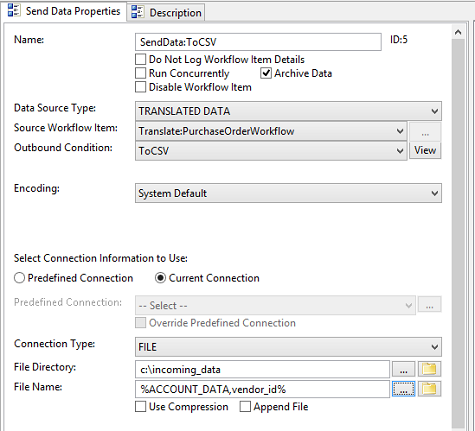
Appendix G Predefined Connections Dialog
Overview
The Predefined Connection describes all of the information needed to connect to the data referenced in your Workflows. Additionally, when connecting to a Database, the Inbound and Outbound Template screens also have a facility for connecting to easily create and validate your templates. Predefined Connections are created from the Repository menu. To get to the Predefined Connections screen, navigate to Repository | Predefined Connections in the menu bar, or simply click the '...' button next to the Connection drop down on your Workflows, as well as the Inbound or Outbound Template areas when using Database templates.
When using a connection several times within your Workflows, it's better to create a Predefined Connection that can be referenced where needed. This allows you to have one location to change information, such as the password if it changes, and have all Workflows that use the connect be affected by the change.
Overriding a Predefined Connection
For connections that are basically the same but have a few parameters different, such as a file location or file name, you are still encouraged to created Predefined Connections. When selecting a Predefined Connection, you can override the parameters for it and change one or more of them as they are being used, without affecting the actual Predefined Connection or other Workflows that use it. Overriding takes place on the Get Data and Send Data workflow item screens.
Data Source Connections
Data Source Connections are configured to indicate the source of data to read into a BridgeGate Workflow. Identical connection types are available for both source connections and destination connections.
Data Destination Connections
Data Destination Connections are configured to indicate the destination of data to write to from a BridgeGate Workflow. Identical connection types are available for both source connections and destination connections.
Connection Types
BridgeGate™ uses the following data connection types to connection to source and destination locations:
- AS2
- BridgeGate Web Service (source only)
- BridgeGateFTP
- BridgeGateJMS (source only)
- BridgeGateMQSeries (source only)
- BridgeGateMSMQ (source only)
- BridgeGateSocket (source only)
- Command Prompt
- Data Stream (destination only)
- Database
- File
- FTP (unsecured, SSL, SSH)
- HTTP
- JMS
- MQ Series
- MSMQ
- Socket
- SSH (shell only, no file transfer)
- Web Service
AS2
BridgeGate™ can use Applicability Statement version 2 (AS2) as a connection type. AS2 is an EDI specification for secure transmission over HTTP traffic. AS2 allows the use of S/MIME and real-time HTTPS. AS2 uses encryption and digital signatures to achieve security, authentication, message integrity, and privacy.
BridgeGate™ allows for the following settings to be configured for AS2 data transmission:
- AS2 Identifier
- Signing Certificate (Must be previously installed and configured)
- Encryption Certificate (Must be previously installed and configured)
- HTTPS Certificate (Must be previously installed and configured)
- Email Address
- AS2 URL
- Transport
- HTTP
- HTTPS
- Security
- Signed
- Encrypted
- Signed and Encrypted
- Compression
- True
- False
- MDN Transport
- Synchronous
- Asynchronous
- AS2 MDN URL
- MDN Security
- Signed
- Unsigned
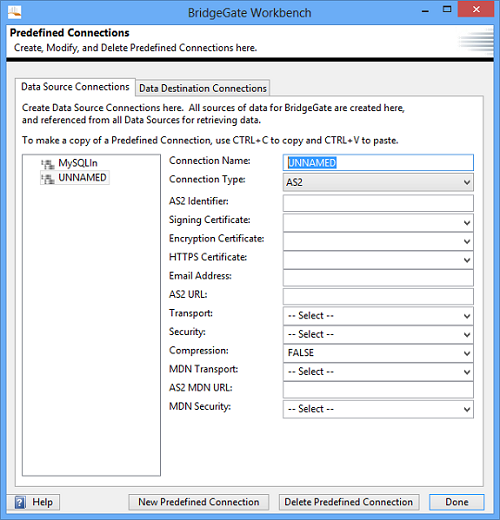
BridgeGate Web Service
This is not to be confused with Web Service. BridgeGate™ Web Service is a feature that allows BridgeGate™ to expose a Web Service for others to connect to, while Web Service allows BridgeGate™ to connect to other external Web Services. You can configure this Get Data action to listen as a Web Service on the BridgeGate™ server(s) that you transfer this workflow to.
There are two tabs available for configuration:
- Service
- Operation
Service Tab will need the following:
- Service Endpoint URL : This is for display purposes only to show you the Service Endpoint URL that a remote web service client would connect to, based on the BridgeGate™ server you are currently logged in to.
- Service Name : This should be unique for each BridgeGate™ Web Service Adapter. The Service Endpoint URL will reflect the name you enter here. Once the workflow is completed and Transfered to the server, you can verify that the WSDL is accessible by opening the Service Endpoint URL in the browser suffixed with ?WSDL
- Target Namespace : This is the target namespace of the XML elements that will be sent as the response to invoking this web service. This attribute is not required for all services, but may be required for the particular web service you are implementing.
- Authentication : This specifies whether Authentication should be performed and if so what type.
- NONE : No authentication will be performed by this BridgeGate Web Service.
- BASIC : Choosing BASIC will reveal inputs for user
name and password. These values will be stored in the workflow for comparison against values provided in the request as follows:
- The BridgeGate Web service will use the inbound SOAP header to identify the username and password to use for authentication.
- BridgeGate will look for 'Username' and 'Password' in the SOAP header.
- The Username field is assumed to be plain text.
- The Password field is assumed to be base64 encoded.
- BRIDGEGATE : The BridgeGate Web Service will authenticate the values provided in the request against the BridgeGate Users as follows:
- The BridgeGate Web service will use the inbound SOAP header to identify the username and password to use for authentication.
- BridgeGate will look for 'Username' and 'Password' in the SOAP header.
- The Username field is assumed to be plain text.
- The Password field is assumed to be base64 encoded.
- The username and password will be authenticated against the BridgeGate Users and the Users must have BridgeGate Web Service portal permissions.
- Failed Authentication : Results in an AXIS Fault being returned with
faultcode of "401" and
faultstring of "Authentication failed : Username or Password is incorrect or User does not have security rights".
Either correct the Username and/or Password and resend your request or if doing BRIDGEGATE Authentication confirm that the user has the "BridgeGate Web Service" protocol permission.
- Result : Select Inbound Value only if the inbound and outbound are non-XML datatypes. Use either SOAP Envelope or SOAP Body if both inbound and outbound are XML datatypes.
- Send Synchronous Response : If this box is checked, a synchronous response will be sent to the client invoking this BridgeGate™ web service.
- Send Synchronous Response as SOAP Body : This box is only available if Send Synchronous Response is checked. Selecting this will stream the entire contents of the Send Data linked to this synchronous response into the SOAP response body. This requires that the Send Data in question produces a valid XML document. For XML datatypes ( most common web services ) this should be checked.
Operation Tab will need the following:
- Operations : More than one operation can be added for the service by right-clicking in the multi-line box and choosing New Operation .
- Operation Name : This should be unique for each operation.
- SOAP Action : While SOAP Action can be same as the Operation Name, it needs to be unique per operation. The selected operation will be executed based on the SOAP Action sent by the Web Service Client.
- Request : The request tab will allow the selection of an inbound template from any workflow group.
- Response : The response tab will allow the selection of an outbound template from any workflow group. It is reccomended to use XML inbound templates with XML outbound templates and non-XML inbound with non-XML outbound templates..
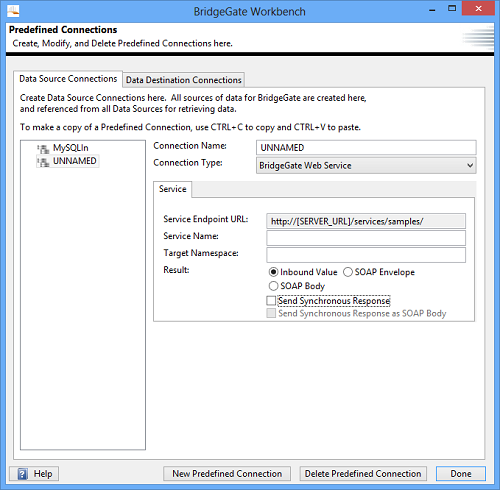
BridgeGateFTP
BridgeGate™ provides internal FTP services for use by the BridgeGate Workbench.
BridgeGate™ allows for the following settings to be configured for BridgeGateFTP data transmission:
- BridgeGate account (Must be pre-configured from the Repository|Account Data menu)
- Trading Partner name (Must be pre-configured from the Repository|Trading Partner menu)
- File Directory
- File Name Mask
- Options to enable
- SSH - Uses SSH secure tunnel to FTP data
- Do Not Delete Files - Leaves files in configured directory after successful transmission
- Use Decompression - Automatically decompresses compressed files
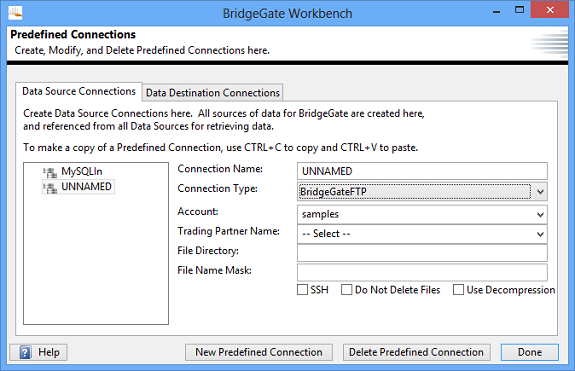
BridgeGateJMS
BridgeGate™ provides an internal Java Message Service (JMS) for data transfer usage by the BridgeGate Workbench.
BridgeGate™ allows for the following settings to be configured for BridgeGateJMS data transmission:
- Destination Type
- Queue
- Topic
- Queue/Topic name (Must be pre-defined)
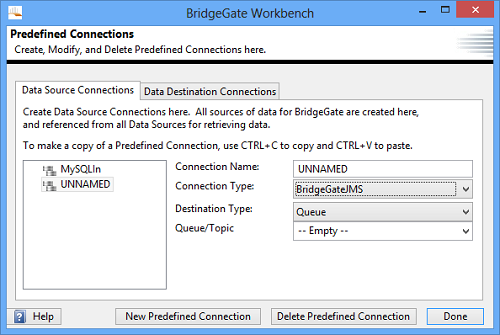
BridgeGateMQSeries
BridgeGate MQ Series is a service capable connection type, when enabled it allows users to continually monitor and retrieve binary or character data from IBM WebSphere MQ as the messages arrive in the designated queue.
BridgeGate™ allows for the following settings to be configured for BridgeGate MQ Series data transmission:
- Queue Manager name
- Destination Type
- Queue
- Topic
- Destination Name
- Durable Client ID
- Host name
- Port
- Username
- Password (Hidden from display)
- Channel
- Timeout (in seconds)
- Auto Commit
- Transactional Commit
- SSL
- Cypher Suite
- Run on Primary Server
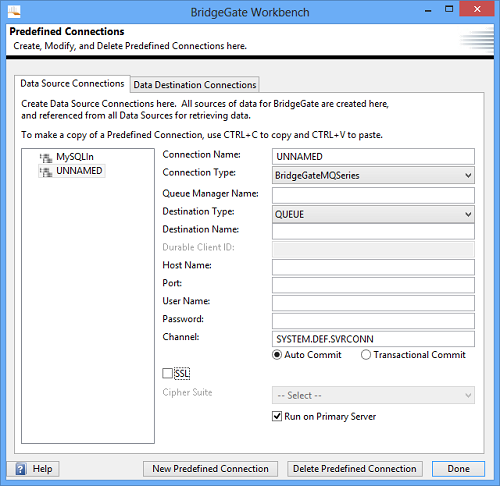
BridgeGateMSMQ
BridgeGate MSMQ is a service capable connection type, when enabled it allows users to continually monitor and retrieve binary or character data from MSMQ as the messages arrive in the designated queue.
BridgeGate™ allows for the following settings to be configured for BridgeGate MSMQ data transmission:
- Queue Type
- Public
- Private
- Queue Name
- URL
- Use Windows Authentication
- Use NYLMv2
- Domain
- Username
- Password (Hidden from display)
- Deadletter
- Transactional
- Auto Commit
- Transactional Commit
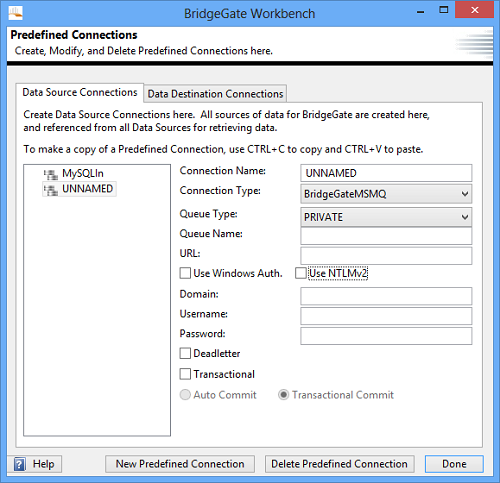
BridgeGateSocket
An internally defined BridgeGateSocket can be used to transfer data. BridgeGate™ allows for the following settings to be configured for BridgeGateSocket data transmission:
- Port Number
- End of Data Terminator
- Timeout in Seconds
- Options to enable
- Keep Client Socket Alive
- SSL
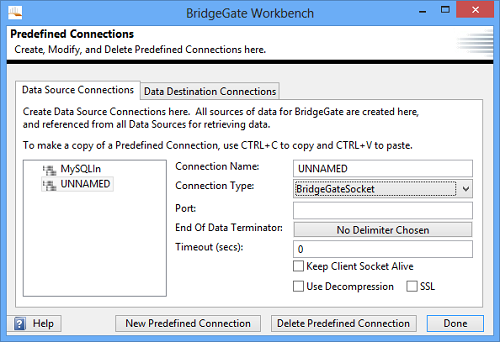
Command Prompt
BridgeGate™ can be configured to allow data transfer as specified by a script that can be run from the command shell. BridgeGate™ allows for the following settings to be configured for Command Prompt data transmission:
- Executable Type
- CMD
- KSH
- Arguments
- File Name
- Options to enable
- Use Decompression
- Stream Arguments
- Script definition
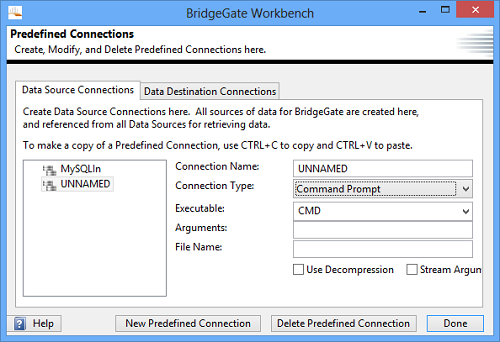
DataStream
DataStream is used to send the translated stream of data to a call workflow for subsequent processing.
NOTE: Data String is stored in memory so it's use should be restricted to small sized data sources.
BridgeGate™ allows for the following settings to be configured for DataStream:
- Call Workflow To Process Data Stream
- Workflow Group
- Workflow to Call
- Run Concurrently
- Run Distibuted on Cluster
- Max Concurrent Transactions
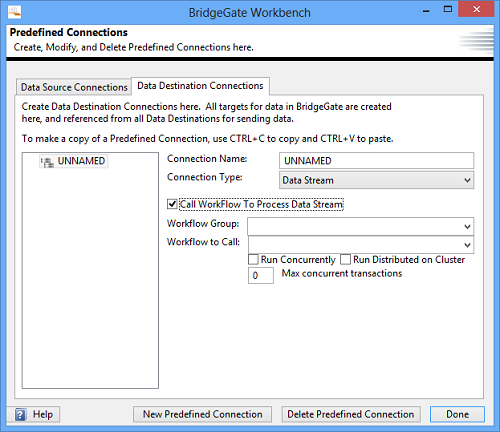
Database
Databases can be used as a source and/or destination of data to translate in BridgeGate™. For convenience, the BridgeGate Workbench can connect directly to your database and display a list of tables and columns when mapping to a database. The types of databases currently available for use with BridgeGate™ are:
- Oracle™
- Microsoft SQLServer™
- IBM DB2™
- MySql
- Microsoft ACCESS™
- ODBC Connection
- PostgreSQL
- Teradata
In order to connect to a database using the BridgeGate Workbench, you must first create a Predefined Connection. You can do this in the Predefined Connections screen. To get to the Predefined Connections screen, navigate to Repository|Predefined Connections in the menu bar, or simply click the '...' button next to the Predefined Connection drop down.
BridgeGate™ uses JDBC connections to connect to a database. The format for JDBC connections is:
<jdbc:driver><hostname or IP address:optional
				port number><database name>
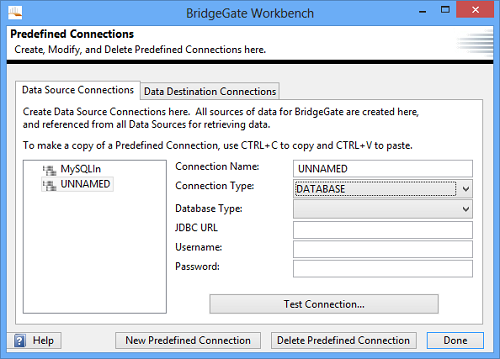
Examples are provided below for different types of databases:
- MySQL -
jdbc:mysql://192.168.10.11/bridgegate(the last field is Database name) - MySQLUnicode (append to
above)
&useUnicode=true&characterEncoding=UTF-8 - Oracle -
jdbc:Oracle:thin:@192.168.10.11:1521:qa9i(the last field is the SID) - SQL Server* -
jdbc:jtds:sqlserver://192.168.10.11/bridgegate(the last field is Database name) - DB2 -
jdbc:db2://192.168.10.11:50000/sample - Microsoft Access -
jdbc:odbc:myDatabaseName(This requires creating an ODBC connection) - PostgreSQL -
jbdc:postgresql://192.168.10.11/bridgegate(This specifies a URL connection) - Teradata -
jdbc:teradata://192.168.10.11/DATABASE=BRIDGEGATE
* If you are using NTLM (Windows Authentication), and connecting to a SQL Server, the domain must be specified in the JDBC Url:
jdbc:jtds:sqlserver://192.168.10.11/bridgegate;domain=OI
(the last field is the Domain name)
If you are using an instance within the SQL Server database:
jdbc:jtds:sqlserver://192.168.10.11/bridgegate;domain=OI;instance=Prod_Instance
(the last filed is the Instance
running on that database.)
If you are using Microsoft Access and ODBC via the System DSN, note that you need to register the Access database in the System DSN. From the Control Panel, find the ODBC data sources (in most of the Microsoft operating systems such as XP, this is found in the Administrative Tools). Pick the Microsoft Access Driver (*.mdb). Enter your database name into the Data Source Name field, and then press the Select button. Navigate to the location of your database (either local or on the network) and select the Access database that you are registering, click OK.
Additional database vendors are supported. Contact BridgeGate Support for instructions on how to setup them up.
BridgeGate™ can be configured to transfer data via email protocols. BridgeGate™ can reference POP3 and IMAP accounts and supports secured email transmission via SSL and TLS.
BridgeGate™ allows for the following settings to be configured for Email data transmission:
- Mail Server : Port #
- example ... 192.168.10.100 : 1234
- if you omit the colon & port #, a default is used based on your protocol selections.
- Secure protocol selection
- SSL
- TLS
- User/Email Address
- Password (Hidden from display)
- Email Protocol
- POP3 (uses default port # 110 for non-SSL, 995 for SSL)
- IMAP (uses default port # 143 for non-SSL, 993 for SSL)
- IMAP only options
- Type of Email
- All
- Seen
- Recent
- Status of Email after BridgeGate™ accesses it
- Seen
- Deleted
- Type of Email
- Read data location
- In the email's body
- In the email's attachment
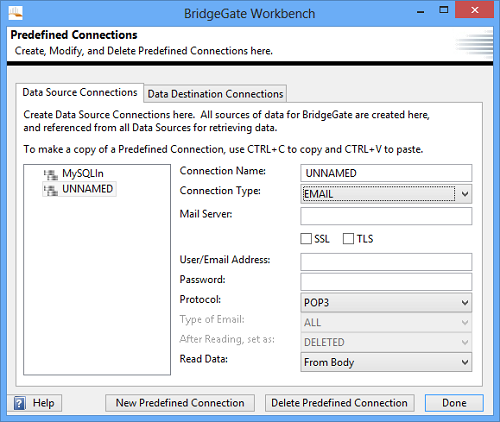
File
BridgeGate™ can reference a file system location for data transfer.
BridgeGate™ allows for the following settings to be configured for file system data transmission:
- File Directory
- File Name Mask
- Options for file handling
- Do Not Delete Files (Leaves files in configured directory after successful transmission)
- Use Decompression (Automatically decompresses compressed files)
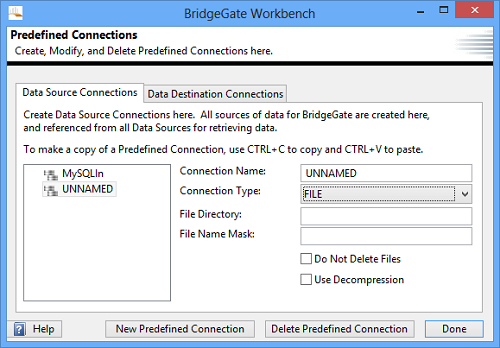
FTP
BridgeGate™ can pull or push translation data to an FTP location.
BridgeGate™ allows for the following settings to be configured for FTP data transmission:
- FTP Server IP Address
- Account Name (Optional)
- User Name
- Password (Hidden from display)
- Directory
- File Name Mask
- Options for file handling
- Do Not Delete Files (Leaves files in configured directory after successful transmission)
- Use Decompression (Automatically decompresses compressed files)
- Passive
- Binary Mode
- ASCII Mode
- SSL
- SSH
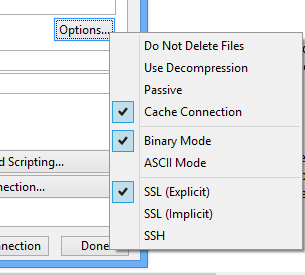
The BridgeGate™ Workbench accepts custom scripting for the FTP connection. When Cache Connection is checked the scripting will be from the cached connection as well. If unique scripting for every connection is desired then un-check Cached Connection.
The BridgeGate™ Workbench custom scripting for the FTP connection is displayed in the following screen print:
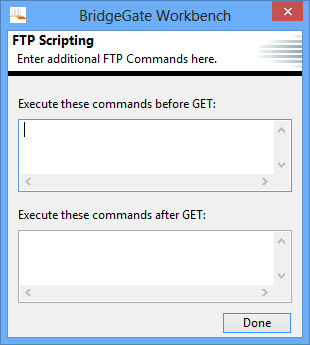
The BridgeGate Workbench additionally allows for the testing of the FTP connection:
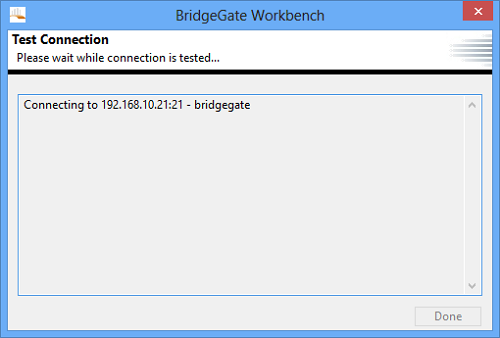
Menu depicting full options for FTP connection:
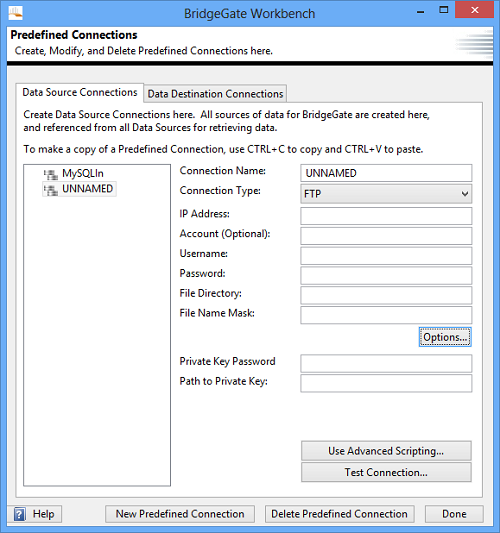
HTTP
BridgeGate™ can connect to a web location via HTTP location.
BridgeGate™ allows for the following settings to be configured for HTTP data transmission:
- URL location
- Option for URLEncoding
- Options for file handling
- Use Decompression (Automatically decompresses compressed files)
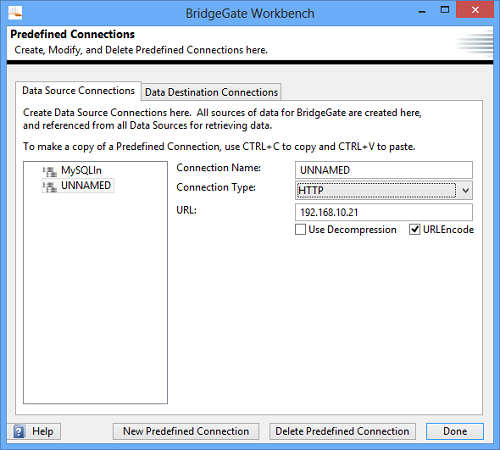
JMS
BridgeGate™ provides access via Java Message Service (JMS) for data transfer usage by the BridgeGate Workbench. Factory information must be pre-configured.
BridgeGate™ allows for the following settings to be configured for JMS data transmission:
- Connection Factory
- Context Factory
- Context URL
- Destination Type
- Queue
- Topic
- Queue/Topic name (Must be pre-defined)
- Durable Client ID
- Username
- Password (Hidden from display)
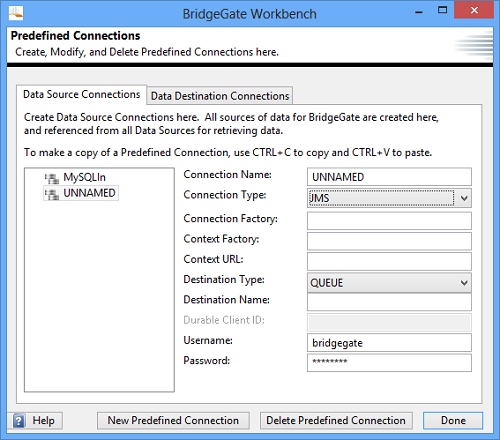
MQ Series
BridgeGate™ provides access via MQ Series connection for data transfer usage by the BridgeGate Workbench. Factory information must be pre-configured.
BridgeGate™ allows for the following settings to be configured for MQ Series data transmission:
- Queue Manager name
- Destination Type
- Queue
- Topic
- Destination Name
- Durable Client ID
- Host name
- Port
- Username
- Password (Hidden from display)
- Channel
- Timeout (in seconds)
- Auto Commit
- Transactional Commit
- SSL
- Cypher Suite
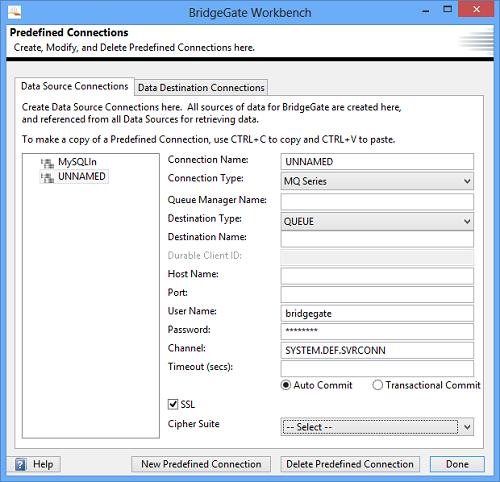
MSMQ
BridgeGate™ provides access via MSMQ connections for data transfer usage by the BridgeGate Workbench. Factory information must be pre-configured.
BridgeGate™ allows for the following settings to be configured for MSMQ data transmission:
- Queue Type
- Public
- Private
- Queue Name
- URL
- Use Windows Authentication
- Use NYLMv2
- Domain
- Username
- Password (Hidden from display)
- Deadletter
- Transactional
- Auto Commit
- Transactional Commit
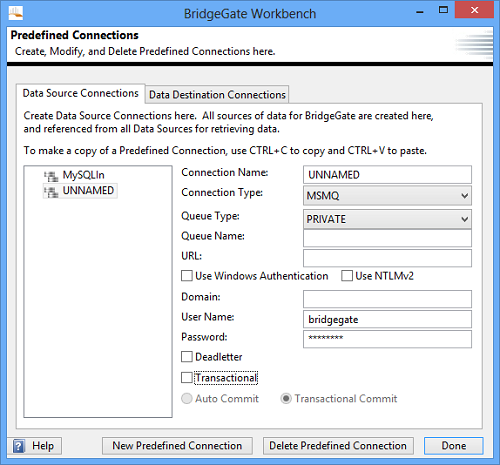
Socket
BridgeGate™ can reference standard IP sockets to transfer data.
BridgeGate™ allows for the following settings to be configured for Socket data transmission:
- IP Address
- Port Number
- End of Data Terminator
- Timeout in Seconds
- Options to enable
- Keep Client Socket Alive
- SSL
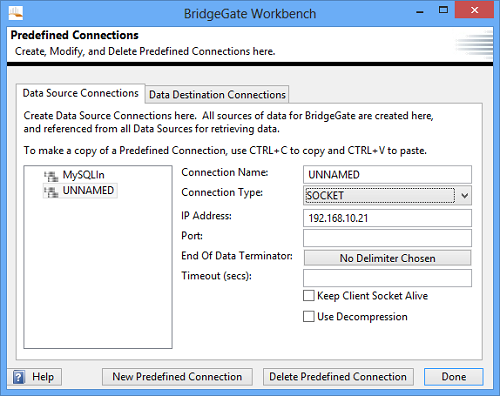
SSH
BridgeGate™ can use SSH to securely transfer data, and custom scripts can be defined for further customization of the data transfer.
BridgeGate™ allows for the following settings to be configured for SSH data transmission:
- Host Name
- Username
- Password
- Script
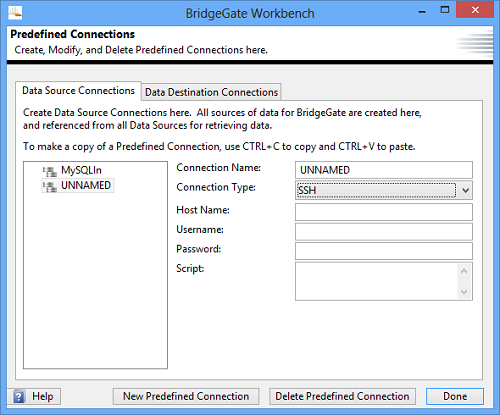
Web Service
BridgeGate™ can use Web Service.
BridgeGate™ allows for the following settings to be configured for Web Service data transmission:
- Service Endpoint URL (for display purposes only)
- Target Namespace
- Request Element
- SOAP Action
- SOAP Prefix
- Authentication
- Timeout (in seconds)
- Use SOAP Response Body as Result
- Maintain HTTP Session
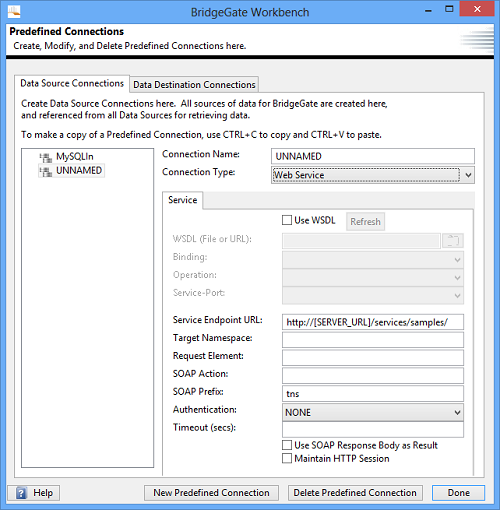
Appendix H Date Formatter and Number Formatter Dialogs
Date/Time Format Instructions
IMPORTANT: ONLY enter a valid time format.
Date/Time Format Syntax
To specify the date/time format use a date pattern string. In this pattern, all ASCII letters are reserved as pattern letters, which are defined as the following:
Symbol Meaning Presentation Example
------ -------
------------ -------
G era designator (Text) AD
y
year (Number) 1996
M month in year (Text & Number) July
& 07
d day in month (Number) 10
h hour in am/pm
(1~12) (Number) 12
H hour in day (0~23) (Number) 0
m minute in hour (Number) 30
s second in minute (Number) 55
S millisecond (Number) 978
E day in week (Text) Tuesday
D day in year (Number) 189
F day of week in month (Number) 2
(2nd Wed in July)
w week in year (Number) 27
W week
in month (Number) 2
a am/PM marker (Text) PM
k hour
in day (1~24) (Number) 24
K hour in am/PM (0~11) (Number) 0
z time zone (Text) PST
zzzz time zone (Text) Pacific Standard Time
Z UTC offset (Number) -8:00
' escape for text
(Delimiter)
'' single quote (Literal) '
(Text) : 4 or more pattern letters--use full form, < 4--use short or abbreviated form if one exists.
(Number) : the minimum number of digits. Shorter numbers are zero-padded to this amount. Year is handled specially; that is, if the count of 'y' is 2, the Year will be truncated to 2 digits.
(Text & Number) : 3 or over, use text, otherwise use number.
Any characters in the pattern that are not in the ranges of ['a'..'z'] and ['A'..'Z'] will be treated as quoted text. For instance, characters like ':', '.', ' ', '#' and '@' will appear in the resulting time text even they are not embraced within single quotes.
A pattern containing any invalid pattern letter will result in a thrown exception during formatting or parsing.
Examples Using the US Locale
Format Pattern Result
-------------- -------------
"yyyy.MM.dd G 'at' hh:mm:ss z" ->> 1996.07.10 AD at 15:08:56
PDT
"EEE, MMM d, ''yy" ->> Wed, July 10, '96
"h:mm a" ->> 12:08 PM
"hh 'o''clock' a, zzzz"
->> 12 o'clock PM, Pacific Daylight Time
"K:mm a, z"
->> 0:00 PM, PST
"yyyyy.MMMMM.dd GGG hh:mm aaa" \
->> 1996.July.10 AD 12:08 PM
Database Date Fields
Any of the date patterns will work with storing dates in a database. Each Database vendor has its own default date pattern. Please reference your Database manual for the default date pattern. BridgeGate has included some of the popular formats in the pattern builder. These patterns are most commonly used for INSERT, UPDATE or in a WHERE clause.
The following are some of the popular formats. For example use "oracle" as the pattern to create the default Oracle SQL format for a date.
| Database Vendor | Pattern Syntax | Default date format |
| Oracle | oracle | 'to_date('''yyyy-MM-dd HH:mm:ss'','''YYYY-MM-DD HH24:MI:SS''') |
| MS SQL Server | sqlserver | yyyy-MM-dd HH:mm:ss |
| MySql | mysql | yyyy-MM-dd HH:mm:ss |
| IBM DB2 | db2 | yyyy-MM-dd HH:mm:ss |
XML Dates
XML Schema compliant date/time, date, or time strings can be generated by entering XML_DATETIME , XML_DATE , or XML_TIME in the pattern field.
JSON Dates
The standard JSON serialization of .NET DateTime elements (\/Date(#############-####)\/) is available by entering JSON in the pattern field.
Number Formatter Dialog
IMPORTANT: Only enter a number format.
Number Format Syntax
- pattern := pos_pattern{';' neg_pattern}
- pos_pattern := {prefix}number{suffix}
- neg_pattern := {prefix}number{suffix}
- number := integer{'.' fraction}{exponent}
- prefix := '\u0000'..'\uFFFD' - special_characters
- suffix := '\u0000'..'\uFFFD' - special_characters
- integer := min_int | '#' | '#' integer | '#' ','
- integer min_int := '0' | '0' min_int | '0' ','
- min_int fraction := '0'* '#'*
- exponent := 'E' '0' '0'*
Notation: X* 0 or more instances of X { X } 0 or 1 instances of X X | Y either X or Y X..Y any character from X up to Y, inclusive S - T characters in S, except those in T
Special Pattern Characters
Many characters in a pattern are taken literally; they are matched during parsing and output unchanged during formatting. Special characters, on the other hand, stand for other characters, strings, or classes of characters. They must be quoted, unless noted otherwise, if they are to appear in the prefix or suffix as literals.
| Symbol | Location | Localized? | Meaning |
| 0 | Number | Y | Digit |
| N | Number | Y | Digit, if all zeros after decimal, shows as absent and no decimal. formats 200.00 to 200 and 200.10 to 200.10 |
| # | Number | Y | Digit, zero shows as absent |
| . | Number | Y | Decimal separator or monetary decimal separator |
| - | Number | Y | Minus sign |
| , | Number | Y | Grouping separator |
| E | Number | Y | Separates mantissa and exponent in scientific notation. Need not be quoted in prefix or suffix. |
| ; | Subpattern boundary | Y | Separates positive and negative subpatterns |
| % | Prefix or suffix | Y | Multiply by 100 and show as percentage |
| \u2030 | Prefix or suffix | Y | Multiply by 1000 and show as per mille |
(\u00A4) |
Prefix or suffix | N | Currency sign, replaced by currency symbol. If doubled, replaced by international currency symbol. If present in a pattern, the monetary decimal separator is used instead of the decimal separator. |
| ' | Prefix or suffix | N | Used to quote special characters in a prefix or suffix, for example, "'#'#" formats 123 to "#123" . To create a single quote itself, use two in a row: "# o''clock" . |
Examples Using the Number Format
Format Pattern Test Data Result
- "###,###,###.##" 100000000.00 ->> 100,000,000.00
- "##,###.NN" 10234.00 ->> 10,234
- "##,###.NN" 10234.20 ->> 10,234.20
- "##,###.##" 10234.20 ->> 10,234.2
- "##,###.00" 10234.00 ->> 10,234.00
Using the Precision setting with an outbound Number Pattern the inbound data can be converted to include the assumed or implied decimal place.
Format Pattern Test Data Result
- "$##,###.00" 2 N 800 ->> $8.00
- "$##,###.00" 0 N 800 ->> $800
- "$##,###.0" 2 Y 825 ->> $8.3 (Number was rounded)
- "$##,###.0" 2 N 825 ->> $8.2 (Number was truncated)
Appendix I Regular Expression Dialog
Summary of regular-expression constructs
| Construct | Matches |
| Characters | |
| x | The character x |
| \\ | The backslash character |
| \0 n | The character with octal value 0 n (0 <= n <= 7) |
| \0 nn | The character with octal value 0 nn (0 <= n <= 7) |
| \0 mnn | The character with octal value 0 mnn (0 <= m <= 3, 0 <= n <= 7) |
| \x hh | The character with hexadecimal value 0x hh |
| \u hhhh | The character with hexadecimal value 0x hhhh |
| \t | The tab character ('\u0009') |
| \n | The newline (line feed) character ('\u000A') |
| \r | The carriage-return character ('\u000D') |
| \f | The form-feed character ('\u000C') |
| \a | The alert (bell) character ('\u0007') |
| \e | The escape character ('\u001B') |
| \c x | The control character corresponding to x |
| Character classes | |
| [abc] | a, b, or c (simple class) |
| [^abc] | Any character except a, b, or c (negation) |
| [a-zA-Z] | a through z or A through Z, inclusive (range) |
| [a-d[m-p]] | a through d, or m through p: [a-dm-p] (union) |
| [a-z&&[def]] | d, e, or f (intersection) |
| [a-z&&[^bc]] | a through z, except for b and c: [ad-z] (subtraction) |
| [a-z&&[^m-p]] | a through z, and not m through p: [a-lq-z](subtraction) |
| Predefined character classes | |
| . | Any character (may or may not match line terminators ) |
| \d | A digit: [0-9] |
| \D | A non-digit: [^0-9] |
| \s | A whitespace character: [ \t\n\x0B\f\r] |
| \S | A non-whitespace character: [^\s] |
| \w | A word character: [a-zA-Z_0-9] |
| \W | A non-word character: [^\w] |
| POSIX character classes (US-ASCII only) | |
| \p{Lower} | A lower-case alphabetic character: [AZ] |
| \p{Upper} | An upper-case alphabetic character:[AZ] |
| \p{ASCII} | All ASCII:[\x00-\x7F] |
| \p{Alpha} | An alphabetic character:[\p{Lower}\p{Upper}] |
| \p{Digit} | A decimal digit: [0-9] |
| \p{Alnum} | An alphanumeric character:[\p{Alpha}\p{Digit}] |
| \p{Punct} | Punctuation: One of !"#$%&'()*+,-./:;<=>?@[\]^_`{|}~ |
| \p{Graph} | A visible character: [\p{Alnum}\p{Punct}] |
| \p{Print} | A printable character: [\p{Graph}] |
| \p{Blank} | A space or a tab: [ \t] |
| \p{Cntrl} | A control character: [\x00-\x1F\x7F] |
| \p{XDigit} | A hexadecimal digit: [0-9a-fA-F] |
| \p{Space} | A whitespace character: [ \t\n\x0B\f\r] |
| Classes for Unicode blocks and categories | |
| \p{InGreek} | A character in the Greek block (simple block ) |
| \p{Lu} | An uppercase letter (simple category ) |
| \p{SC} | A currency symbol |
| \P{InGreek} | Any character except one in the Greek block (negation) |
| [\p{L}&&[^\p{Lu}]] | Any letter except an uppercase letter (subtraction) |
| Boundary matchers | |
| ^ | The beginning of a line |
| $ | The end of a line |
| \b | A word boundary |
| \B | A non-word boundary |
| \A | The beginning of the input |
| \G | The end of the previous match |
| \Z | The end of the input but for the final terminator , if any |
| \z | The end of the input |
| Greedy quantifiers | |
| X ? | X , once or not at all |
| X * | X , zero or more times |
| X + | X , one or more times |
| X { n } | X , exactly n times |
| X ( n ,} | X , at least n times |
| X { n , m } | X , at least n but not more than m times |
| Reluctant quantifiers | |
| X ?? | X , once or not at all |
| X *? | X , zero or more times |
| X +? | X , one or more times |
| X { n }? | X , exactly n times |
| X ( n ,}? | X , at least n times |
| X { n , m }? | X , at least n but not more than m times |
| Possessive quantifiers | |
| X ?+ | X , once or not at all |
| X *+ | X , zero or more times |
| X ++ | X , one or more times |
| X { n }+ | X , exactly n times |
| X ( n ,}+ | X , at least n times |
| X { n , m }+ | X , at least n but not more than m times |
| Logical operators | |
| XY | X followed by Y |
| X | Y | Either X or Y |
| ( X ) | X, as a capturing group |
| Back references | |
| \ n | Whatever the n th capturing group matched |
| Quotation | |
| \ | Nothing, but quotes the following character |
| \Q | Nothing, but quotes all characters until \E |
| \E | Nothing, but ends quoting started by \Q |
| Special constructs (non-capturing) | |
| (?: X ) | X , as a non-capturing group |
| (?idmsux-idmsux) | Nothing, but turns match flags on - off |
| (?idmsux-idmsux: X ) | X , as a non-capturing group with the given flags on - off |
| (?= X ) | X , via zero-width positive lookahead |
| (?! X ) | X , via zero-width negative lookahead |
| (?<= X ) | X , via zero-width positive lookbehind |
| (?<! X ) | X , via zero-width negative lookbehind |
| (?> X ) | X , as an independent, non-capturing group |
Backslashes, escapes, and quoting
The backslash character ('\') serves to introduce escaped constructs, as defined in the table above, as well as to quote characters that otherwise would be interpreted as unescaped constructs. Thus the expression \\ matches a single backslash and \{ matches a left brace.
It is an error to use a backslash prior to any alphabetic character that does not denote an escaped construct. These are reserved for future extensions to the regular-expression language. A backslash may be used prior to a non-alphabetic character regardless of whether that character is part of an unescaped construct.
Backslashes within string literals are interpreted as either Unicode escapes or other character escapes . It is therefore necessary to double backslashes in string literals that represent regular expressions to protect them from interpretation by the BridgeGate translator. The string literal "\b", for example, matches a single backspace character when interpreted as a regular expression, while "\\b" matches a word boundary. The string literal "\(hello\)" is illegal in order to match the string (hello) the string literal "\\(hello\\)" must be used.
Line terminators
A line terminator is a one- or two-character sequence that marks the end of a line of the input character sequence. The following are recognized as line terminators:
- A newline (line feed) character ('\n'),
- A carriage-return character followed immediately by a newline character ("\r\n"),
- A standalone carriage-return character ('\r'),
- A next-line character ('\u0085'),
- A line-separator character ('\u2028'), or
- A paragraph-separator character ('\u2029).
Groups and capturing
Capturing groups are numbered by counting their opening parentheses from left to right. In the expression ((A)(B(C))), for example, there are four such groups:
| 1 | ((A)(B(C))) |
| 2 | (A) |
| 3 | (B(C)) |
| 4 | (C) |
Group zero always stands for the entire expression.
Capturing groups are so named because, during a match, each subsequence of the input sequence that matches such a group is saved. The captured subsequence may be used later in the expression, via a back reference, and may also be retrieved from the matcher once the match operation is complete.
The captured input associated with a group is always the subsequence that the group most recently matched. If a group is evaluated a second time because of quantification then its previously-captured value, if any, will be retained if the second evaluation fails. Matching the string "aba" against the expression (a(b)?)+, for example, leaves group two set to "b". All captured input is discarded at the beginning of each match.
Groups beginning with (? are pure, non-capturing groups that do not capture text and do not count towards the group total.
Examples
Regular expressions allow more complex search and replace functions to be performed in a single operation.
Regular Expressions:
| Symbol | Function |
|---|---|
| \ | Marks the next character as a special character. "n" matches the character "n". "\n" matches a linefeed or newline character. |
| ^ | Matches/anchors the beginning of line. |
| $ | Matches/anchors the end of line. |
| * | Matches the preceding character zero or more times. |
| + | Matches the preceding character one or more times. |
| Matches any single character except a newline character. | |
| (expression) | Brackets or tags an expression to use in the replace
command. A regular expression may have up to 9 tagged expressions, numbered according to their order in the regular expression. The corresponding replacement expression is \x, for x in the range 1-9. Example: If (h.*o) (f.*s) matches "hello folks", \2 \1 would replace it with "folks hello". [xyz] A character set. Matches any characters between brackets. [^xyz] A negative character set. Matches any characters NOT between brackets. |
| \d | Matches a digit character. Equivalent to [0-9]. |
| \D | Matches a nondigit character. Equivalent to [^0-9]. |
| \f | Matches a form-feed character. |
| \n | Matches a linefeed character. |
| \r | Matches a carriage return character. |
| \s | Matches any white space including space, tab, form-feed, etc but not newline. |
| \S | Matches any nonwhite space character but not newline. |
| \t | Matches a tab character. |
| \v | Matches a vertical tab character. |
| \w | Matches any word character including underscore. |
| \W | Matches any nonword character. |
| \xhh | The character with hexadecimal value 0xhh |
| \uhhhh | The character with hexadecimal value 0xhhhh |
| Note - ^ refers to the character '^' NOT Control Key + value. | |
| Examples: | |
| m.n | matches "man", "men", "min" but not "moon". |
| Te+st | matches "test", "teest", "teeeest" etc. BUT NOT "tst". |
| Te*st | matches "test", "teest", "teeeest" etc. AND "tst". |
| [aeiou] | matches every lowercase vowel |
| [,.?] | matches a literal ",", "." or "?". |
| [0-9, a-z] | matches any digit, or lowercase letter |
| [^0-9] | matches any character except a digit (^ means NOT the following) |
| [abc] | a, b, or c (simple class) |
| [^abc] | Any character except a, b, or c (negation) |
| [a-zA-Z] | matches a through z or A through Z, inclusive (range) |
| [a-d[m-p]] | matches a through d, or m through p: [a-dm-p] (union) |
| [a-z&&[def]] | matches d, e, or f (intersection) |
| [a-z&&[^bc]] | matches a through z, except for b and c: [ad-z] (subtraction) |
| [a-z&&[^m-p]] | matches a through z, and not m through p: |
| [a-lq-z] | (subtraction) |
| You may search for an expression A or B as follow: | |
| "(John|Tom)" | This will search for an occurrence of John or Tom. There should be nothing between the two expressions. |
| You may combine A or B and C or D in the same search as follows: | |
| "(John|Tom)(Smith|Jones)" | This will search for John or Tom followed by Smith or Jones. |