AS2 Server Installation and Configuration
Overview
AS2 (Applicability Statement 2) is a specification about how to transport data securely and reliably over the Internet. It is described in detail in RFC 4130 .
Data can consist of Electronic Data Interchange (EDI) messages but may be of any other message type. AS2 specifies how to connect, deliver, validate and acknowledge data. AS2 creates an envelope for a message which is then sent securely over the Internet. Security is achieved by using digital certificates and encryption.
An implementation of AS2 involves two machines, a client and a server , communicating with each other over the Internet. On the operating system level, the AS2 client may be a server, too, offering its communication services to application software. The client sends data to the server, e.g. a trading partner. On receipt of the message the receiving application sends an acknowledgment or MDN (Message Disposition Notification) back to the sender.
BridgeGate™ AS2 Server is a fully compliant implementation of RFC 4130, certified by the Drummond Group . You can send and receive messages and MDN's securely and reliably using the exact same interfaces you are already familiar with for FTP, Database, and other types of services within the BridgeGate™ Workbench.
Installation Process
Installation is done using the BridgeGate™ Server Installer.
Windows Installation
Log onto Windows as a user with administrative rights for the local computer. Insert the BridgeGate CD into your CD-ROM drive. The BridgeGate™ Server Installer should open automatically within several seconds. However, if it does not, go to Start → Run and enter d:/install.exe being sure to substitute d: with your CD-ROM drive letter. The following window will appear:

Select the BridgeGate™ AS2 Server checkbox and click Next. The AS2 Server installation screen will appear. When complete, you will see the following messages:

Linux Installation
The BridgeGate™ Server must be installed prior to installing
the BridgeGate™ AS2 Server.
To install the BridgeGate™ AS2 Server, log in as root and run the following commands:
cd /bridgegate
./installas2server.sh
By default, startup and shutdown files are installed in the /etc/rc.d/rc3.d/ directory.
The following commands will start and stop the BridgeGate™ AS2 Server:
/bridgegate/bin/bridgegateAS2 start
/bridgegate/bin/bridgegateAS2 stop
The installation script does not attempt to start the BridgeGate™ AS2 Server. Further configuration is required prior to running the server for the first time.
Configuration of SSL Certificates
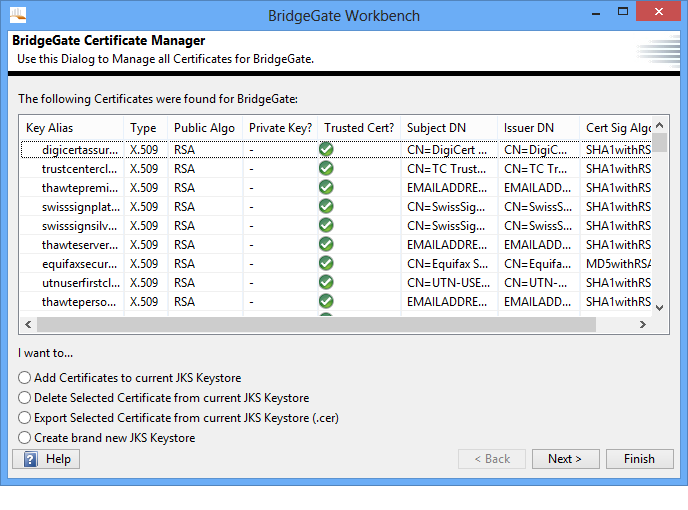
Configuration of the AS2 Server contains 3 steps. The first step is to ensure you have setup a valid Keystore that will securely house your SSL public/private keys for both you and your AS2 participants. BridgeGate™ provides an SSL Certificate Manager interface manages all aspects of SSL public/private key management. The SSL Certificate Manager is located in the BridgeGate Workbench, in the main menu under File → SSL Certificate Manager.
If you have already created a Keystore for BridgeGate™, you can skip the next step, Creating a new JKS Keystore.
Creating a New JKS Keystore
Open the BridgeGate Workbench. From the main menu, select File → SSL Certificate Manager. From the SSL Certificate Manager screen, select the radio button option to 'Create brand new JKS Keystore' and click Next. You will be presented with a screen to enter the information for the new Keystore file, including the file location, password to protect the file with, and the alias to use for the public/private keypair you want to create. You are also provided with several textboxes to enter the information for the Certificate Signing Request (CSR):
| Field | Description |
| File Location | Enter the full path to the new BridgeGate JKS Keystore
file. Recommendation is: %BG_ROOT%/certificates/bridgegate.jks |
| Password | Password to protect the public/private key file |
| Repeat Password | Repeat the password |
| Key Alias To Use | Nickname for the BridgeGate public/private keypair you are
creating. Recommendation is: 'BridgeGate' as your alias. For your AS2 participants, use a nickname to clearly define the role of each particular company or server. |
| Country Name | Enter 2 letter code. For US, enter US |
| State or Province | Enter the full name of the state or province |
| Locality | Enter your city name |
| Organization Name | Enter a company name, for example |
| Organizational Unit Name | Enter a department or section. You could also use 'BridgeGate' |
| Common Name | Enter your name if you wish, a department name, or 'BridgeGate' |
| An optional email address | Enter an email address if you wish. Not required. |
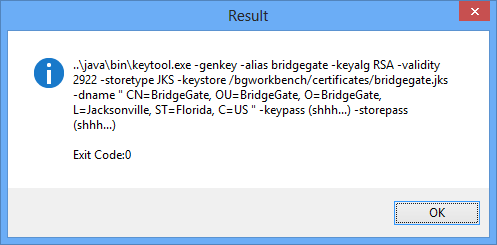
When you are done filling in this information, click Finish. The application will pause for a few seconds as it creates the SSL keypair. A message window will appear with the command line information that BridgeGate used to create the keypair, along with an Exit Code. Ensure the Exit Code is 0 for successful creation.
Click ok, and the screen will now display a list of all keys found in your new Keystore. Since you just created it, you will only see yours. The Key Alias is used in the list to identify the key. Your next step should be to import your AS2 participant's SSL public keys.
Importing your AS2 Participant SSL public keys (SSL Certificates)
Open the BridgeGate Workbench. From the main menu, select File → SSL Certificate Manager. From the SSL Certificate Manager screen, select the radio button option to 'Add Certificates to current JKS Keystore' and click Next. The next screen presents you with many options for importing SSL public keys, also known as SSL Certificates.
| Field | Description |
| My Certificate(s) are in a JKS Keystore | If you already have an existing Java Keystore that houses private/public keys, and you want all or some of them moved into this Keystore, select this option. You will need to know the password for the Keystore file. |
| My Certificate is Base-64Encoded X.509(.cer) | This is the most common form of an SSL public key. It
usually ends in a .cer file extension; however you may receive the
SSL certificate in the body of an email. If opened in a text
editor, the file is ASCII and starts with the line: ------BEGIN CERTIFICATE------ And ends with the line: ------END CERTIFICATE------- |
| My Certificate is DER Encoded Binary X.509 (.der) | This is the binary form of the Base-64 file. It usually ends in a .der extension. |
| My Certificate is Cryptographic Message Syntax- PCKS #7(.p7b) | A less common format for an SSL Certificate. You may need to use tools like OpenSSL to convert keys in and out of this format. OpenSSL tools are provided with the installation of the BridgeGate™ Server, at %BG_ROOT%/utils/openssl |
| File Location | Enter the path to the file containing the SSL public key |
| Password | Some radio options above require a password for the file |
| Key Alias To Use | Nickname to display the SSL public key. For your AS2 participants, use a nickname to clearly define the role of the particular company or server. |
It is common for companies to use a separate SSL certificate for the SSL connection (https), and an SSL certificate for their encrypting/signing needs. If you receive multiple SSL files for a participant, use the 'Key Alias to Use' of each key to uniquely identify it, otherwise you may select the wrong key for the wrong purpose later on. Recommendation is to suffix the 'Key Alias to Use' with 'xxxx - HTTPS','xxxx - Signing' ,'xxxx - Encryption', or 'xxxx - Sign and Encrypt'.p
Exporting your BridgeGate SSL public key for your AS2 Participants
The other participants you are exchanging messages with will need a copy of your public SSL Certificate. Open the BridgeGate Workbench. From the main menu, select File → SSL Certificate Manager. From the SSL Certificate Manager screen, select the key with the alias of 'BridgeGate' (or whatever else you may have used), then select the radio button option to 'Export Selected Certificate from JKS Keystore' and click Next. It should be the only key in your list with the 'Private Key' column marked. The next screen will allow you to specify the directory and filename for the SSL public key you are exporting. The public key file will be created as Base-64 Encoded X.509 .cer file. Give this file to your AS2 participants, so they may configure their AS2 Servers for you. Let them know this is the only SSL certificate BridgeGate uses for HTTPS, Signing, and Encrypting.
Configuration of bridgegate.xml
Now you have a valid JKS Keystore, containing your public/private SSL keypair and the public SSL key from each participant you will send and receive AS2 Messages from. Now you must tell BridgeGate™ Server where to find the file, and the password to access it. To do this, open the file %BG_ROOT%/conf/bridgegate.xml using a text editor or XML editor. Modify the following XML configuration elements, <AS2_SERVER> and <X509_KEYSTORE>:

| <AS2_SERVER> Element | Description |
| PARTNER_ROOT | Enter the root directory of the AS2 Server |
| UNSECURED_PORT | Enter the port to use for HTTP transport |
| SECURED_PORT | Enter the port to use for HTTP/S transport |
| BRIDGEGATE_AS2_ID | Enter the AS2 ID you and your participant(s) agree upon. This is the same AS2 ID you will enter in Step 3 below, for the BridgeGate PDC's AS2 Identifier field. This field is case sensitive, per AS2 Protocol. |
| BRIDGEGATE_KEY_ALIAS | Enter the same name you used in the 'Key Alias To Use' in Step 1 - Configuring of SSL Certificates for the SSL certificate used by BridgeGate for HTTP/S transport, signing and encrypting of data. |
| WEBCONTAINER_URL | Enter the HTTP URL or IP Address to the BridgeGate™ TEI Server, and the port number if different than port 80. This same value, if entered into a browser, would bring up the login page for the BridgeGate Portal. |
| ACTIVE | TRUE or FALSE. If FALSE the AS Server will be disabled. Defaults to TRUE |
| <X509_KEYSTORE> Element | Description |
| PATH_TO_KEYSTORE | Enter the full path to the JKS Keystore created in Step 1. The default value for this field is recommended, and you should use it in Step 1 when creating the JKS Keystore. |
| KEYSTORE_PWD | This is the password you specified when you created the JKS Keystore. It is required to gain access to the public/private SSL key pairs contained within. |
Configuration of AS2 Participants
The last step to configure the BridgeGate™ AS2 Server is to set up the AS2 Participants. This is done using the BridgeGate Workbench. For each AS2 Participant (including BridgeGate itself), a set of Predefined Connections must be created, one for sending messages and the other for receiving messages.
Creating Predefined Connections (PDCs) for AS2 Participants
Open the BridgeGate Workbench. Log in, and select from the main menu, Repository → Predefined Connections. The Predefined Connection screen contains two tabs; one called 'Data Source Connections' for receiving data, and one called 'Data Destination Connections' for sending data. For AS2, you will create one of each for every AS2 participant including BridgeGate. Below is a screen shot of the Predefined Connection screen, along with which values to specify. Following the screen shot is a table explaining the different fields.
| Field | Description |
| Connection Name | Enter a descriptive name for the Predefined Connection. It's a good idea to use the type of connection in the name (AS2). |
| Connection Type | Select AS2. If you do not see AS2 in the drop down, make
sure the BridgeGate™ Server you are logged into has an NT
Service or process for the 'BridgeGateAS2 Server'. Since you are reading this document, it's possible you have not completed the install process yet. |
AS2 Identifier
|
This is a unique identifier for your company, your server, or whatever is agreed upon between you and your participants. BridgeGate only allows a single AS2 Identifier, so ensure all your participants agree upon the one you choose. For the BridgeGate PDC, the AS2 Identifier must match the setting in Step 2 - Configuring the bridgegate.xml. |
| Signing Certificate | This drop down populates with the 'Key Alias To Use'
property of the SSL Certificates found in the SSL Certificate
Manager. If you have not completed Step 1 yet, you may not see your certificates in this list. |
Encryption Certificate
|
This drop down populates with the 'Key Alias To Use' property of the SSL Certificates found in the SSL Certificate Manager. |
| HTTPS Certificate | This drop down populates with the 'Key Alias To Use' property of the SSL Certificates found in the SSL Certificate Manager. |
| Email Address | This email address should be for the technical contact person for your BridgeGate™ AS2 Server. |
| AS2 URL | This is the URL and port your participants will send you messages on. If this PDC is for one of your participants, it is the URL and port you will send messages to them at. |
| Transport | If the AS2 URL is http://, select HTTP. If the AS2 URL is https://, select HTTP/S. |
| Security | The AS2 protocol allows you to send the data Unsigned,
Signed, or Signed and Encrypted. BridgeGate AS2 Server always Signs, Compresses, then Encrypts. Other implementations may Encrypt prior to Signing. BridgeGate AS2 Server automatically figures out the order by itself when receiving messages. |
| Compression | Compress the MIME message or not |
| MDN Transport | The AS2 protocol allows you to send receipts, known as MDN's, back to the originator of the AS2 message. The return of this receipt can be Synchronous or Asynchronous. If Synchronous, the MDN is returned using the same HTTP or HTTP/S connection. If Asynchronous, the MDN is returned using a new HTTP or HTTP/S connection, possibly to a different URL and port. |
| AS2 MDN URL | Only enter this value if you specified Asynchronous in the MDN Transport above. |
| MDN Security | The receipt can be signed to guarantee its authenticity, if your business process requires it. |
Remember, the values shown above apply to the Data Source Connections and the Data Destination Connections, so enter them in the proper context. Keep in mind who is sending and who is receiving on each Connection you create. When you are done filling in all the fields, copy and paste the new PDC into the Data Destination Connections tab, and rename it accordingly. It is recommended for you to put the direction of travel on the name of the AS2 PDC Connection Name. In the example in the screenshot above, the name implied it was for a Data Source Connection because of word 'receiving' in the name 'AS2 - BridgeGate - Receiving of messages/MDNs'. When you paste it, change it to 'AS2 - BridgeGate - Sending of messages/MDNs'. When you are done, perform this task for each participant you will send and receive AS2 Messages from.